Wix Bookings: Managing the Participant List for Your Classes
13 min
In this article
- Adding and removing class participants
- Marking attendance for a class
- Collecting a payment from participants
- Moving participants from one class session to another
- Contacting your class participants
- Managing your participants' contact cards
- Viewing responses to custom fields in the Booking form
- Exporting the participant list for a class
Manage your sessions quickly and efficiently using the participants list from the booking calendar. The participant list helps you keep track of who paid for a class session, who attended, who was a no-show, and more. It also allows you to stay organized and ensure smooth class management. For example, if you run a yoga studio, you can easily see which students have signed up for each class, check their payment status, and follow up with anyone who missed a session.
Adding and removing class participants
Efficiently manage the participants list for your classes. Add new participants or edit an existing booking to update the number of people registered to a specific class session. Collect payment and remove participants with or without cancellation fees.
To add or remove class participants:
- Go to Booking Calendar in your site's dashboard.
- Click the relevant class in your calendar.
- Click Manage.
- Depending on what you want to do, follow the steps below:
Add new participants
 next to the relevant class.
Remove participants (without cancellation and no-show fees)
 next to the participant you want to remove, then click Remove.
Remove participants (with cancellation and no-show fees)
Added a waitlist for this class?
Your class participant list shows two tabs, one for booked participants and another for those on the waitlist.
Marking attendance for a class
Marking attendance for a class helps you keep track of which participants attended, which did not, and apply no-show fees if necessary. You can mark attendance for all participants at once or individually.
Tip:
Marking attendance regularly allows you to track your attendance statistics over time.

To mark attendance for a class session:
- Go to Booking Calendar in your site's dashboard.
Tip: You can also mark attendance for classes using the Wix app. - Click the relevant class in your calendar.
- Click Manage.
- Choose who you want to mark attendance for:
All participants

Individual participants

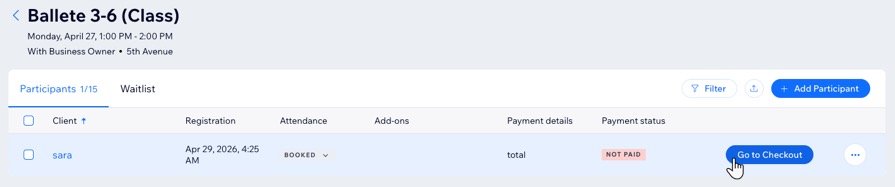
Collecting a payment from participants
Collect a payment by completing the checkout for unpaid or partially paid classes.
Important:
Once you mark a member as "Paid", the change cannot be undone.
To collect a payment:
- Go to Booking Calendar in your site's dashboard.
- Click the relevant class in your calendar.
- Click Manage Participants.
- Click Go to Checkout next to the relevant participant.
- (Optional) Add new details to the participants cart:
- Click + Add Item, then click the relevant tab and choose what you want to add:
- Appointment: Select the relevant service to add an appointment or schedule multi-service appointments.
- Class: Select the relevant class session.
- Course: Select the relevant course session.
- Product: Select the relevant product(s).
- Custom charge: Add a custom item that is not in your catalog.
- Enter What are you charging for?
- (Optional) Enter Additional info.
- Add the Price.
- Click + Add discount:
- Enter the Discount reason.
- Enter the Amount.
- (Optional) Click + Add Another Discount.
- Click + Add tip.
- Select an amount or add a Custom amount.
- (Optional) Click Manage tip distribution to redistribute the tips among your staff.
- Click + Add Item, then click the relevant tab and choose what you want to add:
- When ready, click Save & Collect Payment and choose how you want to collect the payment from your participant.
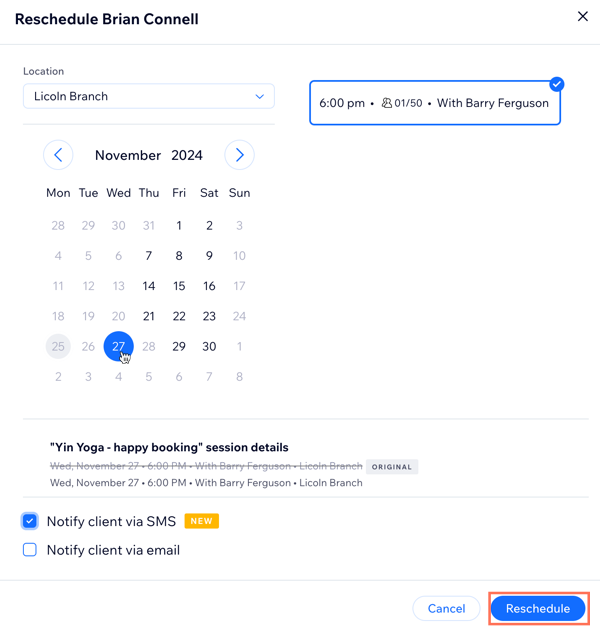
Moving participants from one class session to another
You can move a participant between sessions within the same class service. The booking's original status, payment preferences and the associated order remain the same, the client just attends a different session of the class service.
Note:
It’s not possible to reschedule a participant from one class service to a different class service.
To move a participant from one class session to another:
- Go to Booking Calendar in your site's dashboard.
- Click the relevant class in your calendar.
- Click Manage.
- Click the More Actions icon
 next to the relevant client.
 - Click Reschedule.
- Select the relevant date.
- Select the relevant session from the list available on that date.
- (Optional) Select the Notify client via messages checkbox to send your client a WhatsApp or an SMS notification.
- (Optional) Click the Notify client via email checkbox and add an email to send email confirmation to the client.
- Click Reschedule.
Notes:
- If you offer the class sessions in different locations, you can select the relevant location from the drop-down above the calendar.

- Rescheduling a class session does not affect the payment status. If the session has already been paid for or redeemed (if the client has a pricing plan), the rescheduled session will have the same payment status. If the session is unpaid, you can collect payment or redeem as usual.
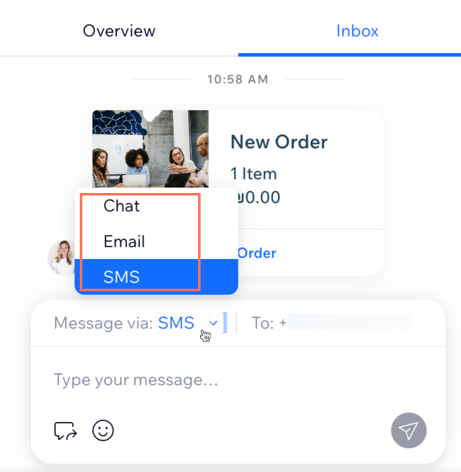
Contacting your class participants
Update your members about changes to an upcoming session or anything else they need to prepare beforehand.
To contact your class participants:
- Go to Booking Calendar in your site's dashboard.
- Click the relevant class in your calendar.
- Click Manage.
- Depending on who you want to contact, follow the steps below:
Contact individual class participants
 , Payment Requests
  , Emojis
  , Attachments
  and more. Learn more about
  .
.Contact all class participants

Tip:
You can also contact participants using the Wix app.
Managing your participants' contact cards
Whenever a new client books a service or interacts with your site (e.g. messages you, buys a product from your store), they're automatically added to your contact list.
The contact card is a useful way to manage your clients by adding labels, notes, reminders and attachments like health forms. You can also create an invoice, book an appointment or even start a chat from their contact card.
To manage your participants' contact cards:
- Go to Booking Calendar in your site's dashboard.
- Click the relevant class in your calendar.
- Click Manage.
- Click the relevant person's name to open their contact card.
- Choose what you want to do next:
Edit the client's details, notes, tasks and more
Manage communication with the client

Tip:
Viewing responses to custom fields in the Booking form
If you add custom questions to the booking form for a class, you can view client responses by clicking on their name on the list.
Learn more about viewing Booking Form responses.

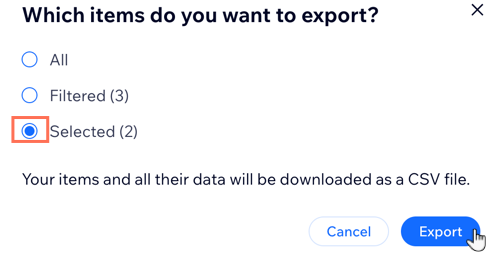
Exporting the participant list for a class
You can export the participant list from your classes, so you can open it in Excel, share it using Google Docs, or print it out.
Important:
Exported files are in English only, even if your account is set to another other language.
To export the participant list for a class:
- Go to Booking Calendar in your site's dashboard.
- Click the relevant class in your calendar.
- Click Manage.
- Click the Export icon
 in the top right, under + Add Participant.
 - Choose what you want to export:
- All: Export the entire participant list for the class.
- Filtered: Export a filtered version of the participant list for the class. For example, you can filter by unpaid payment status.
- Selected: Export only the selected participants.
- Click Export.