

Wix Contacts: Creating and Managing Segments
4 min
In this article
- Creating a segment
- Viewing the contacts in your segments
- Managing your segments
- FAQs
Use segments to organize your contacts into groups based on the details and actions that matter to your business. This helps you understand your audience and reach the right people with the right message.
When someone is added to your contact list or interacts with your site, Wix stores useful contact data such as their name, email, and recent activity. You can use this data to build segments with specific filters and criteria.
Creating a segment
Grouping your contacts into segments helps you send more relevant messages to the right customers at the right time. You can build segments based on contact attributes or site activity, then use them for campaigns and automations.
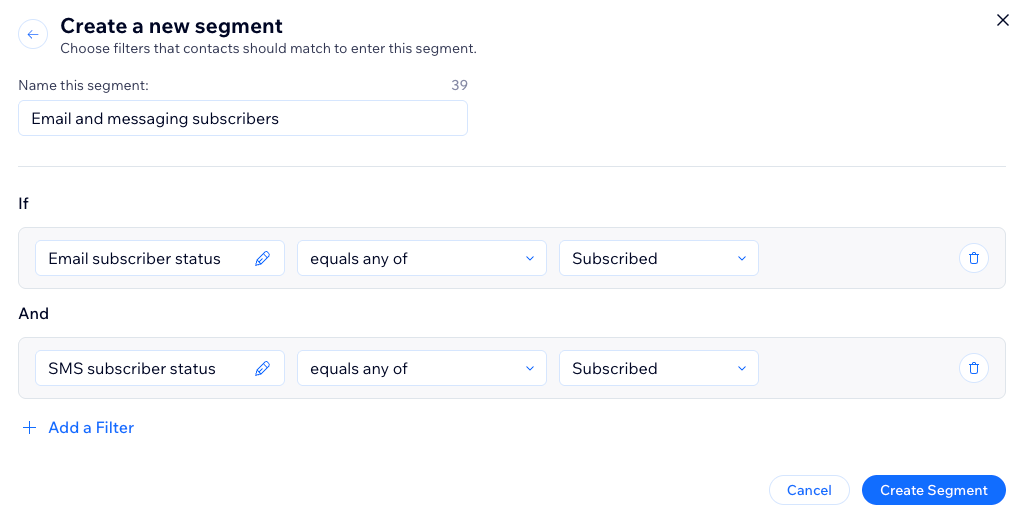
Create a segment using filters and conditional logic. First pick a filter based on either a contact attribute (city, country, email) or contact activities on your site (number of purchases, last purchased). Then choose the conditional logic for this segment.
For example, you can create a segment of contacts who abandoned their cart in the last 30 days and have not made a purchase in that time. Then you can send that group a follow-up email, such as a reminder, special offer, or coupon, to encourage them to complete their purchase.
Important:
The logic of the filters you choose changes based on the attribute or activity. For example, the conditions for 'Birthday' will be different than the conditions for 'Email campaign open.'
To create a segment:
- Go to Contacts in your site's dashboard.
- Click Manage Segments at the top right.
- Click + Create Segment.
- Choose how you want to create your segment:
Select a predefined template
Create a custom segment
Viewing the contacts in your segments
You can view the contacts in a segment from the Segments page. Click the 'No. of contacts' count next to the relevant segment to open a filtered contact list.
To view the contacts in your segments:
- Go to Contacts in your site's dashboard.
- Click Manage Segments at the top of the page.
- Click the No. of contacts icon
 next to the segment you want to view.
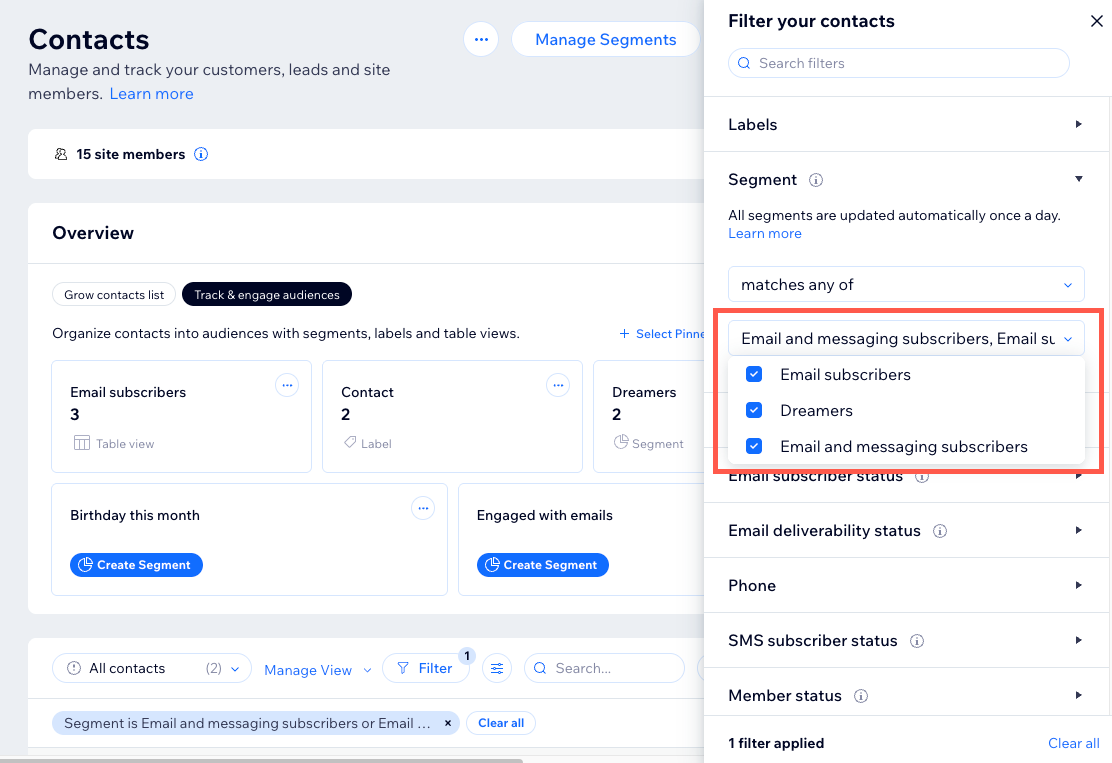
Tip:
To filter your contact list by multiple segments click Filter, select Segment and choose the segments you want to include.
Managing your segments
From the Manage Segments page, you can view, update, and act on your segments. In the segments list, view the date and time a segment was last updated as well as the number of contacts that match the segment.
To manage your segments:
- Go to Contacts in your site's dashboard.
- Click Manage Segments at the top of the page.
- Hover over the segment you want to manage and click the More Actions icon
 .
. - Manage your segment using the available options:
- Send Email Campaign: Send a targeted email marketing campaign to this segment. This counts as one of your monthly campaign allowances.
Note: The segment will be automatically selected in the recipients for the campaign. - Create automation: Create an automation to trigger an action for this segment.
- Export contacts: Export this segment to create a backup of the contacts list or to copy the segment to a different platform.
- Edit: Update the segment's name and filters. You can also add a new filter to make the segment more specific. When you're done editing click Save Segment.
- Duplicate: Create a copy of the segment. You can rename the segment or add new filters to change the criteria. When you're done editing click Create Segment.
- Delete: Remove a segment from the list. The contacts are still saved in your contact list, but the filters are deleted. Click Delete Segment to confirm.
- Send Email Campaign: Send a targeted email marketing campaign to this segment. This counts as one of your monthly campaign allowances.
FAQs
Click a question below to learn more about creating and managing segments.
How do I add new contacts to an existing segment?
Can I create a segment that excludes certain contacts?
What happens if a contact no longer meets the criteria for a segment?
