

Wix Stores: Adding a Physical Product
11 min
In this article
- Video tutorial
- Step 1 | Add your basic info
- Step 2 | Set pricing
- Step 3 | Add product images, GIFs, and videos
- Step 4 | Manage inventory and pre-order settings
- Step 5 | (Optional) Create product options
- Step 6 | (Optional) Create modifiers
- Step 7 | (Optional) Add info sections
- Step 8 | (Optional) Add shipping & fulfillment details
- Step 9 | (Optional) Set up subscriptions
- FAQs
Important:
We're in the process of releasing a brand-new product creation page. If the first field you see is 'Images and videos', you have the previous version and should follow these instructions on creating a physical product.
Start building your online store by creating your products. You can offer physical items like clothing or furniture, as well as digital downloads, such as eBooks, audio files, or images.

This article will guide you through the process of creating and listing physical products. Want to sell digital products instead? Learn how to create digital downloadable products.
Video tutorial
Watch this video tutorial, or scroll down to read the full article.
Step 1 | Add your basic info
To get started creating a product, enter the product's name and description. Optionally, you can also add a ribbon or brand.
To enter the basic product info:
- Go to Products in your site's dashboard.
- Click +New Product.
- Select Physical product.
- Enter the product name (max. 80 characters).
- (Optional) Add a ribbon:
- Click to select an existing ribbon.
- Type the new ribbon text (e.g. May Sale) and click to add it.

- (Optional) Add a brand attribute.
Tip: Brands help Google "understand" your product and make your product eligible for rich results. - Enter a product description.
Product description tips:
- Click Generate AI Text to help compose an effective product description.
- Highlight text to add a link, bold it, or add other customizations.
- You can paste an image into your product description.

Step 2 | Set pricing
Now you can add the product price and manage other pricing options. To indicate that the price has been reduced, you can add a strikethrough price.

Important:
If your product has no product options, you'll manage pricing here. However, once you create product options, you'll manage all your pricing settings per variant (even if they're all sold at the same price).
To set pricing:
- Enter the Price.
- (Optional) Enter the Strikethrough price (i.e. the price before it was marked down).
- (Optional) Enter the cost of goods (i.e. what it costs you to make or buy the product).
Note: Your profit and margin are calculated automatically and aren't displayed to customers. Learn more - Display a price per unit for this product (e.g. $30/100gm).
- Enable the Show price per unit toggle.
- Under Total units in product, select a unit type (e.g. grams) from the drop-down and enter the total product quantity (e.g. if you sell an 80-gram soap bar, enter "80").
- Under Base unit, enter the unit you want to measure by (e.g. enter 100 to measure per 100 grams).

- If you set up tax groups, select a tax group for the product.
Learn more about managing product pricing.
Step 3 | Add product images, GIFs, and videos
Displaying multiple, high-quality product images, GIFs, or videos for each product is one of the best ways to increase sales. Learn more about creating and displaying effective product media.
To add product media:
- Click Add Media.
- Click Upload Media to add images, GIFs, or videos (up to 50).
- Click Add Media.
- (Optional) Click the Crop & edit icon to customize the image in the Wix Photo Studio.

- Drag the uploaded media to reorder them.
Step 4 | Manage inventory and pre-order settings
Now you can set how you manage inventory for this product. You can track specific quantities or simply mark your inventory as 'In stock' or 'Out of stock'.
Additionally, you can add a pre-order option to this product. That means that when the product is out of stock, customers can pre-order it. Learn more about pre-ordering store products.
Important:
If your product has no product options, you'll manage inventory and pre-order here. However, once you create product options, these settings are managed per variant.
To configure inventory and enable pre-ordering:
- Click the Track inventory quantity to enable or disable tracking specific inventory amounts.
- Enter the Status (e.g. In Stock) or the Quantity (e.g. 20 items in stock).
- (Optional) Enter a unique SKU and/or Barcode (GTIN).
- (Optional) Allow customers to pre-order this product:
- Click the Sell as pre-order when this product is out of stock to enable it.
- Add a Pre-order message (e.g. "Available mid-March").
- (Optional) Limit the number of items a customer can preorders:
Note: To limit, you must track inventory quantities.- Select the Limit the number of items available for pre-order checkbox.
- Enter the number.
Step 5 | (Optional) Create product options
Offer products that come with multiple variations, such as size, color, or material.

Each product can contain up to 6 product options (e.g. color or size). Each of those options can have up to 100 option choices (e.g. 100 sizes).
Important:
- Before you create product options, consider whether some of those options could be modifiers instead. Learn more about the differences between product options and modifiers.
- After creating product options, pricing settings, inventory and more are managed per variant, not globally for the product.
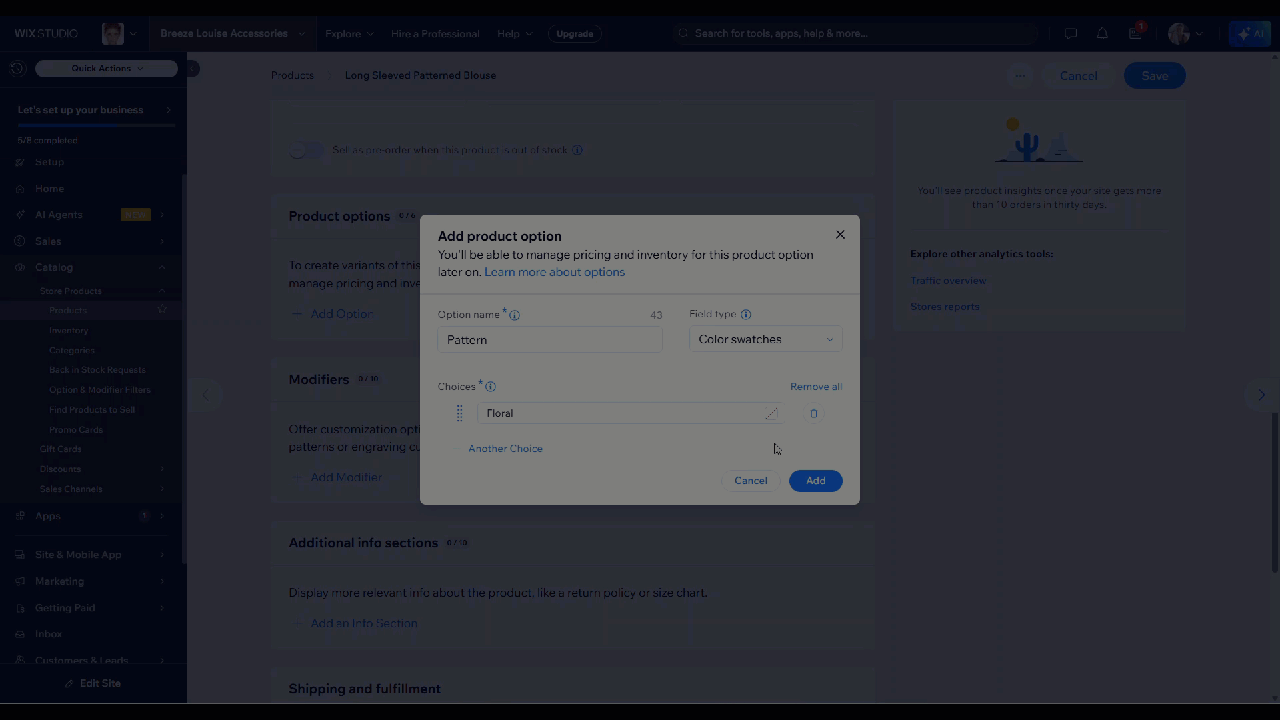
To create product options:
- Click +Add Option.
- Choose which kind of product option you want to add:
- Color and image options:
- Select Color swatches from the Field type drop-down.
- Enter an option name (e.g. Color or Pattern).
- Type your first color name (e.g. Blue or Floral).
- Click the Select shade icon
 .
. - (Optional) Select a swatch image:
Note: Even if you add an image, you need to select a color.- Click the Plus icon next to Swatch image.
- Upload or select the swatch image and click Add Media.
Tip: You can use your product image to create a swatch image (see FAQ below).
- Select the shade.
Note: The shade you choose will be used for this color in all products.- Enter a color code or select a shade.
- Click the Checkmark icon
 .
.
- Add additional colors.
- Click Add.
- Other options:
- Select Dropdown list from the Field type drop-down.
- Enter an option name (Size).
- Type your first option choice (e.g. Small) and select it or press Enter.
- Add the additional option choices (e.g. Medium and Large)
- Click Add.
- Color and image options:
Tip:
After you create product options, click Edit variant to can manage pricing, inventory, add SKUs, weights and more. Learn more about product options.
Step 6 | (Optional) Create modifiers
Allow additional customizations that don't require you to store separate inventory or create separate pricing for each variant. For example, you can use modifiers, to offer free gift wrapping or a free embellishment to an existing product. Learn more about product modifiers.
On your site, color swatch modifiers and drop-down modifiers look the same as product options. In the example below, 'Size' is a product option, but the rest are modifiers. Text boxes can only be added as modifiers.

To create modifiers:
- Click +Add Modifier.
- Enter a modifier name.
Tip: The name is visible to customers only for color swatch and dropdown list modifiers. - Select a field type.
- Customize the field type you selected:
- Dropdown list: Type your options and press Enter after each one.
- Color swatches: Enter your color names and press Enter after each one. Click the color to select a different shade.
- Text box:
- Enter the title (e.g. What name should we engrave?)
- Select or deselect the checkbox next to This is a required field.
- Enter the maximum characters that customers can enter.
- Click Add.
Step 7 | (Optional) Add info sections
Add 1 or more info sections to your product to provide customers with the information they need to know, such as size charts and product care instructions.

Tip:
After you create an info section once, you can select it to apply to other products.
To add an info section:
- Click +Add an Info Section.
- Choose what you want to do:
- Add an existing section
- Create a new info section:
- Click Create New Info Section.
- Enter a title (visible on your site).
- Enter a name (for internal use only)
- Enter the information.
Tip: You can add a table, images, GIFs and more.

Step 8 | (Optional) Add shipping & fulfillment details
Ensure your products reach your customers quickly and efficiently by adding advanced shipping details.
To add shipping & fulfillment details:
- Select who fulfills the product from the Fulfillment by drop-down.
Note: Relevant if some products are fulfilled by a fulfillment service. - (Optional) Assign a Product delivery profile for specific shipping rates.
Note: Relevant if you've set up delivery profiles. - Enter the product weight under Shipping weight.
Note: Relevant if you set up a shipping by weight rule. - (Optional) Enter package dimensions:
- Click the Add package dimension toggle to enable it.
- Enter the dimensions and select a measurement unit from the dropdown.
- Click Save.
Step 9 | (Optional) Set up subscriptions
Generate recurring revenue by offering your physical product as a product subscription. Choose whether the product is available only through a subscription or also as a one-time purchase.
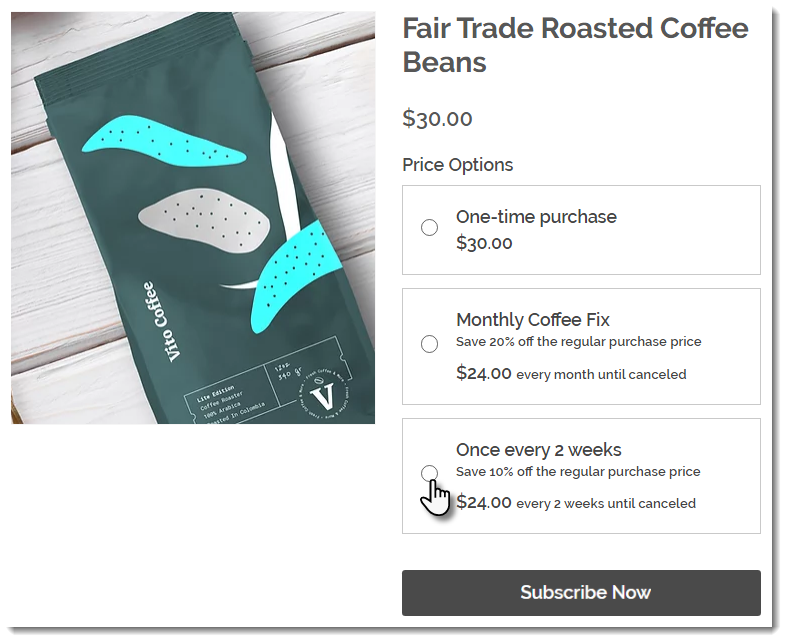
To set up subscriptions:
- Click +Create a Subscription.
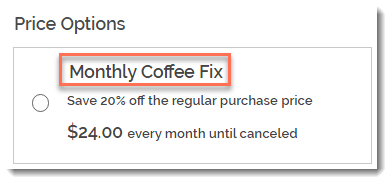
- Enter a subscription option name (appears on the Product page).
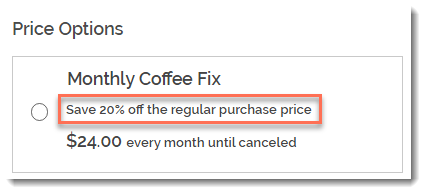
- (Optional) Enter a tagline (appears on the Product page.
- Select how often a new order is created (e.g. once every 2 months):
- Use the up and down arrows to select a number.
- Select a time unit (weeks, months, or years).
- Click the Expires after drop-down and choose when the subscription ends:
- Select one of the available options.
- Click Custom and enter the number of billing cycles before the subscription expires.
- (Optional) Offer a discount off the regular price:
- Select the discount type (price or percentage).
- Enter the discount amount.
- Click Add.
- (Optional) Click +New Subscription to create an additional subscription option (max. 6 subscription options).
- (Optional) Click and drag the subscription options (if there are more than one) to reorder them.
- (Optional) Click the Offer the option for one-time purchase to also sell the product without a subscription.
FAQs
Click a question to learn more about selling physical products.
Do I have to display a product price on my site?

How can I tell if I need to create product options or modifiers?
How can I allow customers to send me a message about a product?

How can I create a swatch image from my product image?
I'm editing product options. Why don't I see some of the settings?

 .
.Can I organize my products with tags?
