

CMS: Selling Items from Catalog Collections
13 min
In this article
- Choose how you want to create a catalog collection
- Creating a new catalog collection
- Converting an existing collection into a catalog collection
- Adding fields and items to your catalog collection
- Setting up your selling experience
- Adding dynamic pages for your catalog
- Adding purchase actions to a dynamic page
- Displaying catalog items on static pages
- Setting up your commerce settings
- Managing your orders
- FAQs
Important:
We're working on releasing this feature, which is not yet available in all Wix accounts.
Turn your CMS (Content Management System) collection into a sellable catalog and manage content and commerce in one place. Catalog collections are a good fit when your items already live in the CMS, or when you want to sell content-driven items like guides, rentals, digital downloads, art, or courses without building a traditional product catalog first.
With catalog collections, you manage your items in a collection and use Wix commerce features like cart, checkout, payments, discounts, and order management. If you sell physical items, you can also set up shipping and tax collection.
Before you begin:
- You need to add CMS to your site if you haven't already.
- Upgrade your site to a plan that supports selling online when you're ready to sell your items.
- You need to set up at least one payment method before customers can complete checkout.
- Catalog collections are best for content-first selling. If you need product variants, advanced inventory tools, or more complex store setups, Wix Stores may be a better fit.
Choose how you want to create a catalog collection
You can start with an existing collection or create a new catalog collection. Choose the path that matches where your content already lives.
Creating a new catalog collection
Use this method if you are starting from scratch and want to create a collection for items you plan to sell.
To create a new catalog collection:
- Go to CMS in your site's dashboard. Alternatively, you can click CMS
 in your editor, then click Your Collections.
 - Click Create Collection at the top right.
- Select Catalog collection and click Next.
- Enter the Catalog collection name.
- (If needed) Edit the Catalog collection ID. This ID is used in your site's code and cannot be modified later.
- Select the catalog fields that will appear in the cart and checkout. You will map these to your collection fields and you can add more later.
- Select the catalog fields you want to include under Essentials:
- Name and Price are required and included by default.
- Image and Description are optional and selected by default. Deselect them if you don't need them.
- (Optional) Select Digital file under Fulfillment if you want to include a digital file that customers can download after purchase. Learn more about the 'Digital asset' field type.
- Click Create Collection.

- Add fields to your collection manually or by importing a CSV file:
- Add fields manually: Click + Add Field to begin adding fields to your collection manually.
- Import a CSV file: Click Import CSV file to upload a CSV file to your collection.
- Add items to your collection:
- Click + Add Item.
- Add content about the item to each relevant field.
- Repeat this step to create as many items as you need.
Converting an existing collection into a catalog collection
Use this method if you already have a collection with items and want to add selling features to it. This is useful for collections like courses, downloads, rentals, artwork, or guides that are already structured in the CMS.
Once you convert to a catalog collection and publish your site, checkout and cart pages are automatically added to your site. After that, you need to customize the page you'll be selling from and add purchase actions.
To turn an existing collection into a catalog collection:
- Go to CMS in your site's dashboard. Alternatively, you can click CMS in your editor, then click Your Collections.
- Click the relevant collection.
- Click More Actions at the top right and select Sell your items.
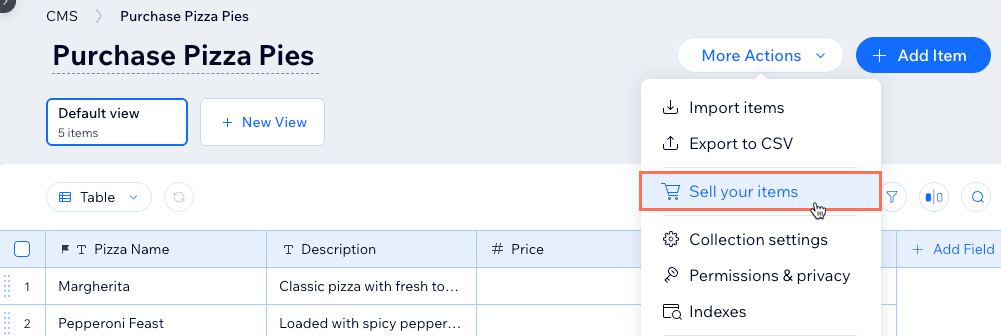
- Click Continue in the setup window.
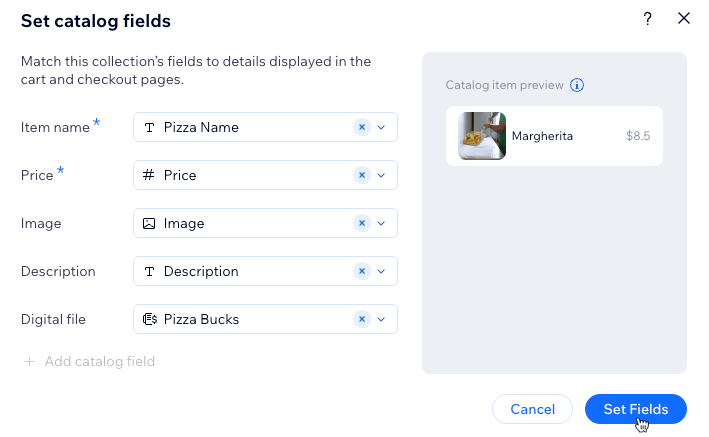
- Map your collection fields to the catalog fields in the Set catalog fields dialog:
- Item name: Select the text field that stores your item names.
- Price: Select the number field that stores your item prices.
- Image: (Optional) Select an image field to show product visuals.
- Description: (Optional) Select a text or rich text field to show item details.
- (Optional) Add a 'Digital asset' field type if you want to include a file customers download after purchase:
- Click + Add catalog field.
- Select the relevant 'Digital asset' field from the dropdown, or select + Add field to create a new field.
- Click Set Fields.
Adding fields and items to your catalog collection
Catalog collections include fields used for selling. You can add more fields based on the type of items you sell.
In order to sell items from your catalog collection, make sure it includes a field for title and price. We recommend adding an image field and a description field to create a better shopping experience.
After setting up the collection, you can add the items you want to sell.
Setting up your selling experience
After your catalog collection is ready, you need pages where customers can browse items and purchase them. In most cases, that means adding dynamic pages and connecting purchase actions to buttons.
Before you begin:
Make sure to create your catalog collection before adding dynamic pages for it.
Adding dynamic pages for your catalog
Catalog collections use dynamic item pages and dynamic list pages to display collection content on your site. The item page shows one item at a time, and the list page shows multiple items together.
Studio Editor
Wix Editor
- Go to your editor.
- Click CMS on the left side of the editor.
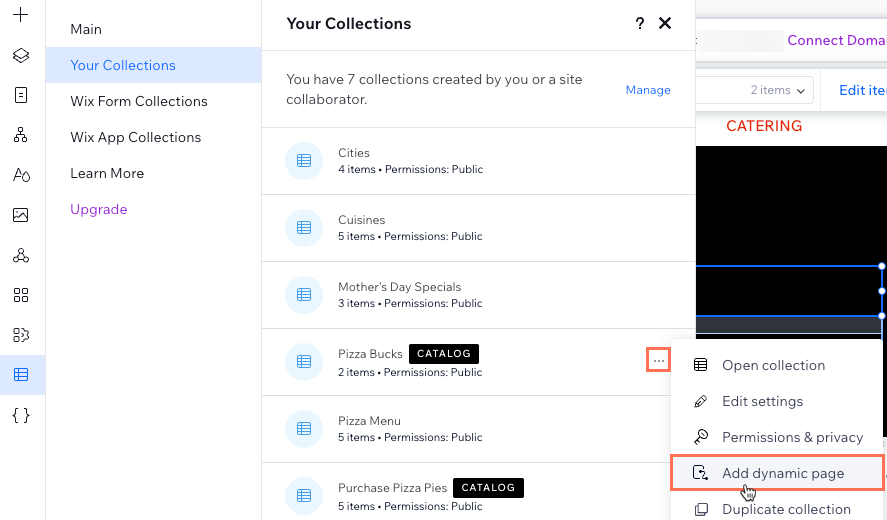
- Click Your Collections.
- Hover over the relevant catalog collection, click the More Actions icon
 , and select Add dynamic page.
- Select the type of dynamic page you want to add:
- Item page: Shows one item at a time. Best for product detail pages.
- List page: Shows multiple items in a repeater or gallery.
- Click Add to Site.
- Connect elements on the page to your CMS collection contents.
- (If needed) Repeat these steps to add another dynamic page type.
- Publish your site when you're ready for the changes to go live.
Adding purchase actions to a dynamic page
The dynamic item page is where customers can view one item in detail. This is usually the best place to place 'Add to cart' and 'Buy now' buttons. These are regular buttons or images that connect to a dataset that connects to your collection. Each button has a dataset click action, either Add to cart or Buy now, that determines what happens when clicked.
The dynamic list page lets customers browse several items together. You can attach a purchase action button to a repeater so customers can add items without opening each item page first.
Studio Editor
Wix Editor
- Go to your editor and navigate to the relevant dynamic page.
- Add a regular button or image to use as your purchase action button.
- Click the button or image, then click the Connect to CMS icon
 .
. - Make sure the dataset connects to your catalog collection.
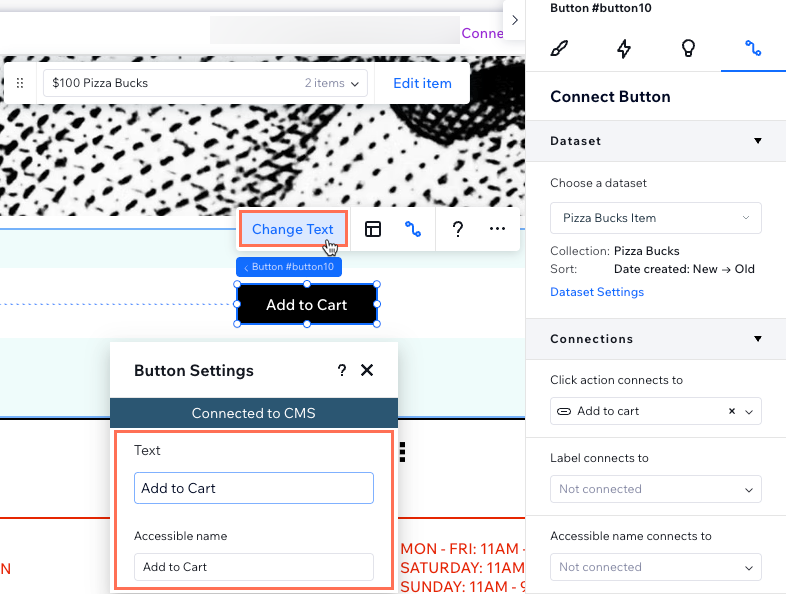
- Click the Click action connects to dropdown and select the action you want to assign to the button:
- Add to cart: When clicked, a side panel opens where the customer can add the item to their cart.
- Buy now: When clicked, the customer navigates to the checkout page where they can purchase the item.
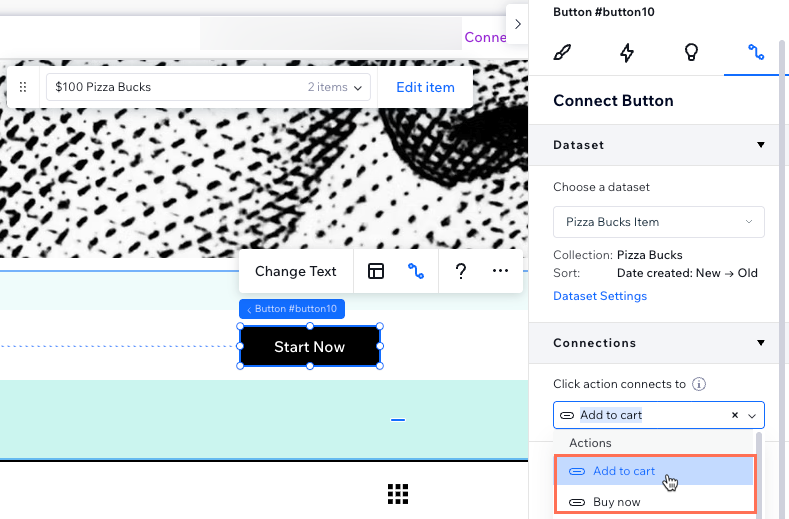
- Click Change Text on the button to customize the static text that displays on the button (e.g. "Add to cart" or "Buy now"). Alternatively, you can display dynamic text from your collection by selecting the relevant field from the Label connects to dropdown in the Connect Button panel.
- Repeat these steps to add another 'Add to cart' or 'Buy now' button to the page.
- (Recommended) Add a 'Cart icon' button if you don't already have one:
- Click Add Elements on the left, then click Store.
- Click Cart Icon, then click and drag the Cart Icon into place.
- Publish your site when you're ready for the changes to go live.
Displaying catalog items on static pages
You can also display catalog collection items on static pages, such as your homepage or landing pages. This lets you feature selected items outside the collection's dynamic pages.
Studio Editor
Wix Editor
- Go to your editor and navigate to a static page.
- Click the element you want to connect to the CMS (e.g. text, image, button).
- Click the Connect to CMS icon .
- Click the Choose a dataset dropdown and select a dataset connected to your catalog collection. If none exists yet, click Add a Dataset, choose your catalog collection, give it a name, and click Create.
- Connect each element to the relevant collection field — for example, connect an image element to your image field, and a text element to your title or description field.
- (For buttons or images) Select the relevant click action after connecting:
- Add to cart: Lets visitors add the item to their cart directly from the page.
- Buy now: Takes visitors straight to checkout.
- Publish your site when you're ready for the changes to go live.
Setting up your commerce settings
Before customers can complete purchases, you need to finish your commerce setup in the dashboard. This includes payments, and for physical items, shipping and tax settings.
Important:
You need at least one payment method before customers can check out.
Managing your orders
Orders from catalog collections are managed from your site's dashboard. This is where you can review purchases and handle fulfillment steps.
Learn more about managing your orders.
FAQs
Click for answers to common questions about selling items from CMS catalog collections.
How is this different from Wix Stores?
Can I sell digital files from catalog collections?
Can I use automations with catalog collections?
What happens to my existing dynamic pages if I enable selling?
Can I import a CSV file to create a catalog collection?
How do customers receive digital files?
Can I format prices with currency symbols?
What happens if I duplicate a collection field that is mapped to a catalog field?
Can I sell items from catalog collections in Wix Vibe?
