

Studio Editor: Adding, Creating and Uploading Images
4 min
In this article
- Adding an image to a page
- Uploading an image
- Create an image using AI
- FAQs
In the Studio Editor, images are not just decorative elements—they’re essential assets that shape your client's brand narrative and elevate the overall design.
Whether you’re uploading custom visuals, utilizing our extensive library of high-quality stock images, or leveraging AI to create tailored images, you have powerful tools at your disposal to ensure the visuals align flawlessly with your client’s goals and aesthetic.
Working with breakpoints:
As you incorporate images into your clients' sites, remember that responsiveness is crucial. Ensure that your images are optimized for various breakpoints, allowing them to adapt seamlessly across different screen sizes.
Adding an image to a page
Adding images is a straightforward process. You can use your own uploads or select from a range of free, professional images available through Wix or Unsplash. Additionally, you have the option to purchase stunning images from Shutterstock
To add an image to a page:
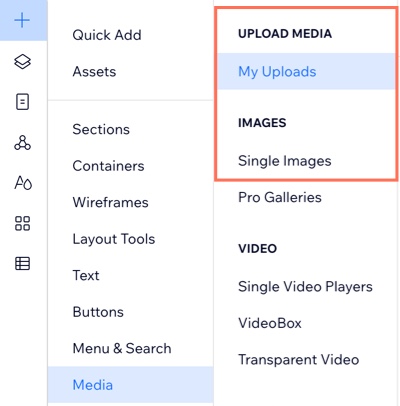
- Click Add Elements
 on the left side of the editor.
 - Click Media.
- Choose one of the options:
- My Uploads: Select an image you have uploaded.
- Single Images: Add an image in the shape you want, then click Change Image to access the Media Manager.
Tip: Click the Media from Wix tab to choose from thousands of professional photos and illustrations, free of charge.
Uploading an image
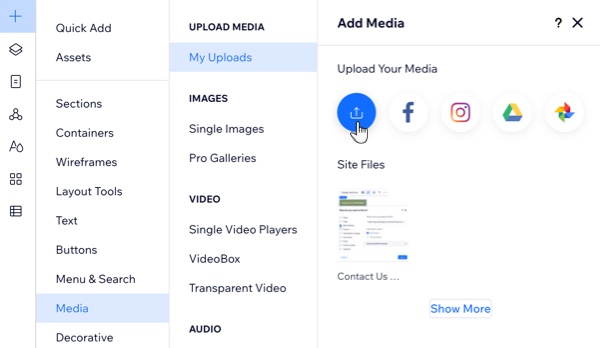
You can upload your own images to the site's Media Manager at any time. Choose from your computer, other Wix sites or external platforms. Once you upload an image, you can use it anywhere on the site.
To upload an image:
- Click Media
 on the left side of the editor.
 - (In the Media Manager) Click + Upload Media.
- Select where you want to add the media from:
- Your computer: Drag and drop files into the Media Manager or click Upload from Computer.
- Your other Wix sites:
- Click My Wix Account
 on the left.
 - Select the site folder.
- Select the files you want to upload.
- Click Upload Selection.
- Click My Wix Account
- External platforms (e.g. Facebook, Google Drive):
- Click the relevant platform on the left.
- Click Connect.
- Select the files you want to upload.
- Click Upload Selection.
- A URL:
- Click the Link icon
 on the left side.
 - Paste the URL link and click Import.
- Click the Link icon
- (Optional) Select the file you just uploaded and click Add to Page.
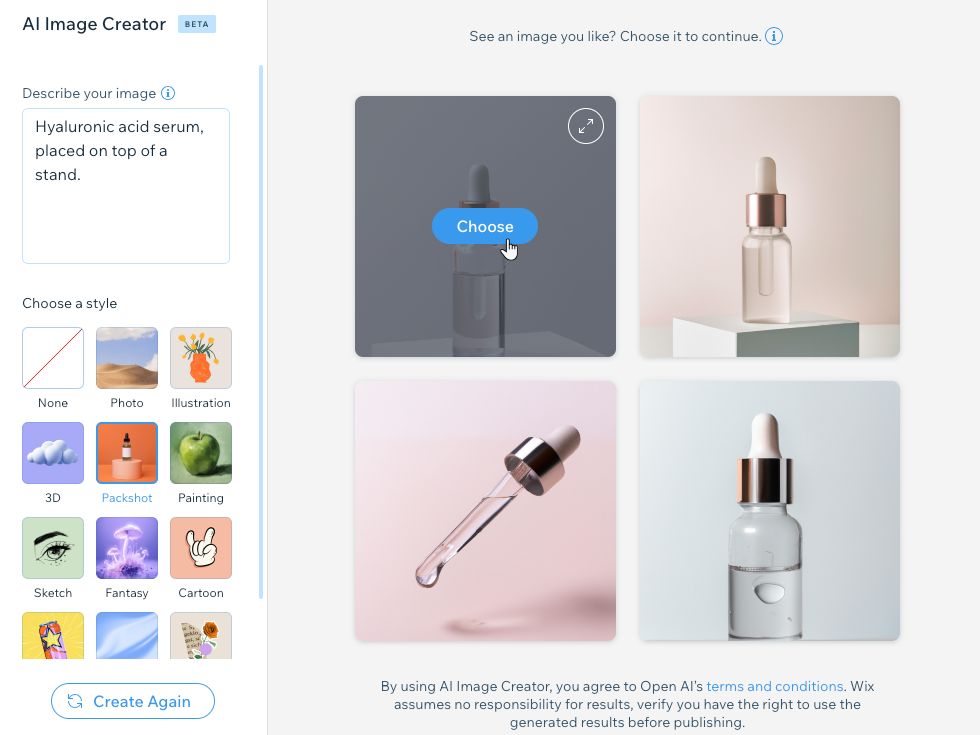
Create an image using AI
With the Wix AI Image Creator, you can create high-quality, personalized image content quickly and cost-effectively. By writing well-structured prompts and applying your preferred image style, you can generate multiple versions of an image and add it to the site.
To use the AI Image Creator:
- Access the AI Image Creator:
- Click Media on the left side of the editor.
- (In the Media Manager) Click AI Image Creator on the left.
- Click Media
- Enter your prompt under Describe your image.
- Click a style to select it.
- Click Create Images.
- (If necessary) Click Create Again to generate another set of images.
- Hover over the image you like best and click Choose.
- (Optional) Edit the image further if needed.
- Click Save to add the image to the site's Media Manager.
FAQs
Click a question below to learn more.
Can I drag and drop external images into the editor?

I'm uploading an SVG file. Can I change its colors in the editor?
