Automations can help you to stay in touch with your clients and make sure they come back for more sessions. Create automations that are triggered for different things, such as when clients attend their first session, when they check in to sessions, or if they haven't booked a session in a while.
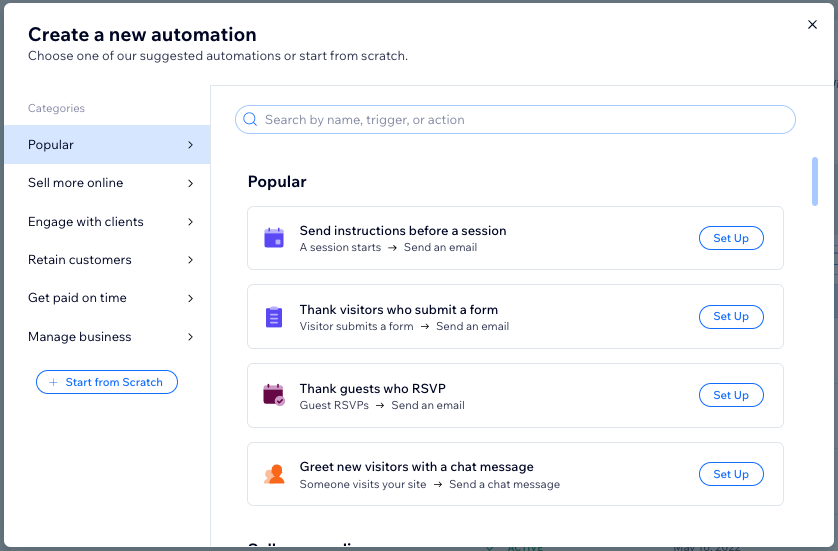
Step 1 | Create a new automation
Create custom automations from the Automations tab in your site's dashboard. Make sure to choose a name that's clear and easy for your staff and collaborators on your site to understand.
To create a new automation:
- Go to Automations in your site's dashboard.
- Click + Create Automation.
- Choose how you want to start creating your automation:
- From Scratch: Click Start from Scratch to begin from a blank automation template.
- Suggested automation: Use the categories or search bar to find the suggested automation you want to edit. Then click Set Up next to the automation.
- Click the title at the top left to give your automation a name.
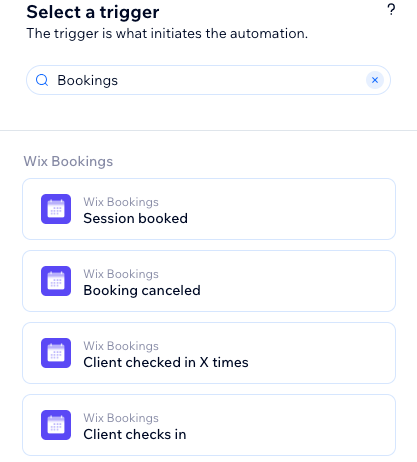
Step 2 | Choose a trigger
The trigger is a specific action your clients take on your site, such as checking in for a session, that activates the automation.
The triggers you see change depending on the app you're using. Make sure to choose Bookings and then select one of the available triggers.
To choose a trigger:
- Enter Bookings in the search bar under Select a trigger.
- Select the relevant trigger:
This trigger activates when a client successfully schedules a session, such as an appointment, class, or course.
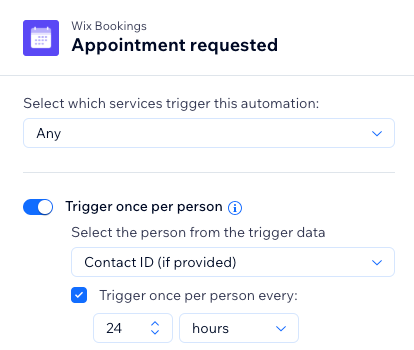
- Select the relevant option from the Select which services trigger this automation drop-down:
- Any: The automation triggers when a client books any of your services.
- Specific: Click + Select and then select the checkbox next to each service you want to trigger the automation. Then click OK.
Note: You can select up to 50 services per automation.
- (Optional) Enable the Trigger once per person toggle to limit trigger frequency:
- Select the person from the trigger data: Decide how often the automation can be triggered for the same person (e.g. Contact ID, Post Author Contact ID, Visitor ID etc.).
Tip: This is useful for triggers that might occur repeatedly. - Trigger once per person every: Select this checkbox if you want to set a specific amount of time that should pass before the automation can be triggered again for the same person.
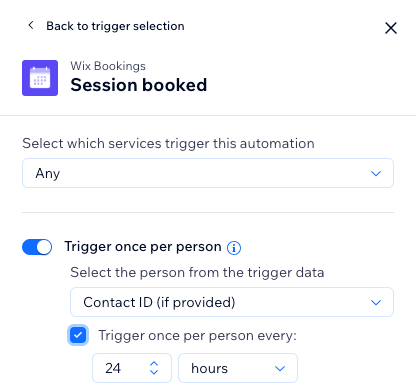
- Click Apply.
This trigger activates when a client cancels a previously scheduled session.
- Select the relevant option from the Select which services trigger this automation drop-down.
- Any: The automation triggers when a client cancels any of your services.
- Specific: Click + Select and then select the checkbox next to each service you want to trigger the automation. Then click OK.
Note: You can select up to 50 services per automation.
- (Optional) Enable the Trigger once per person toggle to limit trigger frequency:
- Select the person from the trigger data: Decide how often the automation can be triggered for the same person (e.g. Contact ID, Post Author Contact ID, Visitor ID etc.). Tip: Useful for triggers that might occur repeatedly.
- Trigger once per person every: Select this checkbox if you want to set a specific amount of time that should pass before the automation can be triggered again for the same person.
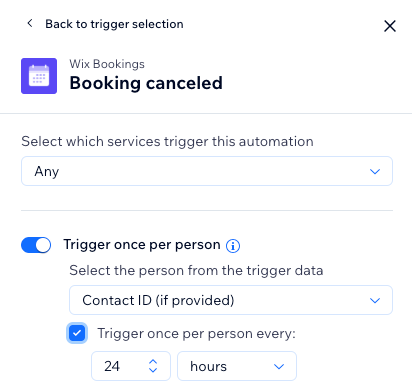
- Click Apply.
Client checked in X times
This trigger activates when a client has checked in for class or course sessions a specified number of times.
- Select the relevant option from the Number of sessions the client has attended drop-down.
- (Optional) Enable the Trigger once per person toggle to limit trigger frequency:
- Select the person from the trigger data: Decide how often the automation can be triggered for the same person (e.g. Contact ID, Post Author Contact ID, Visitor ID etc.). Tip: Useful for triggers that might occur repeatedly.
- Trigger once per person every: Select this checkbox if you want to set a specific amount of time that should pass before the automation can be triggered again for the same person.
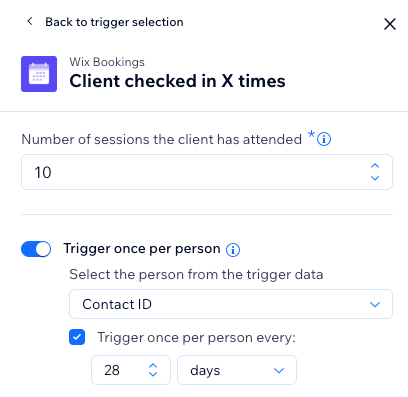
- Click Apply.
This trigger activates each time a client checks in for a session.
- Select the relevant option from the Select which services trigger this automation drop-down.
- Any: The automation triggers when a client checks in for any of your services.
- Specific: Click + Select and then select the checkbox next to each service you want to trigger the automation. Then click OK.
Note: You can select up to 50 services per automation.
- (Optional) Enable the Trigger once per person toggle to limit trigger frequency:
- Select the person from the trigger data: Decide how often the automation can be triggered for the same person (e.g. Contact ID, Post Author Contact ID, Visitor ID etc.). Tip: Useful for triggers that might occur repeatedly.
- Trigger once per person every: Select this checkbox if you want to set a specific amount of time that should pass before the automation can be triggered again for the same person.
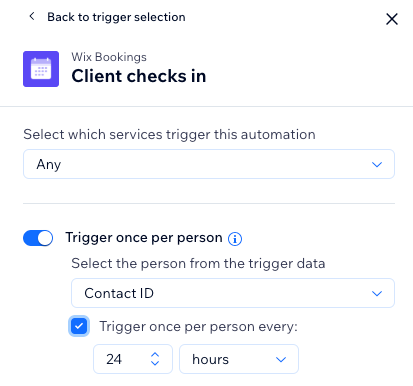
- Click Apply.
Client was last checked-in a while ago
This trigger activates when a certain period has passed since a client's last check-in, indicating they haven't attended a session recently.
Notes:
- If your customer checks in again before the delay trigger expires, it resets the trigger countdown.
- This trigger won’t work retroactively for items that existed before this automation, it’ll only work for items that are created while the automation is active.
- (Optional) Enable the Trigger once per person toggle to limit trigger frequency:
- Select the person from the trigger data: Decide how often the automation can be triggered for the same person (e.g. Contact ID, Post Author Contact ID, Visitor ID etc.). Tip: Useful for triggers that might occur repeatedly.
- Trigger once per person every: Select this checkbox if you want to set a specific amount of time that should pass before the automation can be triggered again for the same person.
- (Optional) Enable the Set the automation to run before the trigger to choose how long before the trigger the automation should start running. Choose the relevant time period using the drop-downs.
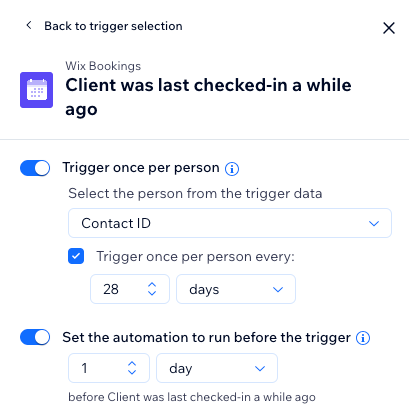
- Click Apply.
This trigger activates at the scheduled start time of a session.
- Select the relevant option from the Select which services trigger this automation drop-down.
- Any: The automation triggers at the start time of any of your services.
- Specific: Click + Select and then select the checkbox next to each service you want to trigger the automation. Then click OK.
Note: You can select up to 50 services per automation.
- (Optional) Enable the Trigger once per person toggle to limit trigger frequency:
- Select the person from the trigger data: Decide how often the automation can be triggered for the same person (e.g. Contact ID, Post Author Contact ID, Visitor ID etc.). Tip: Useful for triggers that might occur repeatedly.
- Trigger once per person every: Select this checkbox if you want to set a specific amount of time that should pass before the automation can be triggered again for the same person.
- (Optional) Enable the Set the automation to run before the trigger to choose how long before the trigger the automation should start running. Choose the relevant time period using the drop-downs.

- Click Apply.
This trigger activates at the scheduled end time of a session.
- Select the relevant option from the Select which services trigger this automation drop-down.
- Any: The automation triggers at the end of any of your services.
- Specific: Click + Select and then select the checkbox next to each service you want to trigger the automation. Then click OK.
Note: You can select up to 50 services per automation.
- (Optional) Enable the Trigger once per person toggle to limit trigger frequency:
- Select the person from the trigger data: Decide how often the automation can be triggered for the same person (e.g. Contact ID, Post Author Contact ID, Visitor ID etc.). Tip: Useful for triggers that might occur repeatedly.
- Trigger once per person every: Select this checkbox if you want to set a specific amount of time that should pass before the automation can be triggered again for the same person.
- (Optional) Enable the Set the automation to run before the trigger to choose how long before the trigger the automation should start running. Choose the relevant time period using the drop-downs.
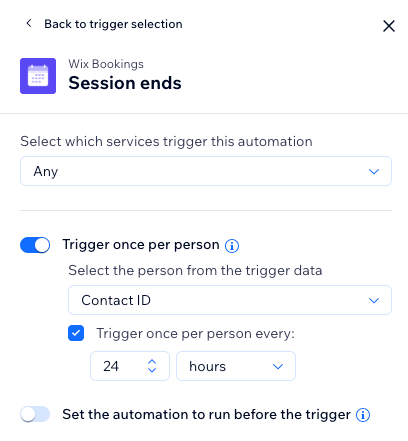
- Click Apply.
Appointment or class updated
This trigger activates when details of an appointment or class are modified, such as changes in time, date, or other pertinent information.
- Select the relevant option from the Select which services trigger this automation drop-down.
- Any: The automation triggers when any appointment or class is updated.
- Specific: Click + Select and then select the checkbox next to each service you want to trigger the automation. Then click OK.
Note: You can select up to 50 services per automation.
- (Optional) Enable the Trigger once per person toggle to limit trigger frequency:
- Select the person from the trigger data: Decide how often the automation can be triggered for the same person (e.g. Contact ID, Post Author Contact ID, Visitor ID etc.). Tip: Useful for triggers that might occur repeatedly.
- Trigger once per person every: Select this checkbox if you want to set a specific amount of time that should pass before the automation can be triggered again for the same person.
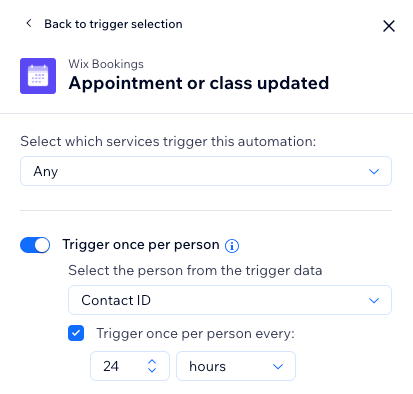
- Click Apply.
This trigger activates when details of a course are modified, such as changes in schedule, content, or other relevant information.
- Select the relevant option from the Select which services trigger this automation drop-down.
- Any: The automation triggers when any of your courses is updated.
- Specific: Click + Select and then select the checkbox next to each service you want to trigger the automation. Then click OK.
Note: You can select up to 50 services per automation.
- (Optional) Enable the Trigger once per person toggle to limit trigger frequency:
- Select the person from the trigger data: Decide how often the automation can be triggered for the same person (e.g. Contact ID, Post Author Contact ID, Visitor ID etc.). Tip: Useful for triggers that might occur repeatedly.
- Trigger once per person every: Select this checkbox if you want to set a specific amount of time that should pass before the automation can be triggered again for the same person.
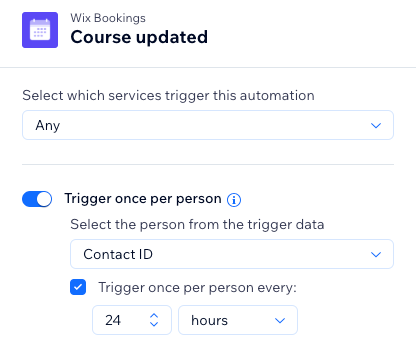
- Click Apply.
Appointment request approved
This trigger activates when a pending appointment request from a client is approved.
- Select the relevant option from the Select which services trigger this automation drop-down.
- Any: The automation triggers when any appointment request is approved.
- Specific: Click + Select and then select the checkbox next to each service you want to trigger the automation. Then click OK.
Note: You can select up to 50 services per automation.
- (Optional) Enable the Trigger once per person toggle to limit trigger frequency:
- Select the person from the trigger data: Decide how often the automation can be triggered for the same person (e.g. Contact ID, Post Author Contact ID, Visitor ID etc.). Tip: Useful for triggers that might occur repeatedly.
- Trigger once per person every: Select this checkbox if you want to set a specific amount of time that should pass before the automation can be triggered again for the same person.
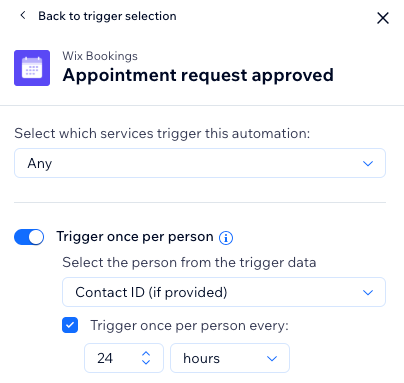
- Click Apply.
Appointment request declined
This trigger activates when a pending appointment request from a client is declined.
- Select the relevant option from the Select which services trigger this automation drop-down.
- Any: The automation triggers when any appointment request is declined.
- Specific: Click + Select and then select the checkbox next to each service you want to trigger the automation. Then click OK.
Note: You can select up to 50 services per automation.
- (Optional) Enable the Trigger once per person toggle to limit trigger frequency:
- Select the person from the trigger data: Decide how often the automation can be triggered for the same person (e.g. Contact ID, Post Author Contact ID, Visitor ID etc.). Tip: Useful for triggers that might occur repeatedly.
- Trigger once per person every: Select this checkbox if you want to set a specific amount of time that should pass before the automation can be triggered again for the same person.
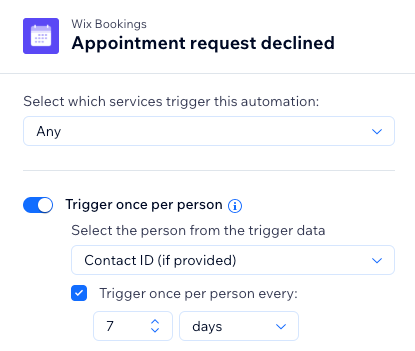
- Click Apply.
Client marked as "no-show"
This trigger activates when a client is marked as a "no-show" for a scheduled session, indicating they did not attend.
- Select the relevant option from the Select which services trigger this automation drop-down.
- Any: The automation triggers when a client is a no-show for any of your services.
- Specific: Click + Select and then select the checkbox next to each service you want to trigger the automation. Then click OK.
Note: You can select up to 50 services per automation.
- (Optional) Enable the Trigger once per person toggle to limit trigger frequency:
- Select the person from the trigger data: Decide how often the automation can be triggered for the same person (e.g. Contact ID, Post Author Contact ID, Visitor ID etc.). Tip: Useful for triggers that might occur repeatedly.
- Trigger once per person every: Select this checkbox if you want to set a specific amount of time that should pass before the automation can be triggered again for the same person.
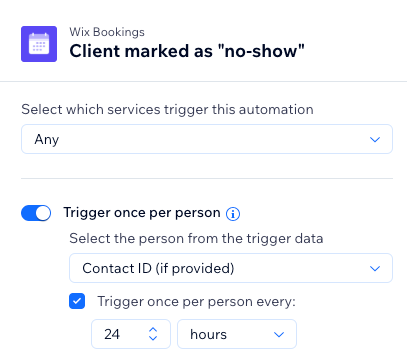
- Click Apply.
This trigger activates when a client submits a request to schedule an appointment, pending approval.
- Select the relevant option from the Select which services trigger this automation drop-down.
- Any: The automation triggers when any appointment is requested.
- Specific: Click + Select and then select the checkbox next to each service you want to trigger the automation. Then click OK.
Note: You can select up to 50 services per automation.
- (Optional) Enable the Trigger once per person toggle to limit trigger frequency:
- Select the person from the trigger data: Decide how often the automation can be triggered for the same person (e.g. Contact ID, Post Author Contact ID, Visitor ID etc.). Tip: Useful for triggers that might occur repeatedly.
- Trigger once per person every: Select this checkbox if you want to set a specific amount of time that should pass before the automation can be triggered again for the same person.
- Click Apply.
Step 3 | Choose what you want to add to your automation:
After selecting a trigger, continue setting up your automation using any of the available steps: Action, Delay, Condition. You can add these steps anywhere in your automation sequence depending on the logic you are trying to implement.
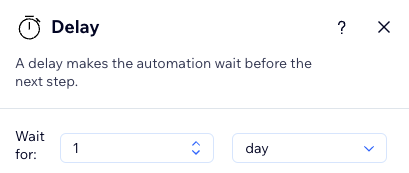
Add a delay
Add a time buffer between steps. For example, if your trigger is 'Client marked as no-show' and your action is 'Send an email', you would want to delay the automation by sending this after a certain amount of time has passed.
- Click + to add a step.
- Click Delay.
- Click the up and down arrows (or enter a number in the field) and click the drop-down to choose between days, hours, and minutes.
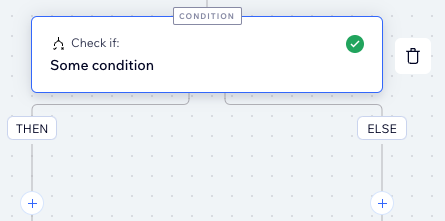
Add a condition
Conditions let you create complex automation flows by defining criteria for continuing the flow. In the ‘THEN’ path, the automation flow continues only if the condition is met. You can set an ELSE path to define what happens if it isn’t.
- Click + to add a step
- Click Condition.
- Click the Select a property drop-down and choose the dynamic field that the automation collects when it runs (e.g. Party Size).
Tip: Learn more about the property picker and all that it offers. - Click the Select logic drop-down and choose an operator that will compare the received data with the value (e.g. 'is greater than').
- Click the next field to set the value (e.g. '3').
Tip: Click Customize to create custom workflows using the formula field. - (Optional) Click + Or or + And to add more criteria to the condition.
Note: If you add more than one criterion, you can choose ‘and’/’or’ relations between criteria of the same condition. - Click Apply.
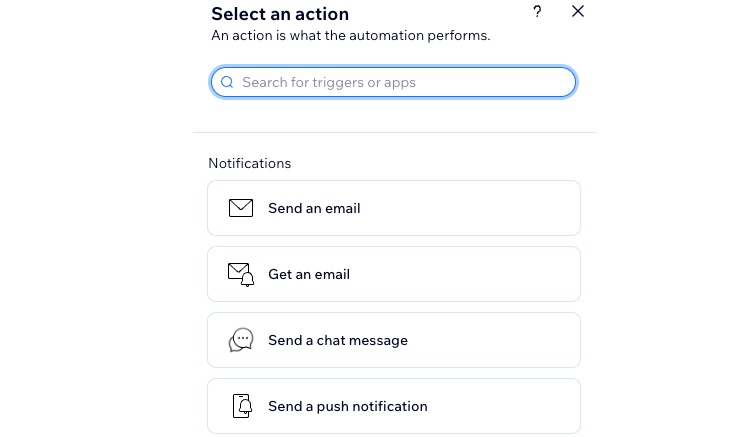
Choose an action
Actions are what the automation performs. For example, if your trigger is 'Session ends', you might want to send that visitor an automatic thank you email. In the actions selection panel, you can find the action offering relevant to the selected trigger, which you can customize to suit your needs.
- Click + to add a step.
- Click Action.
- Choose an action from the panel.
Note: The actions available will differ based on your trigger choice.
- Set up the action using the available settings. See examples below.
Note: You must have
Wix Chat installed to set up this action.
- Enter the chat message you'd like to send in the Message field.
- Click the Send this message only when I'm online to chat toggle to specify when these messages are sent:
- Enabled: This chat message will only be sent when your chat status is online.
- Disabled: This chat message will be sent whether your chat status is online or offline.
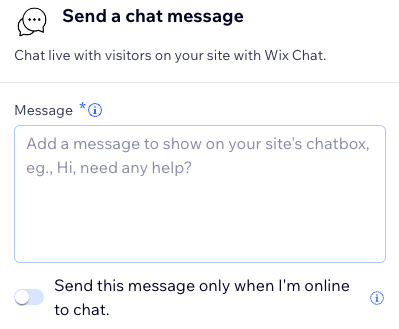
- Click Apply.
Send a push notification that appears on a customer's device screen ("pushed" by their mobile app). Enter the notification's title and message, and choose whether it takes customers to your app's home screen or a specific product or service.
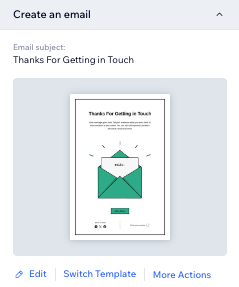
Send invoices for unpaid orders or services. You can customize the email subject and the accompanying message. Your clients will be able to pay the invoice by clicking the button “View Invoice” displayed in their email.
- Enter the email subject.
- Customize the message.
- (Optional) Click Add Dynamic Value to add more personalized content to your automation:
- Select one of the following options from the Variable name drop-down: Contact name (the client), Service name, Service start date, or Service end date.
- (Optional) Add the relevant Fallback value, for example: the fallback value for Contact name as 'Dear client'.
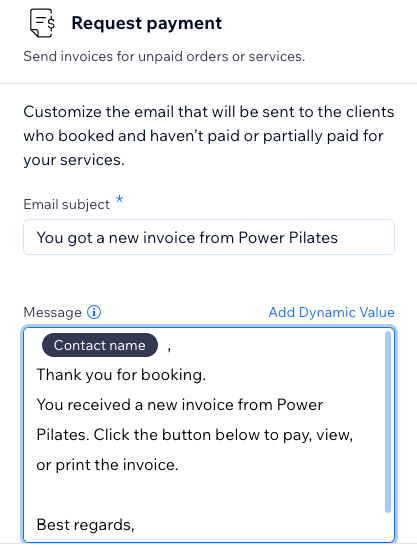
- Click Apply.
- Click + Add Label to select the label(s) you'd like to add.

- Click Apply.
- Enter a description of this way of earning points in the Tell customers how they can earn points field.
Note: This description should reflect the trigger you've chosen for this automation (for example, if your trigger is a visitor submitting a form, this will be the way they earn points). - Enter the number of points awarded in the Customer earns field.
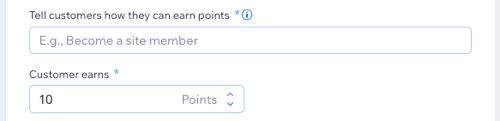
- Click Apply.
- Select whether to send a unique coupon or a fixed coupon each time in the Select the type of coupon code section.
- Click the + Select under Select a coupon to choose an existing coupon or click + Create New to make a new coupon by following the on-screen instructions.

- Click Apply.
Adding a coupon does not automatically send that coupon. You need to attach the coupon to a relevant action and add it as a dynamic value to send. For example, you can use the coupon code in ‘Send an Email’, ‘Send an SMS’ and more.
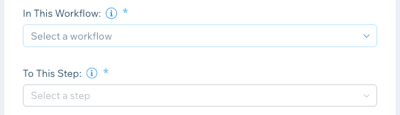
A workflow is a list that displays all the steps of a project in columns so you can easily keep track of every phase. Create or move a card in a workflow automatically with Automations.
Learn more about workflows.
- Click the In This Workflow drop-down to select the workflow you'd like to move a card in.
- Click the To This Step drop-down to select the step you'd like to move the card to.
- Click Apply.
Badges allow you to label your contacts so they can be easily differentiated (for example, a badge could mark a certain milestone being met). Learn more about
member badges.
- Click + Add Badge to create your first badge if you don't see any listed.
- Click x next to the badge(s) you don't want to assign, until you can only see the badge(s) you do want this automation to assign.

- Click Apply.
Send an email to contacts to invite them to join your group.
Step 4 | Activate the automation
Click
Activate at the top right is you're ready to turn on the automation. You can click
Save to save the automation as a draft if you're not ready to activate it yet. After saving or publishing, the automation now appears on your
Automations page where you can monitor, edit, deactivate, or delete according to your needs.