

Wix Meetings: Creating and Managing Scheduling Links
10 min
In this article
- Managing your meeting settings
- Creating a Single Host meeting
- Creating a Round Robin meeting
- Deactivating scheduling links
- FAQs
Create a scheduling link so clients can schedule meetings with you directly. You can set up a Single Host meeting or a Round Robin meeting, customize the duration and location, and choose whether to charge for it.
You can also add forms to collect client information, set policies for cancellations / approvals and deactivate scheduling links when you no longer want clients to book through them.
Important:
- Currently, Wix Meetings is only available to site owners, co-owners, and back-office manager roles. Learn more about roles and permissions.
- Sites on the Basic Studio plan, Light Premium plan, or a free plan can host up to 3 free meetings per site. Upgrade your site to schedule unlimited meetings.
Managing your meeting settings
Manage everything about your meetings from one place. Keep your calendar in sync, set your business time zone, adjust available time slots, and set up reminders to help everything run smoothly for you and your clients.
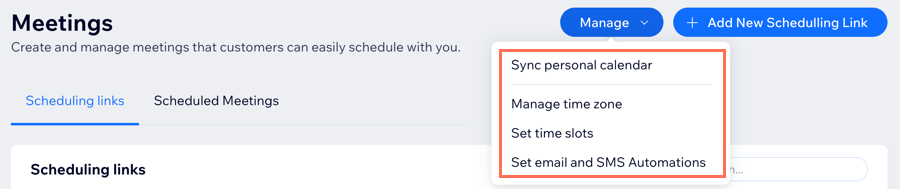
To manage your meeting settings:
- Go to Wix Meetings in your site's dashboard.
Note: First time only click Get Started. - Click Manage at the top.
- Choose what you want to do:
- Sync personal calendar: Sync your personal calendar to avoid double bookings and keep your availability up to date.
- Manage time zone: Set which time zone clients see on their calendars. Keep it in your business’ time zone, switch to your client’s, or let clients choose which works best for them. Read more about setting your business time zone.
- Set time slots: Choose how to set up your meetings: Allow start times based on your service duration or set specific intervals (e.g. every 5 minutes, every hour).
- Set email and SMS Automations: Set up email and SMS reminders for meetings.
Creating a Single Host meeting
Create a meeting that is always assigned to the same host. This is a good option when one person handles every booking.
Before you begin:
- Make sure you've synced your calendar to avoid double-bookings. Learn how to sync your calendar.
- To accept payments for meetings, connect a payment method. Learn more about connecting payment methods.
To create a Single Host meeting:
- Go to Wix Meetings in your site's dashboard.
Note: First time only click Get Started. - Click + Add New Scheduling Link.
- Select Single Host and click Next.
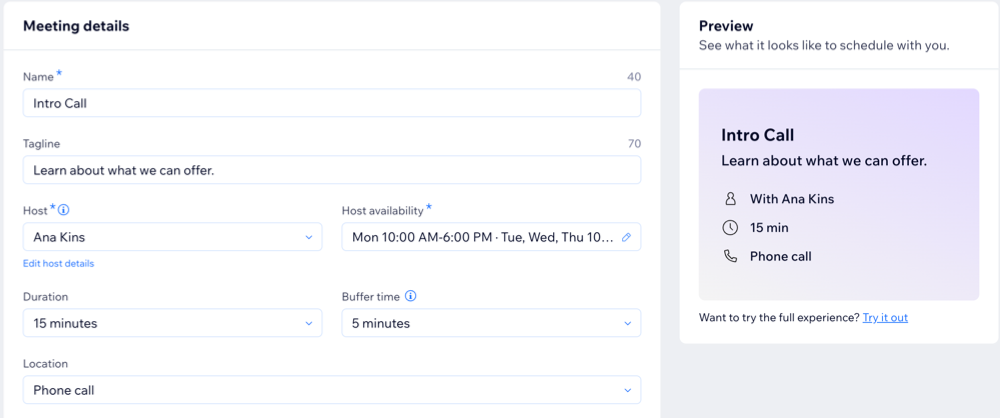
- Add the Meeting details:
- Meeting name: Add the name of your meeting (e.g. '15-minute consultation').
- Tagline: Write a short description or purpose for the meeting.
- Host: Select the host for the meeting.
Note: The host list includes only site owners, co-owners, and back-office manager roles. - Host availability: Set when the host is available to take these meetings.
Tip: You can click the Edit icon to update the hours.
 - Duration: Choose how long the meeting lasts.
- Buffer time: Add a buffer between meetings to avoid back-to-back meetings.
- Location: Select the meeting location type: Phone call, Online, or In person.
Tip: For online and phone call meetings, add to the description how you'll provide the meeting (e.g. "We'll meet over Zoom"). - (Optional) Charge for this meeting: Enable the toggle if you want to charge clients for the meeting.
- (Optional) Customize the Meeting settings:
- Guest form: This is the form clients fill out when scheduling a meeting. By default, the form asks for clients first name, last name, email, and phone number. Click Edit to update your form fields or add questions.
- Policy: Set your meeting terms, including cancellation and waitlist policies. You can also choose to approve meetings manually or automatically. Click Edit to customize your policy.
Note: Each meeting has its own individual policy.
- Click Save.
- (Optional) Share, copy, or test your new scheduling link from the pop-up.
Creating a Round Robin meeting
Create a meeting that can be assigned automatically to one available host from a group of selected hosts. This is useful when you want to distribute bookings across multiple hosts.
Note:
Assigning meetings by host priority is only available on sites with a Business plan or higher.
To create a Round Robin meeting:
- Go to Wix Meetings in your site's dashboard.
Note: First time only click Get Started. - Click + Add New Scheduling Link.
- Select Round Robin.
- Add the Meeting details:
- Meeting name: Add the name of your meeting (e.g. '15-minute consultation').
- Tagline: Write a short description or purpose for the meeting.
- Duration: Choose how long the meeting lasts.
- Buffer time: Add a buffer between meetings to avoid back-to-back meetings.
- Location: Select the meeting location type: Phone call, Online, or In person.
Tip: For online and phone call meetings, add to the description how you'll provide the meeting (e.g. "We'll meet over Zoom"). - (Optional) Charge for this meeting: Enable the toggle if you want to charge clients for the meeting.
- Set up Hosts & assignment:
- Host: Select the hosts you want to include in the rotation. You can add multiple hosts from the dropdown.
- Host assignment: Choose how meetings are assigned:
- Automatic: Meetings are distributed evenly between available hosts.
- Based on host priority: Meetings are assigned according to the priority you set for each host.
- Priority order: Choose whether higher-priority or lower-priority hosts are assigned first.
- Set Host Priority: Click Set Host Priority to set the priority level for each host, then click Save.
- (Optional) Customize the Meeting settings:
- Guest form: This is the form clients fill out when scheduling a meeting. By default, the form asks for clients first name, last name, email, and phone number. Click Edit to update your form fields or add questions.
- Policy: Set your meeting terms, including cancellation and waitlist policies. You can also choose to approve meetings manually or automatically. Click Edit to customize your policy.
Note: Each meeting has its own individual policy.
- Click Save.
- (Optional) Share, copy, or test your new scheduling link from the pop-up.
Deactivating scheduling links
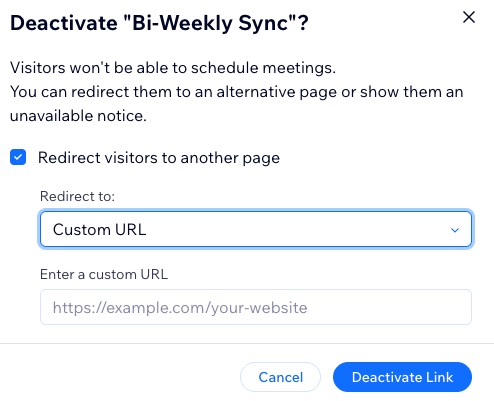
Deactivate a scheduling link when you no longer want clients to book through it. You can either send people to another page or show an unavailable notice.
To deactivate a scheduling link:
- Go to Wix Meetings in your site's dashboard.
- Click the More Actions icon
 next to the relevant meeting name.
 - Select Deactivate link.
- Choose what you want to do:
- Redirect visitors to another page: This option is selected by default. Click the Redirect to dropdown and select a destination.
Tip: If you select Custom URL, enter the relevant URL. - Show an unavailable notice to visitors: Deselect the checkbox next to Redirect visitors to another page.
- Redirect visitors to another page: This option is selected by default. Click the Redirect to dropdown and select a destination.
- Click Deactivate Link.
FAQs
Click below for answers to common questions about Wix Meetings.
What is the difference between Wix Bookings and Wix Meetings?
How do I set up a video conference account?
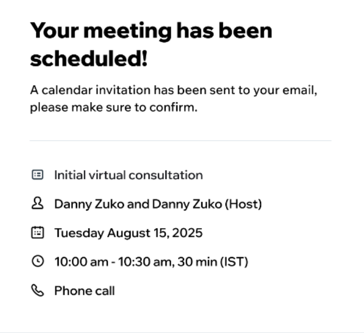
How do clients schedule meetings?

How do I sync my calendars to avoid scheduling conflicts?
Can I cancel or reschedule meetings?
 next to the relevant meeting.
How can I add a new host option to my meetings?
How can I share links for standalone scheduling pages?
Why can't I choose the option to notify customers via SMS?
How can I make sure clients enter a valid country code with their phone number?
How can I customize my meeting policy?
What is the difference between a Single Host and a Round Robin meeting?
