

CMS: About Dataset Click Actions for Buttons and Images
13 min
In this article
- Editing actions
- Submit
- New
- Revert
- Delete
- List actions
- Load more
- Apply filters
- Reset input values
- Next item / Previous item
- Navigation actions
- Next page / Previous page
- Next dynamic page / Previous dynamic page
- Field actions
- Wix Stores actions
- Add to cart
- Open quick view
- Pricing Plans actions
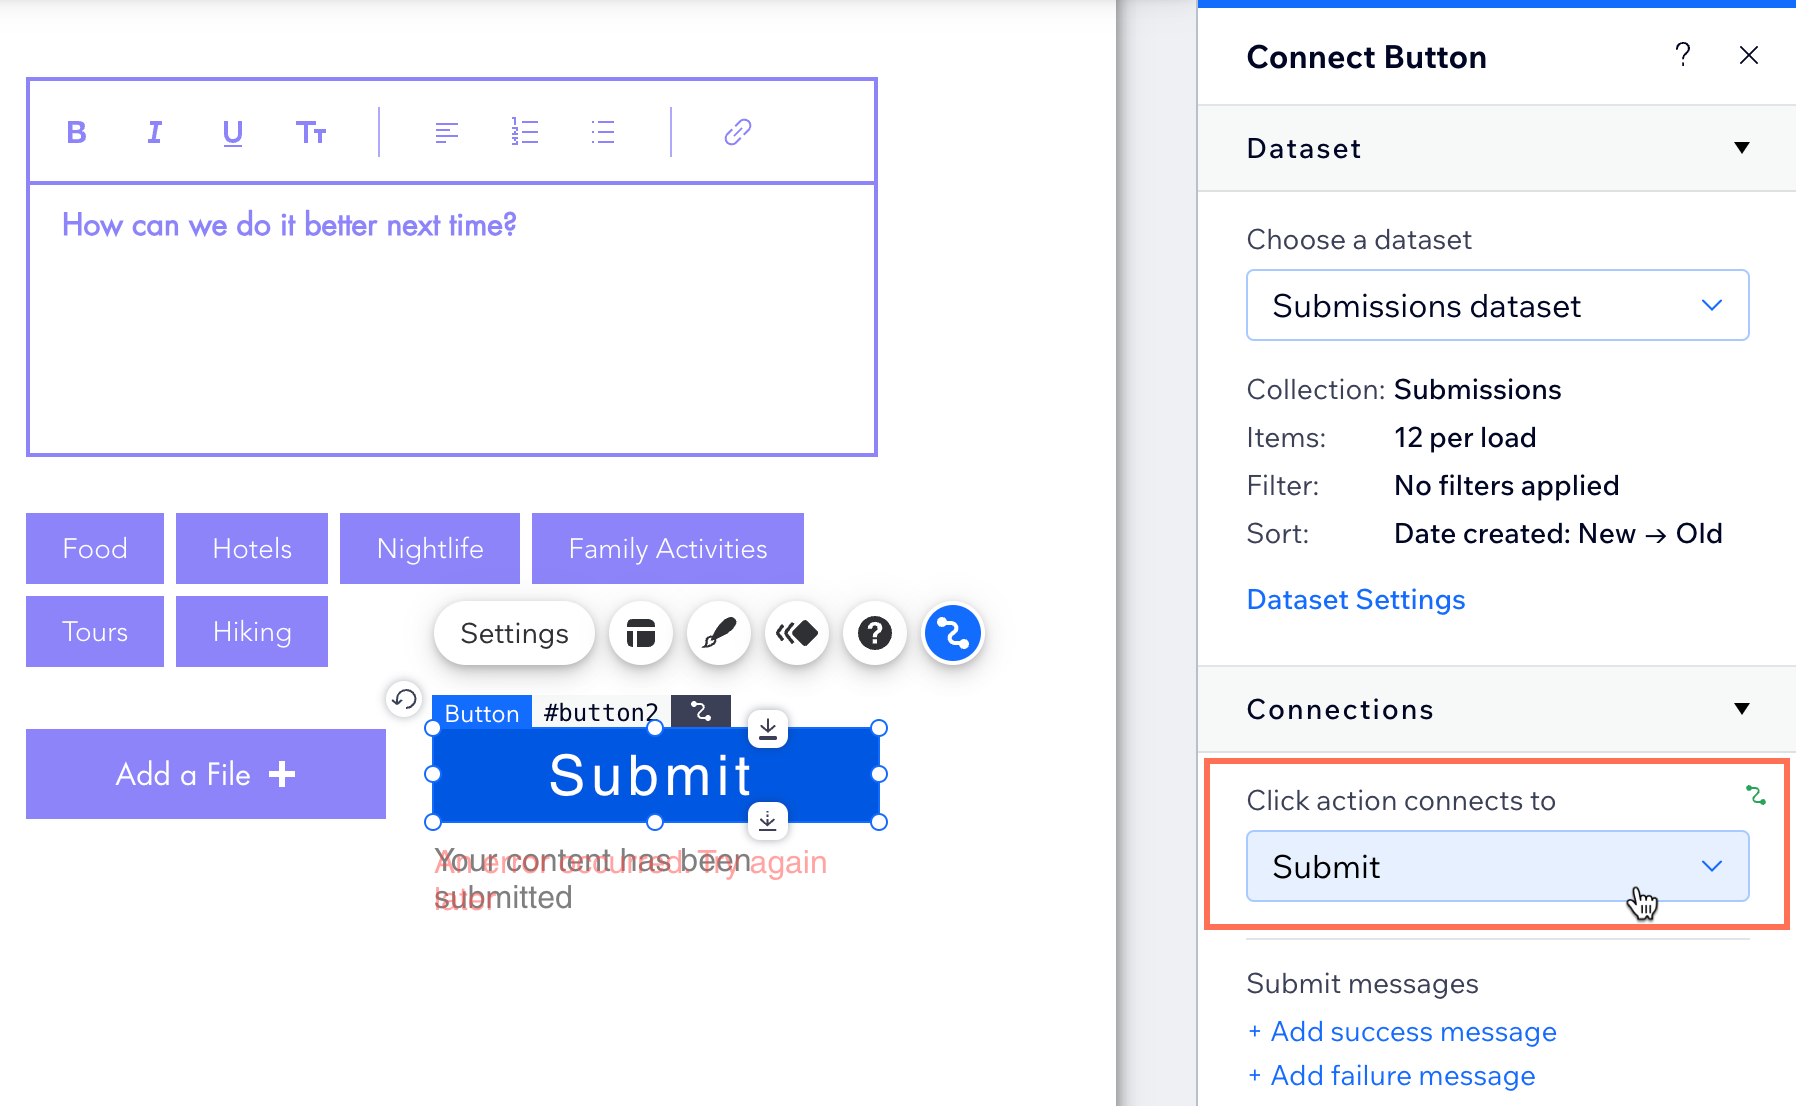
When connecting a button or image to a dataset, choose what action occurs when visitors click the element. The list of available actions varies depending on the dataset mode and whether you connect to a regular dataset or a dynamic page dataset. Learn more about all the available dataset click actions below.
Editing actions
Use dataset editing actions to create custom CMS forms that are built with input elements that submit to your collection. These actions include 'Submit', 'New', 'Revert', and 'Delete'. View details about each dataset editing action below:
Submit
Use the 'Submit' click action to save information to your collection that visitors provide in input elements.
Learn how to create a custom form using input elements that saves to your CMS collection.
Notes:
- Set the dataset mode to Write or Read & Write to allow visitors to submit new items or update existing items. If the dataset mode is set to:
- Write: The 'Submit' action adds the input values to a new item in your collection.
- Read & Write: The 'Submit' action updates the input values of the existing collection item that is being read by the dataset.
- Set the collection permissions to Collect content or Advanced to allow visitors to add content to your collection.
New
Use the 'New' click action to submit values from the dataset's connected input elements to your collection and then reset the inputs so they can accept new values.
Set the dataset mode to Read & Write to use the 'New' action to either add new items or update existing items in your collection. In this mode, the inputs display the current values of an existing item. If you edit these values and click 'New', the updated values replace the existing item's values. After this, the inputs reset. If you fill them out again and click 'New', the input values create a new item in your collection.
Learn more about managing collection content from your live site.
Notes:
- Set the dataset mode to Read & Write to allow visitors to use 'New' buttons.
- Set the collection permissions to Collect content or Advanced to allow visitors to add or update content in your collection.
Revert
Use the 'Revert' action to let visitors click to undo any selections or edits they've made to the input elements. The 'Revert' action resets the values of the dataset's connected input elements that have not yet been submitted to your collection. This is a great way for visitors quickly reset their custom CMS form selections and start over from scratch filling out the form.
Notes:
- Set the dataset mode to Write or Read & Write to allow visitors to use 'Revert' buttons to reset inputs that submit to your collection.
- Set the collection permissions to Collect content or Advanced so the input elements that connect to the same dataset as your 'Revert' button can submit to your collection.
- If you want to give visitors a way to reset input elements that are set to filter content, use the 'Reset input values' action instead.
Delete
Use the 'Delete' click action to delete existing items from the dataset's connected collection. When visitors click the 'Delete' button, the item that is read by the dataset is deleted from your collection.
Notes:
- Set the dataset mode to Read & Write to use this 'Delete' action. The dataset needs to be able to first read the collection item in order to then delete it.
- Set the collection permissions to Advanced and select the Delete checkbox next to the relevant roles.
- You can restore deleted collection items with CMS backups.
List actions
Use dataset list actions to create buttons that interact with other elements that connect to the dataset and read from your collection. These actions include 'Load more', Apply filters', 'Reset input values', 'Next item' and 'Previous item'. View details about each dataset list action below:
Load more
Use the 'Load more' click action to cause the dataset's connected repeater or gallery to load an additional batch of items. The maximum number of items that can load in each batch is determined by the 'Items per load' dataset setting. This setting also controls the maximum number of items that initially load in the dataset's connected repeater or gallery.
For example:
Imagine having a repeater connected to a dataset with the 'Items per load' setting set to 4 and the collection containing 10 items. When the page loads, the dataset can only read 4 items per load, so only 4 items initially appear in the repeater. When a visitor clicks a 'Load more' button, the next 4 collection items are read and displayed for a total of 8 items (4+4=8). Clicking 'Load more' again causes the dataset to look for 4 more items. The collection only has 2 more items, so the remaining 2 items load to display all 10 items (4+4+2=10).
Other dataset settings, such as filters and sorts, also apply to the 'Load more' action. So, if you add a filter to exclude items, the dataset does not read these items or display them when visitors click your 'Load more' button. Dataset sort conditions determine the order in which the items load initially, and when visitors click the 'Load more' button.
Notes:
- Set the dataset mode to Read or Read & Write to use the 'Load more' click action. The dataset needs to be able to read your collection in order to display its items.
- You can set the collection permissions to Show content, Collect content, or Advanced. Whichever you choose, make sure to set the 'View' permissions so only the appropriate visitors can view the collection content on your live site.
- The 'Load more' action is only relevant to datasets that connect to repeaters or galleries.
FAQs about the 'Load more' action:
What is the maximum number of items I can load at a time?
Why should I add 'Load more' or 'Previous/Next page' buttons?
How do I create a 'Load more' button?
Why doesn't my pro gallery's 'Load more' button respond to the dataset settings?

Apply filters
When you have input elements that are set to filter content, by default, the filters are applied as soon as a visitor makes a selection. You can change this behavior by using the 'Apply filters' click action. With an 'Apply filters' button, the content is not filtered until visitors click this button. This creates a better experience for visitors if, for example, you want them to set multiple filters before applying them all at once.
Notes:
- Set the dataset mode to Read or Read & Write to use the 'Apply filters' click action. The dataset needs to be able to read your collection in order to display and filter its items.
- You can set the collection permissions to Show content, Collect content, or Advanced. Whichever you choose, make sure to set the 'View' permissions so only the appropriate visitors can view the collection content on your live site.
- The 'Apply filters' action is only relevant when connected to a dataset that also connects to input elements that are set to filter content.
Reset input values
Use the 'Reset input values' action to let visitors click to clear all the selections they've made in input elements that are set to filter content. This is a great way for visitors to clear all the filters they've set in one click. The 'Reset input values' action is similar to the 'Revert' action used for input elements that collect content,
Notes:
- Set the dataset mode to Read or Read & Write to use the 'Reset input values' click action. The dataset needs to be able to read your collection in order to display and filter its items.
- You can set the collection permissions to Show content, Collect content, or Advanced. Whichever you choose, make sure to set the 'View' permissions so only the appropriate visitors can view the collection content on your live site.
- The 'Reset input values' action is only relevant when connected to a dataset that also connects to input elements that are set to filter content.
- If you need to reset the values of input elements that are set to collect content, use the 'Revert' action instead.
Next item / Previous item
Use the 'Next/Previous item' actions to show content from the next or previous item read by the dataset. The order in which the collection items are read is determined by the dataset's sort condition. Dataset filters also apply so the dataset does not load any items that are excluded by the filter.
If you connect input elements that collect content to a Read & Write mode dataset, clicking the 'Next item' button saves the input values to the current collection item before loading the next one. The same applies to the 'Previous item' button, which saves changes before loading the previous item.
Learn how to manage collection content from your live site:
Notes:
- Set the dataset mode to Read or Read & Write to use the 'Next/Previous item' click action. The dataset needs to be able to read your collection to show content from the next or previous items.
- You can set the collection permissions to Show content, Collect content, or Advanced to use the 'Next/Previous item' action.
- The 'Next/Previous item' actions are not relevant for buttons or images that connect to dynamic page datasets:
- On dynamic item pages: Use the 'Next/Previous dynamic page' action instead if you want to take visitors to the next or previous item's version of the page.
- On dynamic list pages: Use the 'Next/Previous page' action instead if you want the connected repeater or gallery to show the next batch or 'page' of items. The Items per load dataset setting determines how many items can appear in each 'page' of items.
- To cycle through the next or previous 'page' of items in a repeater or gallery on a static page, use the 'Next/Previous page' action instead. With repeaters and galleries, the 'Next/Previous item' action only cycles through one item at a time. This makes it appear not to not work until you've clicked enough times to cycle through all the displayed items. Whereas the 'Next/Previous page' action loads an entire new group of items in one click.
Navigation actions
Use dataset navigation actions to create buttons that take visitors to the next or previous dynamic page read by the dataset, or to specific dynamic pages. These actions include 'Next/Previous page' and 'Next/Previous dynamic page'. View details about the dataset navigation actions below:
Next page / Previous page
Use the 'Next/Previous page' actions to cause connected repeaters and galleries to display the next or previous 'page' of items. The dataset's 'Items per load' setting determines how many items are on each 'page'. The dataset's filters and sort conditions determine which items load and the order in which they appear in each 'page'.
For example, if you click a 'Next page' button and the dataset's 'Items per load' setting is "10", the next 10 items read by the dataset load in the repeater or gallery.
These click actions are similar to the 'Load more' action. However, instead of loading additional items, the 'Next/Previous page' actions replace the existing items with a new 'page' of items in the repeater or gallery.
Notes:
- These actions are only relevant to datasets connected to repeaters and galleries.
- These actions are not relevant for dynamic item page datasets used to show only 1 item on the page. Instead, use the 'Next/Previous dynamic page' action to take visitors to the next or previous item's version of the page (at its dynamic URL).
- Set the dataset mode to Read or Read & Write to use the 'Next/Previous page' click actions. The dataset needs to be able to read your collection to show the next/previous 'page' of items.
- You can set the collection permissions to Show content, Collect content, or Advanced with these actions.
Next dynamic page / Previous dynamic page
On a dynamic item page, the 'Next/previous dynamic page' actions take visitors to the next or previous item's version of the page. Each item has a unique dynamic URL for its dynamic item page in which the item displays.
In the dataset settings, the dataset's sort condition determines the order in which the next or previous item's dynamic URL loads. You can add a filter to the dataset to exclude specific item page URLs from loading.
For example, with the 'Next dynamic page' action, if the dataset sorts a 'Number' field type from low to high, the item with the next highest number loads next. If the dataset has a filter that excludes certain items from loading, these excluded items will be skipped and the next available item page loads.
When visitors are viewing the last dynamic item page read by the dataset, the 'Next dynamic page' click action is disabled. This is because there are no more item pages remaining that can load from the dataset. The same concept applies to the 'Previous dynamic page' action. If visitors are on the first item page returned by the dataset, the 'Previous dynamic page' click action is disabled since there are no previous item pages read by the dataset.
The 'Next/Previous dynamic page' actions can also be used by visitors to edit collection content. If you connected input elements to a Read & Write mode dataset, when visitors click the 'Next dynamic page' button, their inputs write to the current collection item before loading the next dynamic item page. The same concept applies to the 'Previous dynamic page' click action, which writes to the collection before loading the previous dynamic item page. Learn more about managing collection content from your live site.
Note:
- These click actions are only available when the dataset mode is set to Read or Read & Write.
- These click actions work with buttons and images on dynamic item pages only. The button or image must be connected to the dynamic item page's connected dataset.
- Set the dataset mode to Read or Read & Write to use the 'Next/Previous dynamic page' click actions. The dataset needs to be able to read your collection to go to the next/previous dynamic page URL.
- You can set the collection permissions to Show content, Collect content, or Advanced with these actions.
Field actions
Connect buttons and images directly to the following collection field types: Audio, Document, Email, Image, Video, and URL.
What happens when visitors click these buttons depends on the connected field type:
- Email: Opens the visitor's default email client (like Mail or Outlook) so they can send a message to the address stored in the item.
- URL, Document, Audio, Video: A new tab opens and the file loads.
When connecting a URL field, you can choose to open the URL in the current window as well as set rel values for improved SEO.
Wix Stores actions
Use the dataset 'Stores/Products Actions' to create buttons that interact with your Wix Stores products. To use these dataset actions, make sure to enable Wix App Collections in your CMS advanced settings. View the available dataset 'Stores/Products Actions' below:
View full tutorials about:
Add to cart
Use the 'Add to cart' action to give visitors a way to add products to their shopping cart from a repeater displaying your products.
Note:
This click action is available if you have Wix App Collections enabled, Wix Stores products, and the dataset connects to the Products Wix App collection.
Open quick view
If you have a repeater displaying your Wix Stores products, use the 'Open quick view' action to let visitors view products in the quick view window. From there, visitors can read more about the product and add it to their cart.
Note:
This click action is available if you have Wix App Collections enabled, Wix Stores products, and the dataset connects to the Products Wix App collection.
Pricing Plans actions
Use the dataset 'PaidPlans/Plans Actions' to create separate buttons visitors can use to select a plan and go to checkout. To use these dataset actions, make sure to enable Wix App Collections in your CMS advanced settings.
You can connect buttons and images to the following Pricing Plans dataset actions:
- Select plan: When clicked, this action adds the relevant plan to the cart.
- Navigate to checkout: When clicked, this action takes the visitor to checkout.
Note:
This click action is available if you have Wix App Collections enabled, plans created in Wix Pricing Plans, and the dataset connects to the Plans Wix App collection.
