

CMS: Displaying Your Wix Stores Products on Any Page
9 min
In this article
- Step 1 | Add a pro gallery, repeater, or table to a page
- Step 2 | Connect your gallery, repeater or table to the CMS
- Step 3 | (Optional) Manage the dataset settings
- Step 4 | (Optional) Let customers filter products
- Step 5 | (Optional) Add 'Load More' or navigational buttons
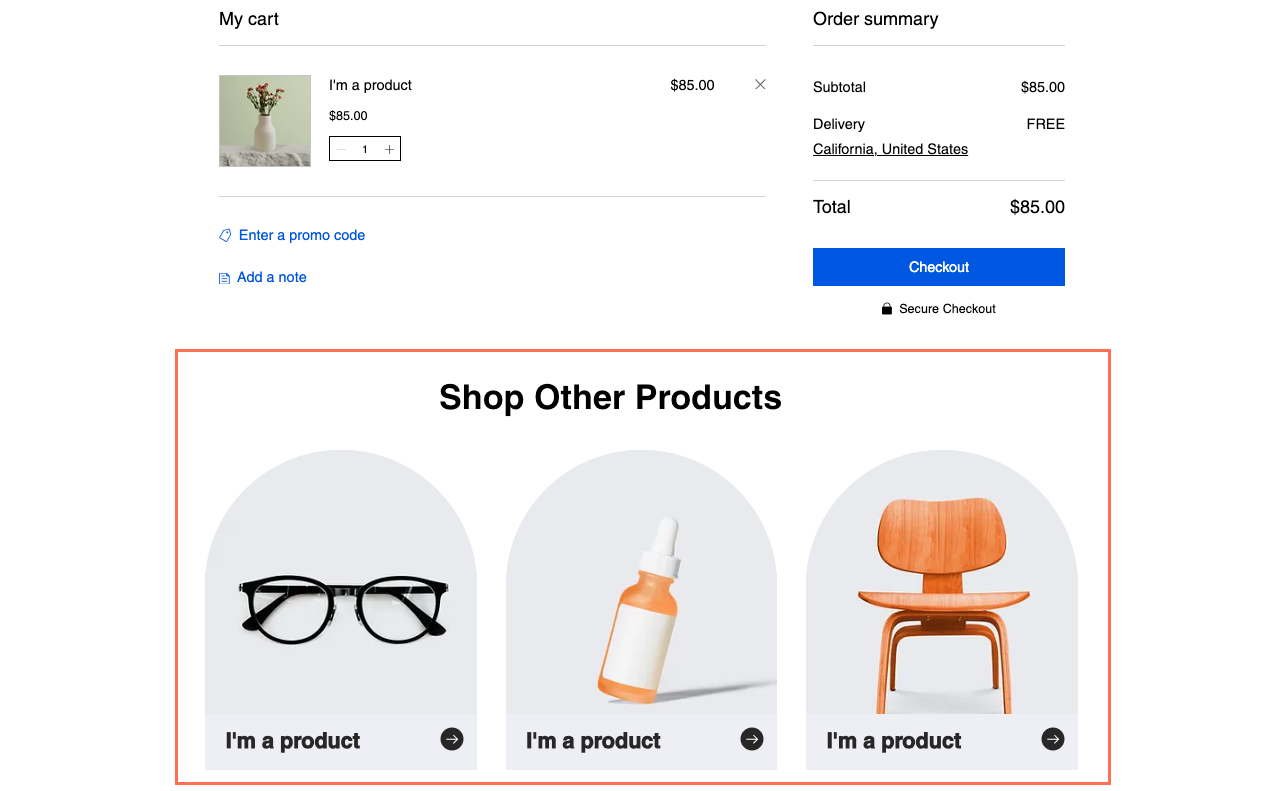
Showcase your Wix Stores products in a gallery, repeater, or table on any page such as your Home or Cart page. The CMS (Content Management System) allows you to dynamically link the buttons, images, or table columns to your Product page. Customers can click to navigate to the Product page where they can learn more before deciding to purchase.
You can also link buttons, images, and columns to the 'Add to Cart' action or the Quick View window. Use the settings in the dataset that binds your products to the page elements to filter, sort, or limit the total products displayed.
Before you begin:
- Create your own products in Wix Stores.
- Make sure to add the CMS to your site if you haven't already.
- Enable Wix app collections so you can use Wix Stores with the CMS.
Step 1 | Add a pro gallery, repeater, or table to a page
Go to the page in your editor where you want to display your Wix Stores products. If needed, you can add a new page. Then add the element you want to display your products in.
Wix Editor
Studio Editor
- Go to your editor.
- Go to the page or section where you want to display your Wix Stores products.
- Click Add Elements
 on the left side of the editor.
 - Add a pro gallery, repeater, or table:
- Pro gallery: Display your products in a gallery:
- Click Gallery.
- Click and drag the pro gallery of your choice onto the page.
- Remove the default images from the gallery:
- Click the gallery and select Manage Media.
- Click Select All then click Delete.
- Click Done.
- Repeater: Display your products using multiple elements attached to a repeater:
- Click List.
- Click and drag the repeater of your choice onto the page.
- Make sure your repeater has an image or button so you can link it to your Product page later. You can add or remove elements from your repeater. If necessary, you can resize the repeater so it can fit all the elements you need inside it.
- Table: Display your products in a table format:
- Click List.
- Click Tables and drag the table of your choice onto the page.
- Pro gallery: Display your products in a gallery:
Step 2 | Connect your gallery, repeater or table to the CMS
Connect the collection fields to your repeater, gallery or table. The values from these dynamic fields change on your live site depending on the product retrieved by the dataset.
Wix Editor
Studio Editor
- In your editor, click the repeater, gallery, or table on added.
- Click the Connect to CMS icon
 .
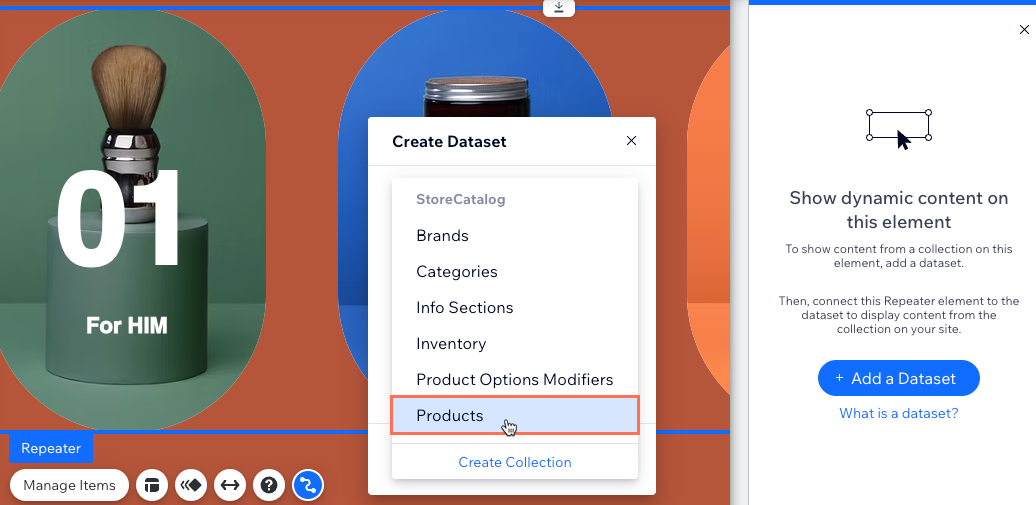
. - Click Add a Dataset. If you already have a dataset on your page, click the Choose a dataset drop-down and select Add a Dataset.
- Click the Choose a collection drop-down and select Products under the StoreCatalog or Stores Wix app collection.
For developers:
- If you have the StoreCatalog Wix app collection, your site uses the Wix Stores Catalog V3.
- If you have the Stores Wix app collection, your site uses the Wix Stores Catalog V1.
- (Optional) Click the Dataset name field and enter a name for the dataset.
- Click Create.
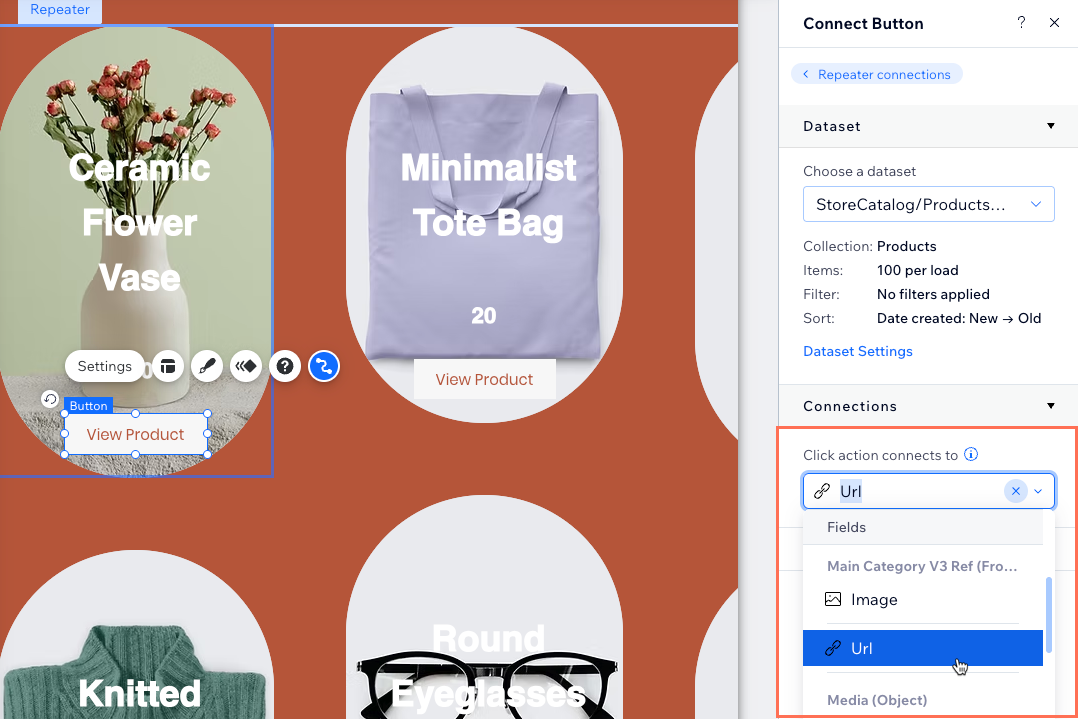
- (Repeaters only) Under Connections, click the repeater element you want to connect (e.g. text, button, image).
- Click the relevant drop-down menus and choose which Wix Stores fields connect to each part of the element.
Tip: You can link to the URL (Wix Stores Catalog V3) or Page URL (Wix Stores Catalog V1) field to give customers a way to click to go to the relevant Stores Product page.
- (Repeaters only) Click Repeater connections and repeat steps 7-8 above to connect additional elements in the repeater.
- Click to adjust your repeater elements, pro gallery or table as needed.
Tip: You can add or remove elements from your repeater at any time. Disconnect elements if you want to use static content that doesn't change according to the relevant category. - Click Preview to test the functionality.
- Click Publish if you are ready to make the changes go live.
Step 3 | (Optional) Manage the dataset settings
In your dataset settings, you can choose the maximum products that can display at a time. You can add filters to include specific products or use sort conditions to control the order.
Note:
The Items per load field does not apply to tables. If using a table to list products, you can limit the number of items displayed by clicking the Layout icon  . Then, set a custom table height and enable pagination.
. Then, set a custom table height and enable pagination. Wix Editor
Studio Editor
- Go to the dataset settings:
- Click CMS
 on the left.
 - Click Manage Page Connections.
- Click the More Actions icon
 next to the relevant dataset and select Dataset settings.
- Click CMS
- (Optional) Click the permission type next to Permissions to determine who can view, add, update, or delete collection content on your live site.
- Edit the Items per load field to set the maximum number of items that can load at a time.
Note: This is also the maximum number of items that can load when visitors click 'Load More' buttons, 'Next/Previous page' buttons, or pagination bars. See the next section for steps. - (Optional) Click + Add Filter to only show specific products in the element.
- (Optional) Click + Add Sort to choose the order in which the products appear in the element.
- Click Preview to test the functionality.
- Click Publish if you are ready to make the changes go live.
Step 4 | (Optional) Let customers filter products
Give shoppers a way to view only products that match filters they apply such as price, inventory, or brand. Choose from any of the following input elements that allow filtering: radio buttons, checkboxes, dropdowns, selection tags, or sliders (range sliders only).
Learn how to set up input elements that allow visitors to filter collection content.

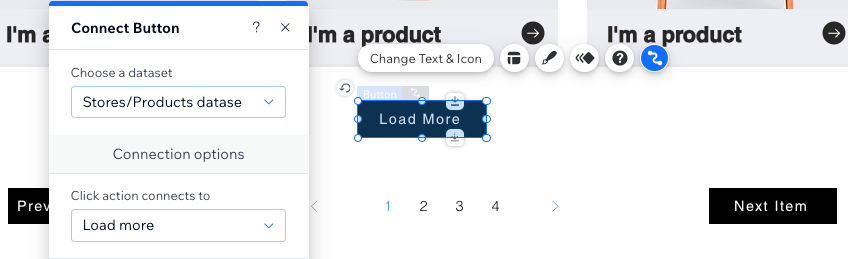
Step 5 | (Optional) Add 'Load More' or navigational buttons
Improve your page's performance by limiting the number of products that appear and adding a 'Load More' button.
You can add navigational buttons to let shoppers click to view the next/previous items displayed or add a pagination bar for cycling through a set number of products at a time.
Tip:
Learn more about the CMS dataset actions you can apply to buttons and images.
