

Wix Bookings POS: Accepting Payment for Booked Services at a Mobile Point of Sale
9 min
In this article
- Accepting payment for booked sessions at a POS
- FAQs
Important:
Wix Mobile POS allows you to make sales from your phone while on the go. To process payments in a physical store, learn more about Wix POS Register.
Make your phone a point of sale so you can accept payment for services that have already been booked. You can accept payment for multiple sessions, as well as add store items to the sale. You can also add a custom charge, discount, or tip to the sale.
Tip:
You can also book new sessions and accept payment for them using your mobile POS.
Accepting payment for booked sessions at a POS
From the Wix app, select the session your client wants to pay for, then accept payment using your mobile device.
Before you begin:
Make sure you set up your mobile device as a point of sale.
To accept payment for booked services at a mobile POS:
- Go to your site in the Wix app.
- Tap Manage
 at the bottom.
 - Tap Bookings Calendar.
- Select a service from the calendar:
- Appointment:
- Tap to select the relevant date.
- Tap to select the relevant appointment.
- Tap Collect Payment.
- Class or Course:
- Tap to select the relevant class or course.
- Tap Manage Participants.
- Tap to select the relevant participant.
- Appointment:
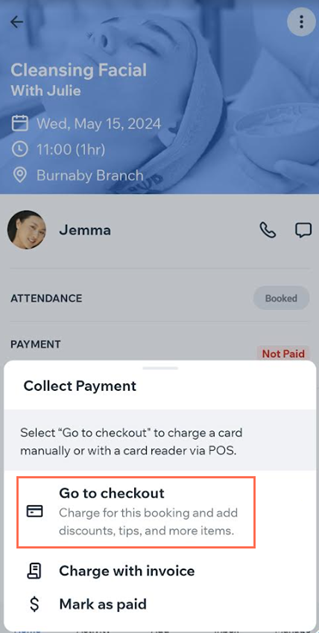
- Select an option:
- Go to checkout: Select this option to collect cash, card, tap-to-pay, or gift card payment. You can also add discounts, tips, coupons, or a custom charge to the sale. If you sell Wix Stores products, you can add products to the sale as well.
- Charge with invoice: Issue an invoice requesting payment for the session.
- Mark as paid: Accept payment offline and mark the session as paid.
- If you selected Go to checkout:
- (Optional) Tap Add More Items to add additional products or services to the order.
- (Optional) Tap Add Custom Charge to add a custom amount to the order.
- (Optional) Tap Add a Discount to add a price reduction.
- Tap Charge.
- Choose how you want to accept payment:
Cash
Card
Manual card entry
(US and UK only) Tap to Pay
Charge with pay link
Gift card
Split payment
 and then Mark as Partially Paid to collect the 2nd payment later.
Save order and charge later
FAQs
Click a question below to learn more about selling services at a mobile POS.
What payment method do I need to connect to be able to process card payments?
Are there limitations to what I can do with Mobile POS?
Can I collect tips from clients?
 at the bottom.
How can I send (or resend) my client a receipt at a later date?
 at the top right.
Can I customize receipts?
Are there other Mobile POS options available for Wix Bookings?
Can I offer a refund for a payment made at a point of sale?
