Create and schedule new class services on the go using the Wix app. Classes are recurring services with sessions that clients can book, like a weekly yoga class. You have the flexibility to offer the same class with different instructors or duration, and make classes part of a pricing plan as well.
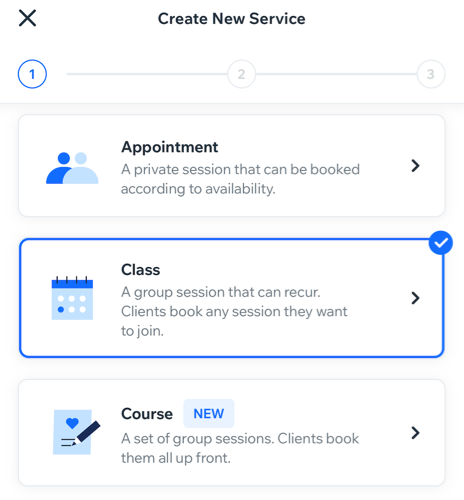
Step 1 | Create a class in the Wix app
Create a new service and choose 'Class' to get started.
- Go to your site in the Wix app.
- Tap Manage
 at the bottom.
 - Tap Booking Services, or tap Catalog and select Booking Services.
- Tap + Create New Service at the bottom.
- Tap Class.
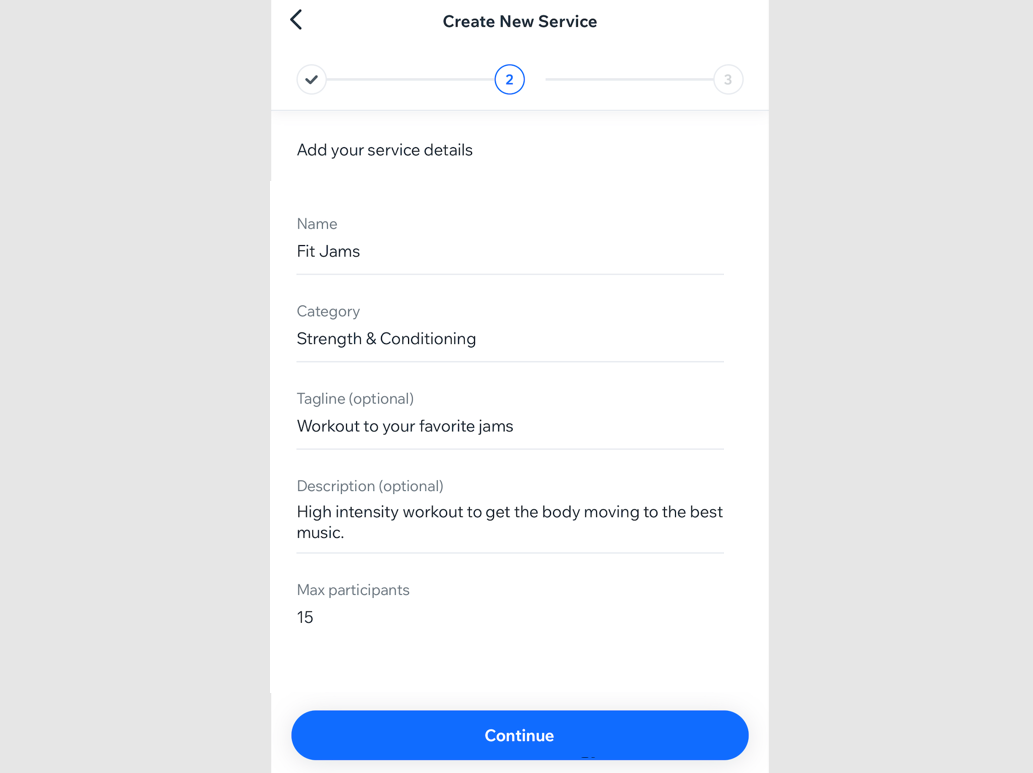
Step 2 | Fill out your service details
Add information about what clients can expect from the class. Include a detailed description to give clients a clearer idea of what you have to offer. You can also set the maximum number of participants that can join the class.
To fill out your service details:
- Add your service details:
- Name: Enter a name for the class.
- Category: Select a category from the drop-down menu (if you created categories).
- Tagline (optional): Enter a tagline that will appear below the service name on your app.
- Description (optional): Enter a description that will appear on the service page of your app.
- Max participants: Set the maximum number of participants that can book your service.
- Tap Continue.
Step 3 | Set your price and payment details
Make your pricing clear and easy to understand. Choose how clients can pay for classes, per session, with a plan, or have both options. You can choose to set a fixed price, offer a customized price, or provide the service for free. You can also set varied prices from your desktop.
To set your price and payment details per session:
- Choose how you want your clients to pay for the service:
Let your clients pay for their class based on the price you set.
- Tap Per session.
- Tap the Price type drop-down and select how you want to charge your client per session:
- Fixed price: You charge a set price for the class:
- Tap Amount and enter the price.
- Choose how clients pay from the Payment preferences drop-down:
- Entire amount online: Only accept online payments for the class.
- Entire amount in person: Only accept in-person payments (before or after the class).
- Entire amount either online or in person: Allow clients to choose whether they pay online or in person.
- Online deposit and the rest in person: Accept an online deposit for the class and have clients pay the rest in person. Add the deposit amount that clients need to pay online.
- Free: Offer the service free of charge. No price will be displayed for this service.
- Varied Prices: Go to your Wix account on desktop to add varied prices to your class. You can charge different rates for classes depending on the staff member, client type, service type and more.
- Custom price: Enter a short description of your pricing (up to 20 characters). The description appears on your site.
Note: This means clients can't pay you online.
2. Tap Create service.
Clients can buy a membership or package and use it to book a session.
- Tap With a plan.
- Tap Connect Pricing Plans to connect to an existing plan.
Note: If you do not have any pricing plans connected, tap + Create new plan to connect a Package or Membership. - Enable the toggle next to the relevant plans or tap + Create new plan.
- Tap Done.
- Tap Create service.
Per session or with a plan
Let your clients choose how to pay for the class. They can pay per session or with a pricing plan they've purchased.
- Tap Per session or with a plan.
- Follow the steps from the Per session and With a plan section above.
- Tap Create Service.
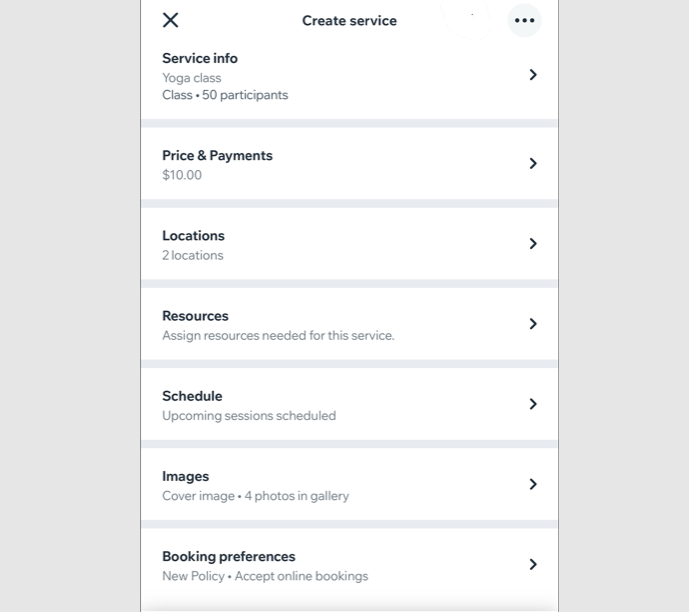
Step 4 | Edit or add additional service details
Finalize your service details by adding images, selecting your service location, and assigning resources. By default, the class is automatically shown on your service list, but you can choose to hide it until you’re ready to take bookings.
To edit or add additional service details:
- Choose what you want to edit or add:
Add an image for clients to see when they look through your list of services.
- Tap Add Photo.
- Select an image for clients to see when they look through your list of services.
- (Optional) Tap Edit to make any changes. Then tap Save.
Note: You can't edit photos added from Free by Wix. - Tap Next.
Edit any of your existing class details, like its name, category or max participants.
Edit how you want clients to be able to pay for the class and edit any payment details.
Display where you offer the class, for example, at your business location(s) or you only offer the class online. You can add the option to meet online with a video link.
- Tap Locations.
- Choose where your clients receive this service:
- Business location: Tap the Choose locations drop-down and select the checkboxes next to the location(s) you provide this service.
Note: You can add a new business location on your desktop. - Custom location: Enter a description of the location in the field (e.g. online meeting).
- Enable the Video conferencing toggle to offer this service online.
Note: Make any changes or set up and add video conferencing from your desktop.
- Tap Save.
Tap the checkboxes to select the available resources for this service. You can create
new resources on your desktop.
- Tap Resources.
- Tap the checkboxes next to any of the relevant resources.
- Tap Save.
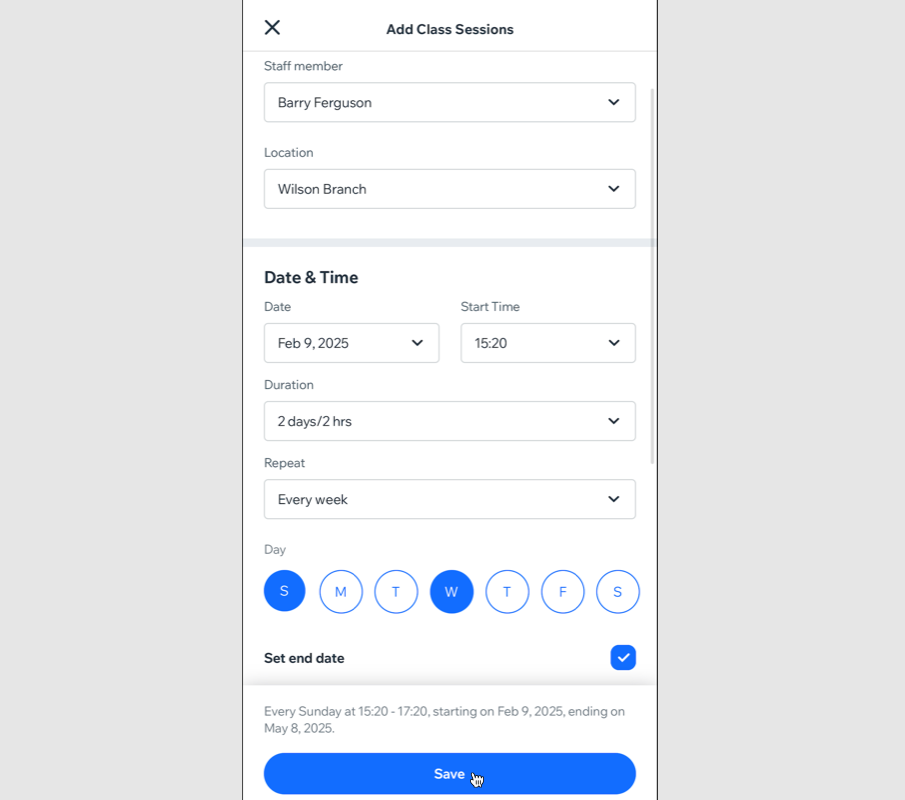
Schedule the class, set how often it repeats (e.g. every 2 weeks), assign an instructor, and more. You can edit the schedule later or add the same class at different times with unique details, like a yoga class on Monday mornings with one instructor and Thursday nights with another.
To schedule class sessions:
- Tap Schedule.
- Tap Add Sessions.
- Tap the Staff Member drop-down and select the staff member leading the class.
- Tap the date, time, and duration of the class to set the Date & time of the class. Then choose how often you want the class to repeat:
- Tap the Repeat drop-down to select how often you want to offer this class session:
- Select the relevant option from the drop-down: Every week, Every 2, 3 or 4 weeks. Note: Tap Don't repeat if the class doesn't repeat.
- Select the day(s) of the week the class takes place.
- (Optional) Tap the Set end date checkbox and choose the date of the last class.
- Tap Save.
- (Optional) On the Upcoming Sessions page, review the session details and choose what you want to do next:
- Edit the upcoming sessions: Tap the More Actions icon
 next to a session and select an option:
- Edit Sessions: Edit all future sessions or just this session. To notify the client, select the Notify client by email checkbox. Tap Save when you're done.
- Cancel Sessions: Cancel all future sessions or just this session. To notify the client, select the Notify client by email checkbox. Tap Cancel Sessions to confirm.
- Add more sessions: Tap + Add more sessions to schedule additional sessions.
- Tap Done.
Add a cover image that clients see at the top of your service page. You can also add a gallery to showcase your service anywhere on your service page.
- Tap Images.
- Choose what you want to edit:
- Cover image: Tap Add Image and select an image for the background of your service's header
- Gallery: Tap the Add icon
 and select the photos you want to add to a gallery for your service page. Then, tap Next.
- Tap Save.
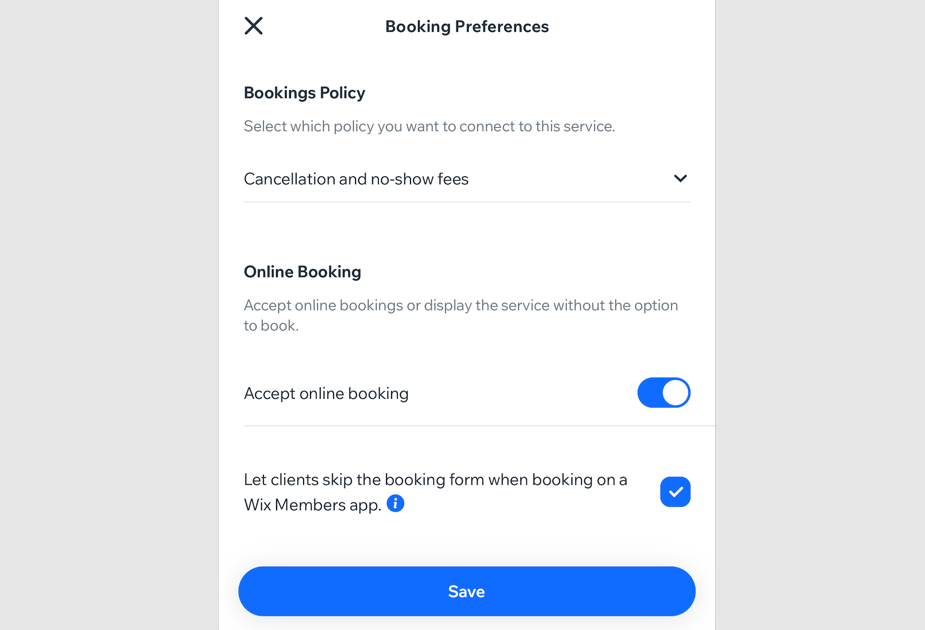
Add a booking policy or make the class view-only if you want clients to contact you for a consultation before booking.
- Tap Booking preferences.
- Choose what you want to update:
- Booking Policy: Tap the drop-down and select a policy for your class. Read more about creating new policies from your Wix app.
- Online Booking: Toggle Accept online booking to enable or disable online bookings.
- Let clients skip the booking form when booking on a Wix Members app: Tap the checkbox to allow clients to skip the booking form and book a class with one tap.
Note: Booking forms can only be created or added from your desktop. Read more about booking forms.
- Tap Save.
Frequently Asked Questions (FAQs)
Click a question below to learn more about classes on the Wix app and member apps.
Can my members make group bookings for classes?
Yes. Through their Wix member apps, your members can add multiple participants to their class sessions. When they go to book a class session, they can tap the Number of participants drop-down and select their group size. Members then proceed to checkout and select the relevant payment option.
How can I share my service?
You can share your service right after creating it. Tap the
More Actions icon

at the top right of the 'Create service' page. Then tap
Share service. Learn more about
promoting your service on the Wix app.
How do I show or hide services on the Wix app?
You can show or hide services from the Wix app by going to the relevant service form and selecting the show/hide option.
- Go to your site in the Wix app.
- Tap Manage at the bottom.
- Tap Booking Services, or tap Catalog and select Booking Services.
- Tap the More Actions icon next to the relevant service.
- Tap Hide from your site.
How can I delete a service I no longer offer?
- Go to your site in the Wix app.
- Tap Manage at the bottom.
- Tap Booking Services, or tap Catalog and select Booking Services.
- Tap the More Actions icon next to the relevant service.
- Tap Delete service.
- Tap the I understand that deleted items can't be recovered checkbox.
- Tap Yes, Delete.
How can I duplicate a service?
- Go to your site in the Wix app.
- Tap Manage at the bottom.
- Tap Booking Services, or tap Catalog and select Booking Services.
- Tap the More Actions icon next to the relevant service.
- Tap Duplicate.
Note: The duplicated service will be called "Copy of (service name)". You can tap the service to make any edits.
Can members make group bookings with pricing plans? What about classes with different price options?
Yes, your members can make group bookings and pay with their pricing plans.
Members can also make group bookings with different price options (e.g. 2 adults at $40 each and 2 children at $30 each). They then proceed to checkout and pay using their pricing plans or online payment method.
Note: The number of available slots remaining in the class session appears at the top.
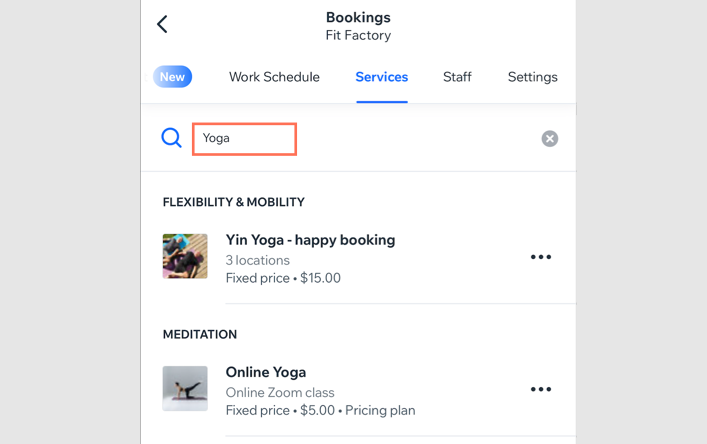
How can I quickly find a service on my services screen?
Use the search bar at the top of the screen to quickly find the service you are looking for.
Can I create multi-day classes on the Wix app?
Yes, to create multi-day classes:
- Follow the steps in the section above to create a class and add sessions.
- In the Time & Duration section, tap the Duration drop-down and select the session duration to cover multiple days (up to 99 hours).
Tips:
- Make sure to edit the hours for the staff providing this service so they are available 24 hours a day on the relevant days.
- To run a similar service in future that starts on another date, simply duplicate the event you created and set a new start date.
Can I create courses and appointments through the Wix app?