

Wix Bookings: Creating Courses Using the Wix App
9 min
In this article
- Step 1 | Create a course in the Wix app
- Step 2 | Fill out your service details
- Step 3 | Set your price and payment details
- Step 4 | Edit or add additional service details
- Frequently Asked Questions (FAQs)
Create and manage courses directly from your phone using the Wix app. Courses are perfect for multi-session meetings or one-time group services, allowing you to offer services with multiple sessions and specific start and end dates. For example, you can set up an eight-week beginner photography course, enabling clients to register and pay for all sessions at once. This approach streamlines scheduling and provides a seamless experience for your clients.
Step 1 | Create a course in the Wix app
Start by creating a new service and selecting Course.
Wix app
Wix Studio app
- Go to your site in the Wix app.
- Tap Manage
 at the bottom.
 - Tap Booking Services, or tap Catalog and select Booking Services.
- Tap + Create New Service at the bottom.
- Tap Course.

Step 2 | Fill out your service details
Provide detailed information about your course to set expectations for clients. For example, include a clear description and specify the maximum number of participants.

To fill out your service details:
- Add your service details:
- Name: Enter a name for the course.
- Category: Select a category from the drop-down menu (if you created categories).
- Tagline (optional): Add a tagline that appears below the course name.
- Description (optional): Provide a description that will be displayed on the service page.
- Max participants: Set the maximum number of participants that can book your service.
- Tap Continue.
Step 3 | Set your price and payment details
Choose the price type for your course, whether it's a fixed fee, custom pricing, or free. Additionally, you can set varied prices from your desktop.

To set your price and payment details for the course:
- Tap Per session.
- Tap the Price type drop-down and select how you want to charge your client per course:
- Fixed price: You charge a set price for the course:
- Tap Amount and enter the price.
- From the Payment preferences drop-down, choose how you want to accept payments:
- Entire amount online: Only accept online payments for the course.
- Entire amount in person: Only accept in-person payments (before or after the course starts).
- Entire amount either online or in person: Allow clients to choose whether they pay online or in person.
- Online deposit and the rest in person: Accept an online deposit for the course and have clients pay the rest in person. Add the deposit amount that clients need to pay online.
- Free: Offer the service free of charge. No price will be displayed for this service.
- Varied Prices: Go to your Wix account on desktop to add varied prices to your course. You can charge different rates for courses depending on the client or service type.
- Custom price: Add a brief description of your pricing. The description appears on your site.
Note: Clients cannot pay online with this option.
- Fixed price: You charge a set price for the course:
2. Tap Create Service.
Step 4 | Edit or add additional service details
Add images, select your service location, and schedule sessions to finalize your service details. Decide whether to show the course on your service list or keep it hidden until you're ready to take bookings. To maximize exposure and attract clients quickly, make your service visible right after creating it.
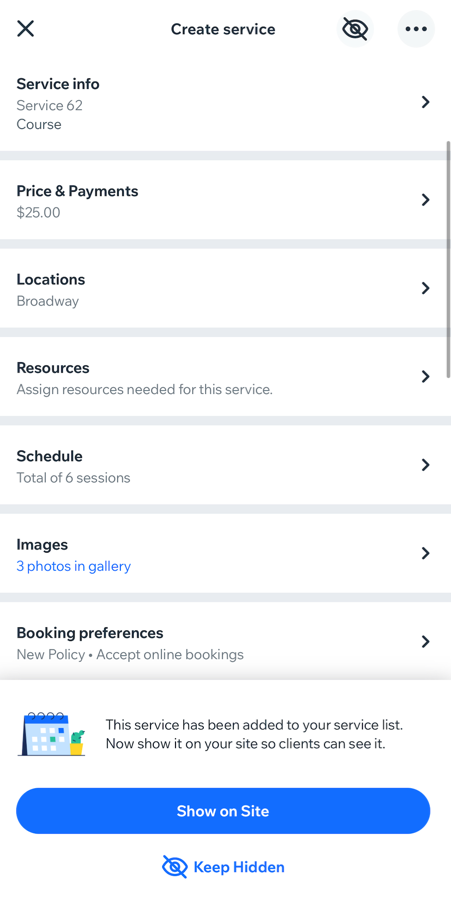
To edit or add additional service details:
- Choose what you want to edit or add:
Add Image
Service Info
Price & payments
Locations

Resources
Schedule
 next to a session and select an option:
Images
 and select the photos you want to add to a gallery for your service page. Then, tap Next.
Booking preferences

2. Tap the Visibility icon at the top when you're ready to show the course on your site.
at the top when you're ready to show the course on your site. 3. Tap Done.
Frequently Asked Questions (FAQs)
Click a question below to learn more about courses on the Wix app.
Can my members make group bookings for courses?

How can I share my service?
 at the top right of the 'Create service' page. Then tap Share service. Learn more about
 How can I delete a service I no longer offer?
How can I duplicate a service?
How can I quickly find a service on my services screen?
Can I create multi-day courses on the Wix app?
Can I create classes and appointments through the Wix app?
