

Studio Editor: Adding and Managing Sections
6 min
In this article
- Adding wireframes and pre-designed sections
- Adding a blank section
- Using cells to organize a section
- Reordering page sections
- Deleting a section
- FAQs
Sections are the building blocks of every page. Use them to keep related content together and make the page look organized, professional and structured.
Add as many sections as you want to each page. You can choose from blank sections, wireframes, or pre-designed sections that are fully customizable. The sections span across the width of the browser, and you can set the height as you wish.
Create global sections:
Make the same section appear on multiple pages by setting it as global.
Adding wireframes and pre-designed sections
We have tons of ready-made and fully responsive sections to speed up your creation process. Just choose the one you want and customize it to your client's style. If you mainly need help with the layout, not so much the design, select one of our blank wireframes instead.
To add a wireframe or pre-designed section:
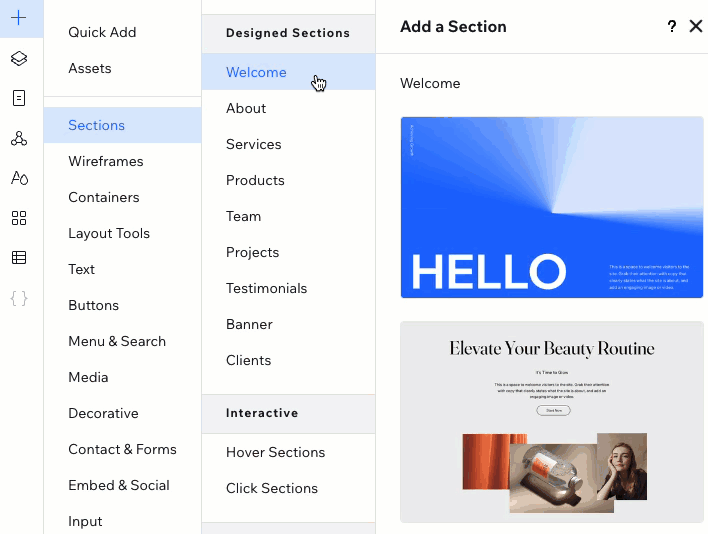
- Click Add Elements
 on the left side of the editor.
 - Click Sections / Wireframes.
- Click a category to see the available designs.
- Drag a section onto the page.
- Customize the section to your needs:
- Click elements to customize their content.
- Change the background.
- Replace images and text to your own.
Adding a blank section
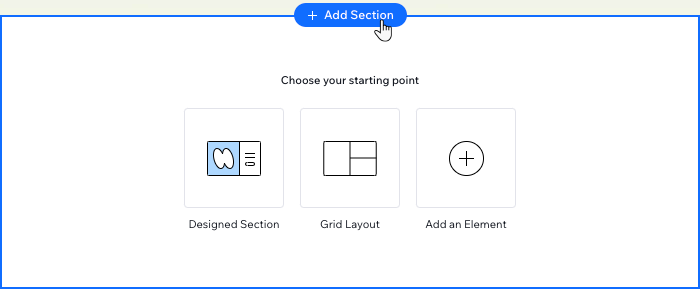
You can quickly add new blank sections while working on the canvas. Hover over the top or bottom of any section and click + Add Section. You can then decide whether you want to design it from scratch, apply a grid layout or use a ready-made design.
To add a blank section:
- Go to the relevant page.
- Hover over the top or bottom of the relevant section and click + Add Section.
- Choose how you want to start designing:
- Designed Section: Choose a pre-designed section and customize it to your client's needs.
- Grid layout: Choose a grid with multiple cells to organize your content.
- Add an Element: Start by adding elements to the blank section.
Save your design for future use:
Select the section in the editor and click the More Actions icon  . Then, click Save as Asset. This saves your design and makes it available in the Add Elements panel (Assets tab).
. Then, click Save as Asset. This saves your design and makes it available in the Add Elements panel (Assets tab).Using cells to organize a section
Add cells to a section to create a responsive, structured layout. Keeping the elements in separate cells ensures they stay in place on all screens. Choose a layout, then move elements to the cells - you can always split the cells or add new ones later.
To apply a grid on a section:
- Select the relevant section in the editor.
- Click the Blank drop-down at the top of the section.

- Choose a layout: Rows, Columns, Collage, etc.
Tip: You can change the layout from the drop-down at any time - it will not move your elements around. - Drag elements to the relevant cells.
- (Optional) Customize the section grid as you wish – add cells, split existing cells, add gaps between cells, etc.
Want to revert to a section with no grid?
Right-click each cell and select Delete.
Reordering page sections
While building your client's site, you may decide that the structure and organization of the content should be slightly different. This is where sections really come in handy; you can move content around very quickly, whenever you want on the canvas.
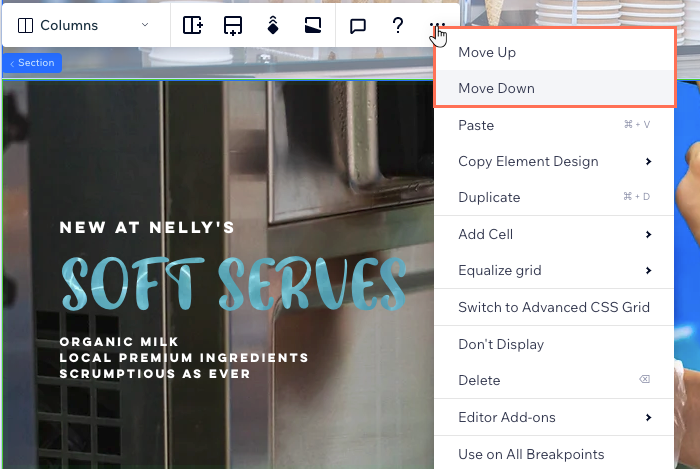
To rearrange sections on the canvas:
- Select the relevant section in the editor.
- Click the More Actions icon on the section.
- Click Move Up or Move Down.
Changed the section order on smaller breakpoints?
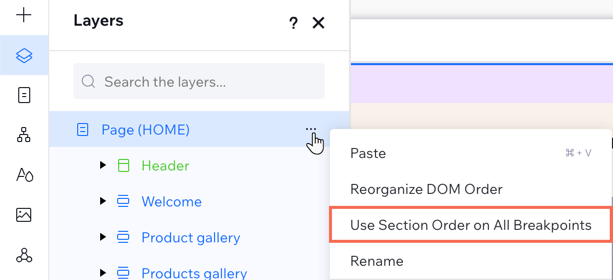
You can always re-apply the order you currently have on desktop. Go to the Layers  panel, click the More Actions icon next to Page and select Use Section Order on All Breakpoints.
panel, click the More Actions icon next to Page and select Use Section Order on All Breakpoints.Deleting a section
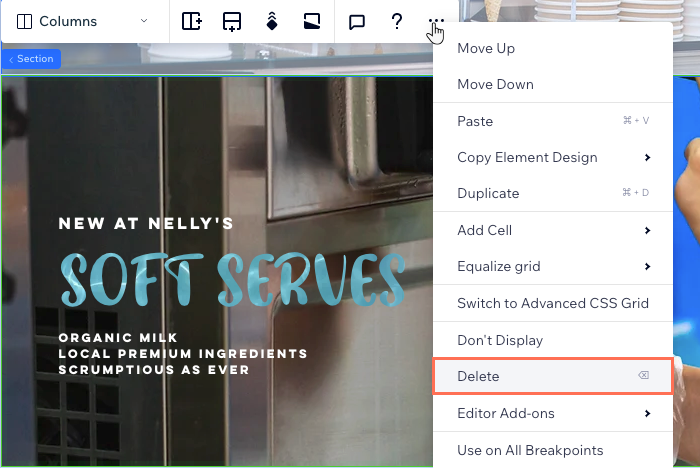
You can delete a section at any time. This deletes the section from the page on all breakpoints.
Note:
It is not possible to delete sections that contain apps such as Stores, Events, Blog etc.
To delete a section:
- Select the relevant section in the editor.
- Click the More Actions icon on the section.
- Click Delete.
Want to hide the section instead?
Click Don't Display to hide the section from the current breakpoint you're on. You can find the hidden section in the Layers panel, where you can also unhide it.
FAQs
Click a question below to learn more.
Can I change the name of sections?
 .
.How do I move a section to another page?
How can I customize a section?
