

Pricing Plans: Creating a One-Time Payment Plan
9 min
In this article
- Step 1 | Create the pricing plan
- Step 2 | Connect benefits to your plan
- Step 3 | Set the price and duration of your plan
- Step 4 | (Optional) Add a custom pricing rule
- Step 5 | Set your plan start date
- Step 6 | Adjust your plan's settings
- Step 7 | (Optional) Enable guest checkout
The Pricing Plans app offers several different types of plans and packages. These include: One-time payment plans, Free plans, and recurring payment plans.
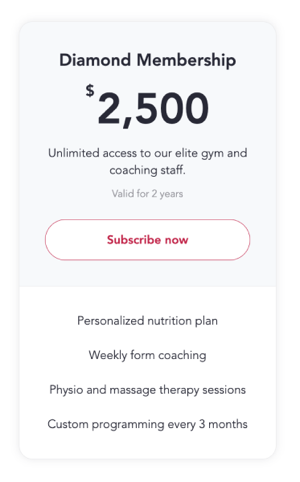
One-time payment plans are a great way to give your regular clients access to exclusive premium services and content, or hidden site pages.
Before you begin:
- Make sure to add the Pricing Plans app to your site.
- To sell plans on your site, you must connect a payment provider. Wix offers a variety of providers for you to choose from.
- You can have up to 75 active pricing plans at the same time.
- Once you create a pricing plan, it is not currently possible to delete it. You can vote for this feature here. You can, however, hide or archive your plans as necessary to create new plans.
Step 1 | Create the pricing plan
One-time plans are a great way to reward your regular clients as they use more of your services. Connect premium services or content to your plans as a way to reward returning clients.
Read an example of how one business used Pricing Plans
To create a pricing plan:
- Go to Pricing Plans in your site's dashboard.
- Click + Create Plan.
- Enter the plan name.
- (Optional) Enter a brief description of the plan.
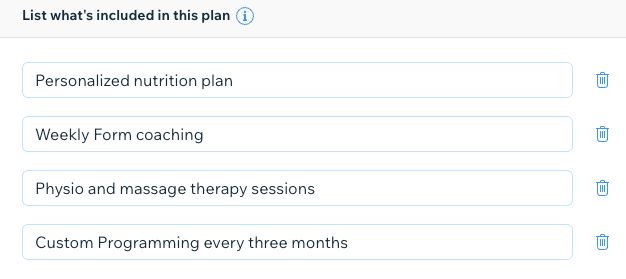
- Add benefits under List what's included in this plan.
Note: What you enter here displays the benefits. It does not connect Wix services or content to the plan.
Step 2 | Connect benefits to your plan
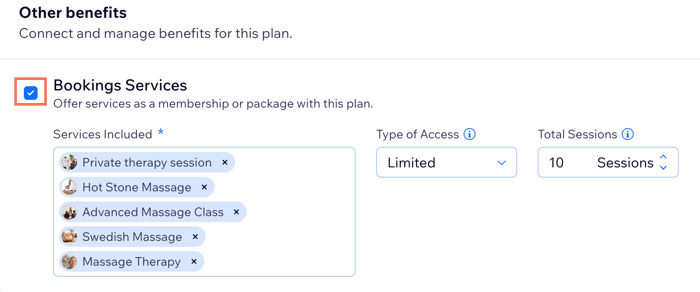
Once you have created your plan and listed the benefits included, you can connect services and content to the plan.
The benefits available to connect to your plan vary according to what you have on your site. For example, if you have Wix Bookings services, you see the option to include them. If you have no relevant content or services, you do not see the Connects & Manage Benefits section.
To connect benefits to your plan:
- Scroll down to Other benefits.
- Select the checkbox next the services or content types you want to include.
- Add the relevant details (e.g. the specific services that are included)
Note:
You can connect site pages only after you finish creating your pricing plan.
Step 3 | Set the price and duration of your plan
Set how you want to charge for your pricing plan and how long it should last. Consider offering a price break to encourage clients to commit to your one-time payment plan.
To set the price and duration of your plan:
- Select One-time payment in the Pricing strategy section.
- Enter the plan Price.
- Select the relevant duration from the Length of plan drop-down. You can select Custom to enter your own duration.
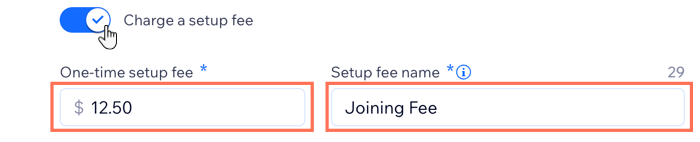
- (Optional) Charge a setup fee:
- Click to enable the Charge a setup fee toggle.
- Enter the amount under One-time setup fee.
- Enter the name for the fee under Setup fee name.
Note: We are in the process of releasing this feature and it's not available to everyone yet.
Note:
It is not possible to change the pricing strategy when there are active subscriptions.
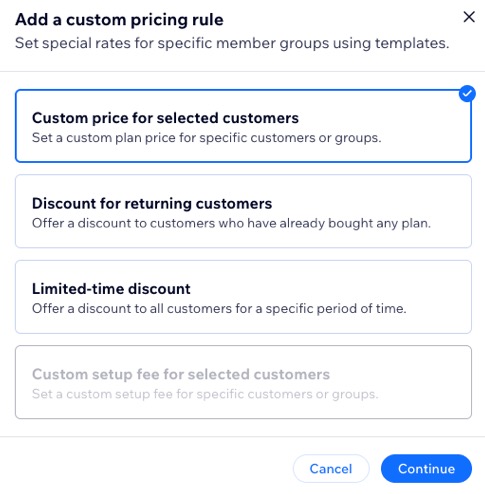
Step 4 | (Optional) Add a custom pricing rule
With custom pricing rules, you can give each customer the price that fits their circumstance. Apply discounts or special rates to specific customers and use templates to create rules per plan.
To add a rule:
- Click + Add Rule.
- Select the relevant option.
- Click Continue.
- Set up the relevant details:
- Custom price for selected customers: Set a custom plan price for specific customers or groups.
- Enter the Member email that contains.
- Enter the Plan price, then click Save.
- Discount for returning customers Offer a discount to customers who have already bought any plan.
- Enter the Discount (%), then click Save.
- Limited-time discount Offer a discount to all customers for a specific period of time.
- Enter the Discount starts after / Discount ends before.
- Enter the Discount (%), then click Save.
- Custom fee for selected customers: Set a custom setup fee for specific customers or groups.
Note: Make sure you enable the Charge a setup fee toggle under Pricing Strategy.- Enter the Member email that contains.
- Enter the Setup fee, then click Save.
- Custom price for selected customers: Set a custom plan price for specific customers or groups.
Step 5 | Set your plan start date
Decide when your pricing plan starts—set a specific date or let customers choose before they check out.
To set your plan start date:
Choose when you want the plan to start:
On a specific date
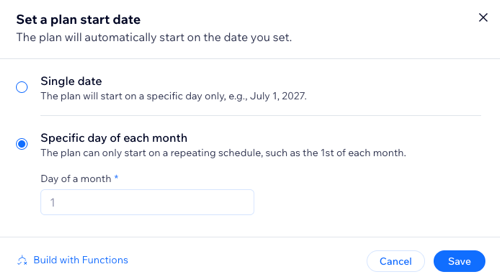
Chosen by customer
Step 6 | Adjust your plan's settings
After entering your plan's details, pricing and benefits, adjust its settings. Make your plan more flexible by letting clients choose their start date or cancel the plan if needed. Create a policy to explain how your plan works and how your clients can get the most value from it.
You can also add custom form fields to collect more info during checkout, and a Thank You page to personalize the experience.
To adjust your plan's settings:
- Scroll down to Settings.
- Choose how you want to adjust your plan's settings:
Limit to a single purchase
Allow plan cancellation
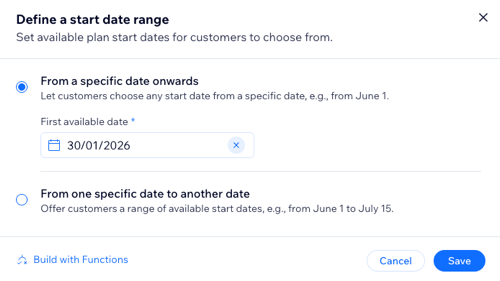
Let clients choose their start date
Add a plan policy
Add custom form fields for clients to fill
Thank you message
3. Click Save at the top to finish creating your plan.
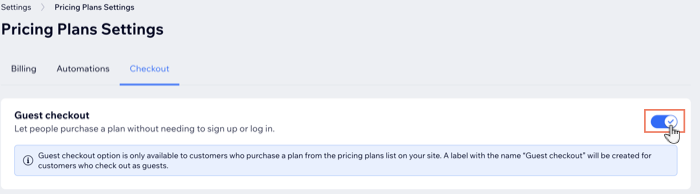
Step 7 | (Optional) Enable guest checkout
You can allow visitors to your site to buy your pricing plans without signing up or logging in, using guest checkout. This is useful if your plans include offline benefits, or if clients don't want to register as a site member. It's also a great way to attract new clients who aren't sure they want to commit right away.
Important:
Guest checkout isn't available for plans that include online content and services. Visitors need to sign up as members of your site to gain access these plan benefits.
To enable guest checkout:
- Go to Settings in your site's dashboard.
- Click Pricing Plans Settings.
- Click the Checkout tab at the top.
- Enable the Guest Checkout toggle at the bottom to let people buy a plan without signing up or logging in to your website.
- Click Save.
What's next?
Promote your new plan with a coupon. Click the More Actions icon  next to your new plan in the Pricing Plans dashboard. Learn more about creating price coupons and percentage coupons.
next to your new plan in the Pricing Plans dashboard. Learn more about creating price coupons and percentage coupons.