

CMS: Adding and Setting Up a Text Input
11 min
In this article
- Step 1 | Add and set up a text input element
- Step 2 | Connect the text input to the CMS
- FAQs
Add a text input, text box or rich text box element to collect responses from your visitors such as an email or phone number. Connect the text element to the relevant collection field and add a 'Submit' button that visitors click to submit the data.
Before you begin:
Make sure to add the CMS (Content Management System) if you haven't already.
Step 1 | Add and set up a text input element
Add a text input that uses a single-line for inputs or a text box that provides a larger area to add multiple lines of text. Then customize the input's settings, layout, and design to match your site's needs.
Wix Editor
Studio Editor
- Click Add Elements
 on the left side of the editor.
 - Click Input.
- Click the type of text input you want to add:
- Text Input: Let visitors enter or edit text in a field with a single line.
- Text Box: Let visitors enter or edit text in a field that allows multiple lines of input.

- Click and drag the text input element of your choice onto the page.
- Click Settings on the input element and edit the following:
- Type: (Text input element only) Select the type of information that the text input allows:
- Text: Allow all character types in the input such as names, addresses, or any other info that does not follow a pattern.
- Password: Conceal all characters entered in the password field.
- Number: Allow only digits in the input.
- Email: Allow email addresses only. If an invalid email address format is entered, a tooltip warns the user.
- URL: Allow web addresses only. If an invalid URL format is entered, a tooltip warns the user.
- Phone Number: Allow all character types in the input.
- Field title: Enter a title that appears above the input element.
- Show initial text: Choose the initial text that displays in the field and enter the placeholder and default text, if needed.
- Validations: Choose from the following options:
- Field type: Select the relevant options:
- Required: Make it mandatory that visitors enter a value in the field before submitting.
- Read only: Set the element to display content only. Visitors cannot edit the values but they can copy them.
- Set character limit: Enable the toggle to limit visitor submissions to a set number of characters, then enter the maximum characters.
- Add pattern validation: (Text input element only) Enable the toggle and enter regex code to add your own pattern validation to the browser's default validation.
- Error message format: Choose how error messages appear: Inline or Tooltip.
- Field type: Select the relevant options:
- Type: (Text input element only) Select the type of information that the text input allows:

- Click the Layout icon
 to edit the indentation, spacing, text direction and alignment.
 - Click the Design icon
 to choose a preset design. Then click Customize Design to adjust the design further.
Step 2 | Connect the text input to the CMS
Connect your text input to a dataset that connects to the collection and the field in which you want to save the submissions. If necessary, adjust the dataset mode and collection permissions. Then, add a 'Submit' button that visitors must click to send their inputs to your collection.
Wix Editor
Studio Editor
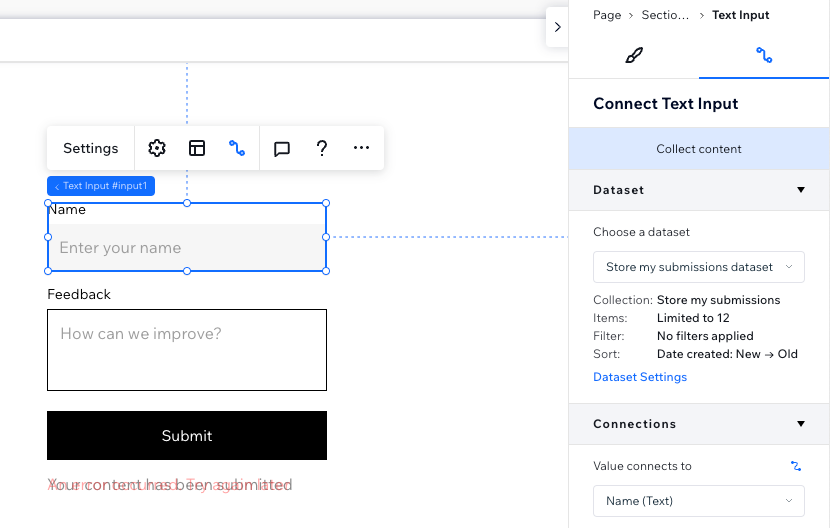
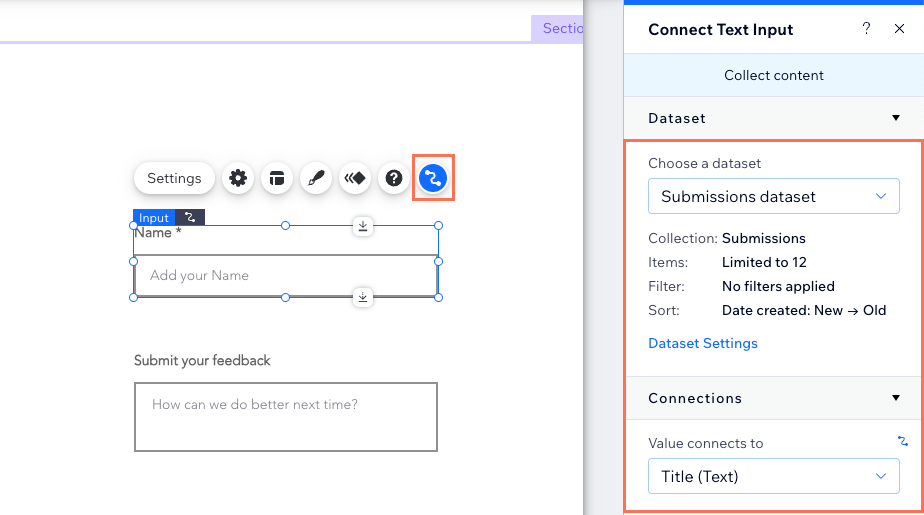
- In your editor, click the relevant text input element.
- Click the Connect to CMS icon
 .
. - Click the Choose a dataset drop-down and select an existing dataset that connects to your collection. Alternatively, click Add a Dataset, then choose the collection you want to connect, give the dataset a name and click Create.
- Click the Value connects to drop-down and choose the collection field in which you want to store the text input submissions.
Tip: Select + Add to add a new collection field for storing the submissions.
- Set the dataset mode and collection permissions:
- Click Dataset Settings in the panel on the right.
- (Optional) Click the permission type next to Permissions to determine who can view, add, update, or delete collection content.
- Click the Dataset mode drop-down and select the relevant option:
- Write: Connected input elements can add new items to the collection, but cannot edit existing items.
- Read & Write: Connected elements can update existing items in the collection. If you connect a 'New' button, visitors can use it to update existing items and add new items to your collection.
- Create a 'Submit' button that visitors click to submit their responses.
FAQs
Click questions below for answers to common questions about the text input element.
Can I use the text input element as a filter or search bar?
Why is my text input field grayed out when visitors try to enter text in it?
How do I troubleshoot form submissions not saving to the CMS collection?
 on each input element and confirm it's properly connected to relevant fields in the dataset. Ensure field types match the
 Can I automate what happens when I receive form submissions?
Can I display form submissions in a table, gallery, or repeater?
How can I allow members to update their own submissions?
How do I connect multiple forms to a single CMS collection?
