

CMS: Displaying Collection Content in a Table
14 min
In this article
- Step 1 | Create a collection
- Step 2 | Add a table to your page
- Step 3 | Connect the table to your CMS collection
- Step 4 | Customize your table
- Step 5 | Manage the dataset settings
- FAQs
Display your CMS (Content Management System) collection content in a table on your site.
When you connect the table to a dataset that binds to your collection, the fields appear as columns and the items appear as rows. By default, supported field types that are set to visible automatically appear in your editor when you connect to the CMS. You can then manage the order of the columns and choose from several settings panels to customize the table's look and behavior.
Step 1 | Create a collection
Create a multiple item collection that you will use to store the content that appears in your table. You can manually add the fields and items or import them from a CSV file.
To create a collection:
- Go to CMS in your site's dashboard. Alternatively, you can click CMS
 in your editor.
 - Click Create Collection.
- Click Start from scratch.
Tip: Alternatively, click Create with AI to let AI (Artificial Intelligence) create a collection for you. - Click Next.
- Enter a name for your collection.
- (Coding only) Enter a collection ID to use in your code.
- Leave Multiple item collection (Default) selected and click Create.
- Add fields to your collection manually or by importing a CSV file:
- Add fields manually: Click + Add Field to begin adding fields to your collection manually.
- Import a CSV file: Click Import CSV file to upload a CSV file to your collection.
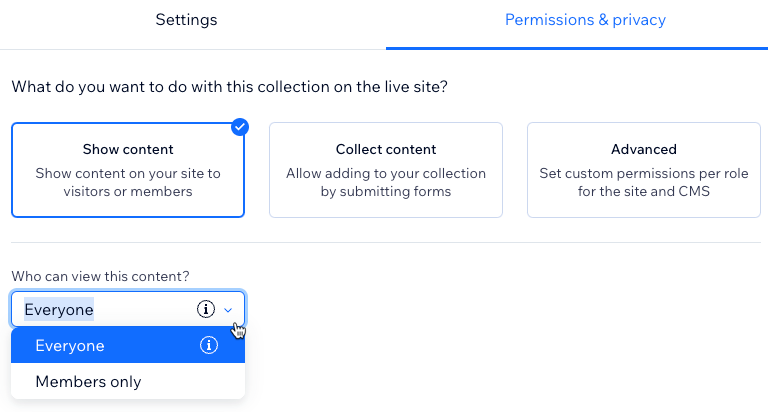
- Set the collection permissions:
- Click More Actions and select Permissions & privacy.
- Choose which permissions you want the collection to have:
- Show content: Allow everyone or only site members to view the collection content on your live site. Admins and collaborators with CMS access always have full access to view, add, update, or delete collection items.
- Collect content: Allow everyone or only site members to add new items to the collection from your live site with input elements or API. Also, specify who can view the content. Admins and collaborators with CMS access always have full access to view, add, update, or delete collection items.
- Advanced: Set custom permissions for each user role to control who can view, add, update, or delete collection content. Admins and collaborators with CMS access have full access. However, you can set permissions for specific collaborator roles to restrict their access to the collection.
- Click Save.
Step 2 | Add a table to your page
Choose from several pre-designed tables to add in your editor. You will connect and fully customize the table later.
Wix Editor
Studio Editor
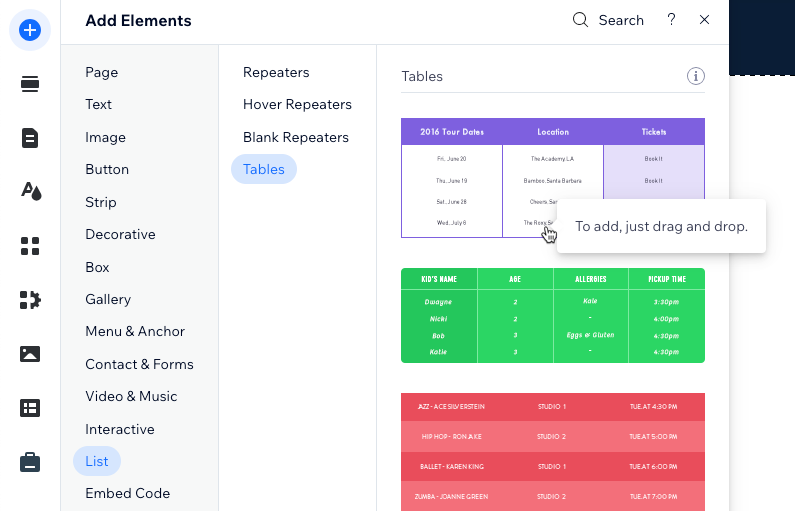
- Go to your editor.
- Click Add Elements
 on the left side of the editor.
 - Click List.
- Click Tables.
- Click and drag the table you want to use onto the page.
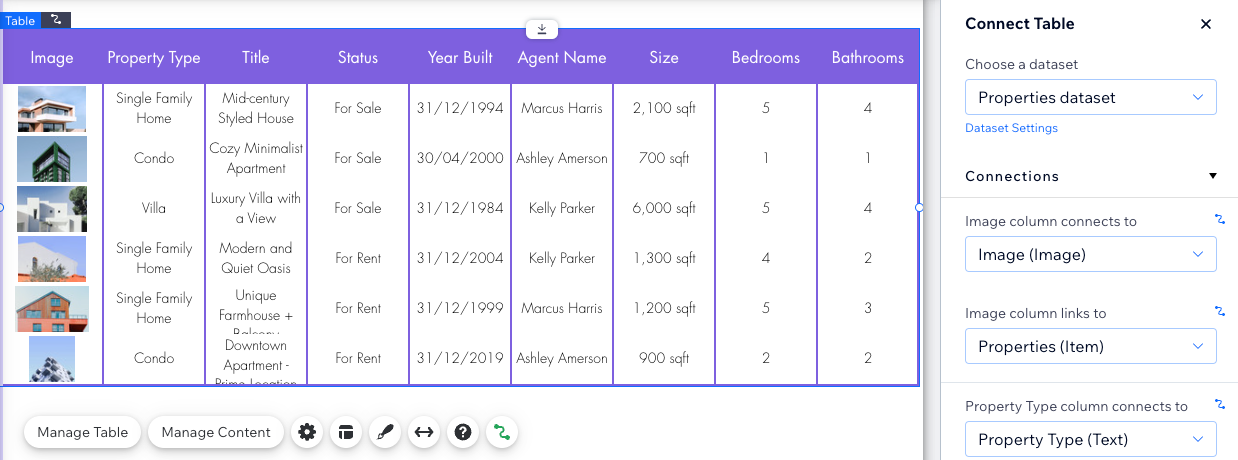
Step 3 | Connect the table to your CMS collection
Supported field types from your collection automatically appear in the table once you connect the table to a dataset that binds to your collection. You can then add links to columns, such as links to dynamic item pages, so visitors can navigate to the links by clicking items in the columns.
Wix Editor
Studio Editor
- Click the table element on your page.
- Click the Connect to CMS icon
 .
. - Click the Choose a dataset drop-down and select an existing dataset that connects to your collection. Alternatively, select Add a Dataset, then choose the collection you want to connect, give it a name and click Create.
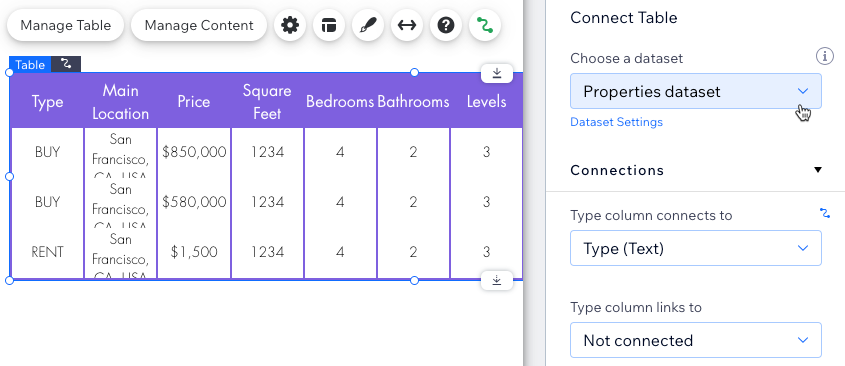
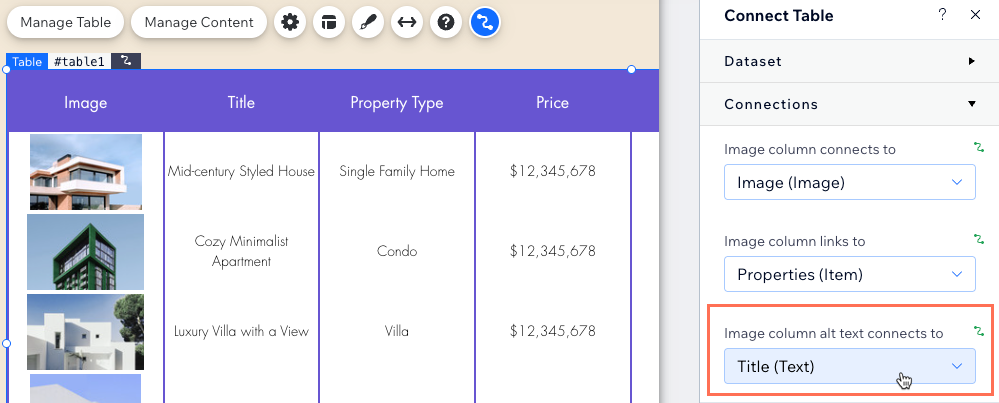
- Click the relevant drop-downs under Connections to choose which collection fields connect to each column.
Tip: If you have images in your table, make sure to connect the Image column alt text connects to drop-down to a field that represents the alt text. Learn more about accessibility best practices.
- (Optional) Link the column items to their dynamic item pages or to other locations:
- Click the relevant [Field Name] column links to drop-down.
- Select the dynamic item page listed as [Collection Name] (Item) or choose another link option.
- Repeat this step for each column item you want to link.

- (Optional) Add another column to the table:
- Click Add column at the bottom of the Connect Table panel on the right.
- Click the Choose column drop-down and select the collection field you want to connect.
- Click Add Column.
Step 4 | Customize your table
Now you can fine tune the table to get it looking just the way you like. Reorder, rename, or remove columns, then choose from several options in the Settings, Layout, and Design panels. You may then want to drag the edges of your table to adjust its size and position.
Wix Editor
Studio Editor
- Click the table element on your page.
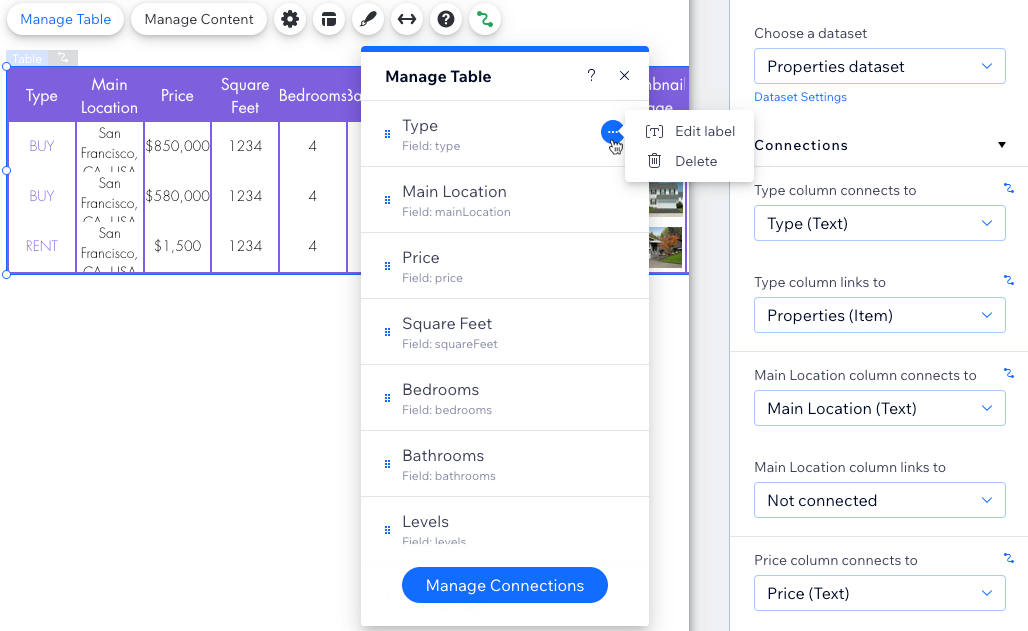
- Click Manage Table and choose want you want to do:
- Reorder: Click the Reorder icon
 next to the relevant column and drag it up or down into place.
 - Change column name: Hover over the relevant column, click the More Actions icon
 , and select Edit label. Enter the new name and click Done.
 - Delete column: Hover over the relevant column, click the More Actions icon , and select Delete.
- Manage Connections: Click Manage Connections to change any of the CMS connections. Then click the relevant drop-downs on the right to choose which collection fields connect to each column and set links for the items.
- Reorder: Click the Reorder icon
- Click the Settings icon
 and choose from the following options:
- Clicking selects: Choose what gets selected in the table when visitors click a cell: Nothing, Rows, or Cells.
- Links open in: If you've linked items, choose whether they open in a new window or in the current window.
- Date format: If you connected a Date field type, choose a format in which the dates display.
- Click the Layout icon
 to choose the table height, header display options, row and column sizing, content alignment, and pagination.
 - Click the Design icon
 to select a preset design, then click Customize Design to fine-tune the look of your table.
 - Click the Stretch icon
 if you want to make the table fit the width of your site.
 - Click and drag the edges of the table to resize it.
Note:
To change a collection field name, turn on Dev Mode in your editor. Then go to your collection and edit the relevant field to edit its field name.
Step 5 | Manage the dataset settings
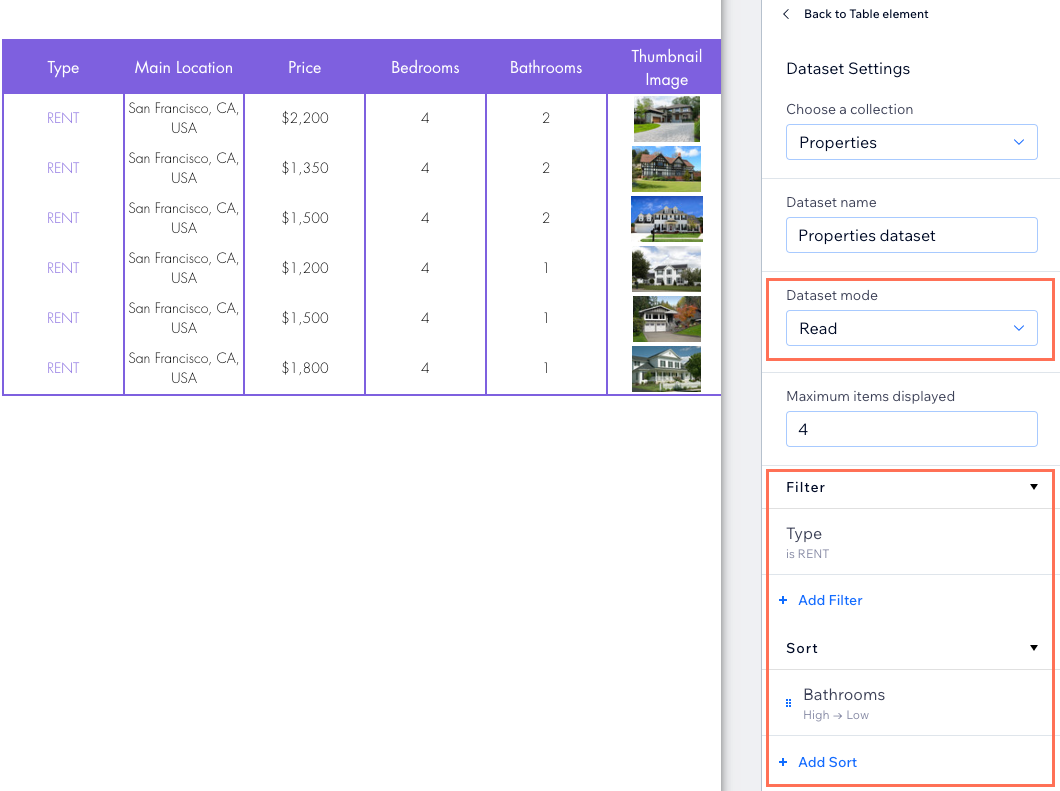
Set the dataset mode, add filters that restrict certain items from appearing, and add sorts to control the order in which the items display in your table. Your table displays all the collection items it can read from the dataset, so the Items per load field does not apply to tables.
Wix Editor
Studio Editor
- In the panel on the right of your editor, click Dataset Settings.
- Click the Dataset mode drop-down and select and option:
- Read: Allow the dataset to display your collection content in the table.
- Read & Write: Allow the dataset to display your collection content in the table and allow visitors to add or edit collection content with input elements.
Note:
The Items per load field does not apply to tables. You can limit the number of items displayed by clicking the Layout icon , then setting a custom table height and enabling pagination.
, then setting a custom table height and enabling pagination. - (Optional) Click + Add Filter to only show specific items in the table.
- (Optional) Click + Add Sort to choose the order in which collection items appear in the table.
FAQs
Click below for answers to common questions about displaying CMS content in tables.
How can visitors filter the info displayed in a table?
Can I connect a 'Load More' button to a table?
How do I enable and customize pagination?
 .
.What are the supported field types that can connect to tables?
