

Wix Services: Creating and Managing Inquiry Services
4 min
In this article
- Creating an inquiry service
- Setting up your business
- Managing your inquiry services
- FAQs
Create inquiry-based services to connect with potential clients and keep all your leads organized in one place. Wix Services lets you track conversations, respond on your own schedule, and send pay links or invoices when you’re ready.
Need to add Wix Services to your site?
Go to Wix Services in the App Market and click Add to Site.
Creating an inquiry service
Let clients reach out with questions about your services. Only the service name is required to set up a service, but adding a description, image or price can help clarify what you offer.
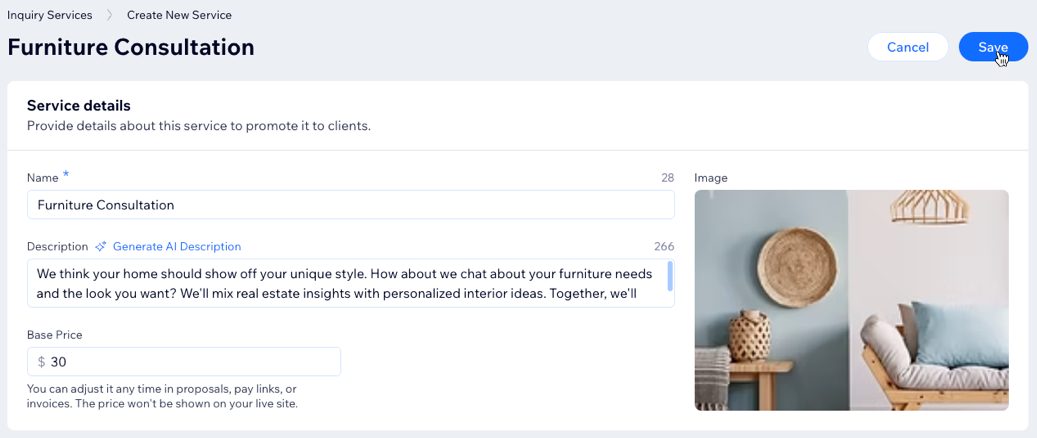
To create an inquiry service:
- Go to Inquiry Services in your site's dashboard.
- Click Add New Service.
Note: If this is your first service, click Add New Inquiry Service. - Enter your service details:
- Name: Enter the service name that will appear on your site (e.g. 'Logo Design').
- Description: Write a short summary of what you offer and why clients should choose this service.
- Base price: Enter a price for your reference only. This won’t be displayed on your site but can be used in proposals, pay links, or invoices.
- Image: Click the Add + icon to upload a cover image that represents this service.
- Click Save.
Lead conversion tools: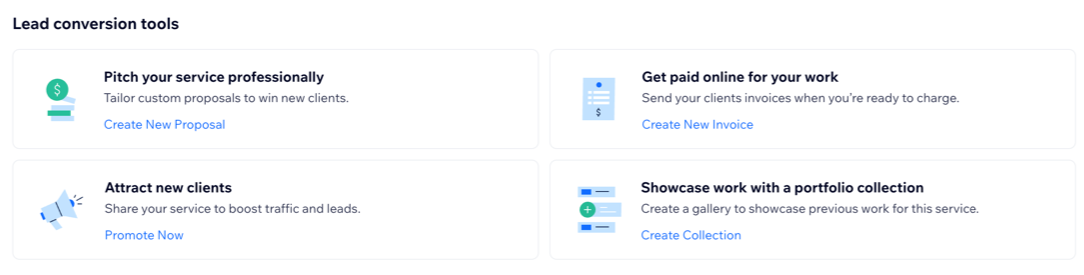
Use lead conversion tools to turn potential clients into paying customers. Send custom proposals to pitch your service, send online invoices to get paid, connect your social media to reach more people, or add your best work to a portfolio to build trust.
Setting up your business
Once you add your first service, a setup panel appears at the top of your Inquiry Services page. This panel guides you through additional steps to help you collect leads, showcase your services, and accept payments from clients. Complete the steps to make the most of Wix Services:
- Upgrade Site: Upgrade your site to unlock scheduling, payment collection, and lead tracking
- Add Service Section: Display services on your site’s pages in an inquiry service widget. This helps visitors easily view and inquire about your services.
- Customize Form: Create a form with service inquiry fields to capture leads and schedule introductions.
- Set up Pipeline: Set up a sales pipeline to turn your leads into business.
- Connect Payment: Connect a payment method to accept client payments for your inquiry services.
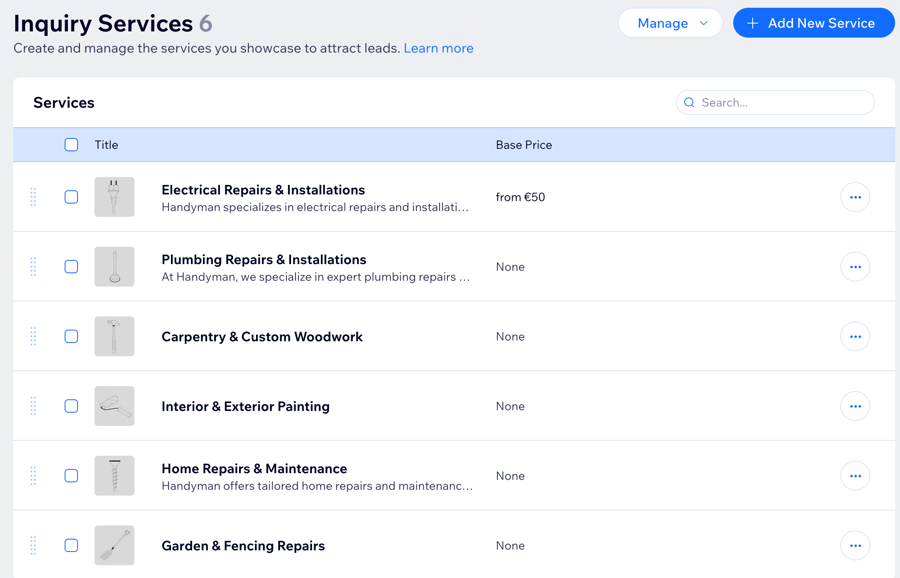
Managing your inquiry services
Manage your inquiry services from your site’s dashboard. You can update details, share services on social media, send payment links or invoices, or remove services you no longer offer. This helps you stay organized and keeps your services up-to-date for clients.
To manage your inquiry services:
- Go to Inquiry Services in your site's dashboard.
- Click the More Actions icon
 next to the relevant service.
 - Choose what you want to do:
- Edit: Edit the details of an existing service.
- Promote service: Connect to social media and share your service.
- Create pay link: Create a pay link to send and charge clients.
- Create invoice: Create an invoice to send and charge clients.
- Delete: Remove a service. Once a service is deleted, it can't be restored.
FAQs
Click a question to learn more about creating and managing inquiry services.
What is the difference between booking and inquiry services?
How do I edit an existing inquiry service?
How do I capture leads from my inquiry services?
