

Wix Proposals by Prospero: Adding and Setting up Proposals
8 min
In this article
- Step 1 | Create a proposal
- Step 2 | Customize your proposal
- Step 3 | Preview, save and share your proposal
- Troubleshooting proposals
- FAQs
Wix Proposals by Prospero helps you win clients with professional proposals. You can create a proposal from scratch or choose from several professionally designed templates.
You also set the payment terms and the payment schedule. Once your clients accept the proposal, you then send invoices automatically according to the agreed schedule. You can also choose to send the invoices manually, if you prefer.
Important:
Any proposals you previously created using Prospero’s app do not transfer to Wix Proposals.
Step 1 | Create a proposal
Once you have given Prospero permission to access your site, you can start creating your proposals. Follow the steps below to create your proposal from scratch.
To create your proposal:
- Go to Proposals in your site's dashboard.
- Click Create Proposal.
- (First time only) Click Agree & Add to accept the terms in the popup.
- Enter the proposal Title.
- Click the Customer drop-down and select an existing client or click + Add Contact to add a new one.
- Click to select the Proposal expiration date.
- Choose from the following options:
Add a catalog item (Stores products)
Add a catalog item (Booking services)
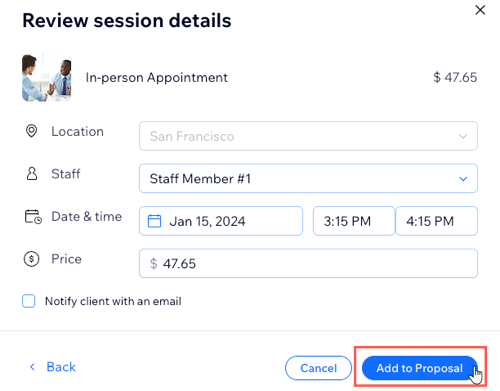
Add a catalog item (Inquiry service)
Add a catalog item (Restaurants menu items)

Add Custom Item
8. Select the relevant option under Payment terms:
Charge a one-time payment

Split total into multiple payments

9. Click the Enable automated invoices toggle to issue invoices to the client by email.
10. Click Next at the top.
11. Hover over the relevant template and click Use template.
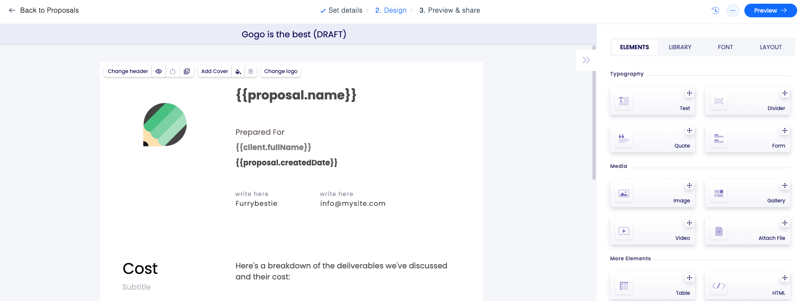
Step 2 | Customize your proposal
Now that you have created your proposal and chosen your template, you are taken to the proposal editor to customize it so that it suits your style and branding.
Each proposal template consists of the following sections, although there may be others: Cover, Cost, Payment Schedule, Terms, and Signature. Within each of these sections, you can click any element (e.g. text, button, table, or image) to customize it. You can also drag and drop any additional items from the elements tab on the right.
Learn more about customizing your Proposals in Prospero's help center. Some Prospero capabilities may differ on Wix.
Tip:
Click the More Actions icon  at the top, to save your changes. You can come back and edit the proposal at any time.
at the top, to save your changes. You can come back and edit the proposal at any time. Step 3 | Preview, save and share your proposal
When you finish customizing your proposal, you can then preview, save, and share it with your client.
To preview, save, and share your proposal:
- Click Preview. You can then click Desktop and Mobile at the top to preview how your proposal will look on both types of devices.
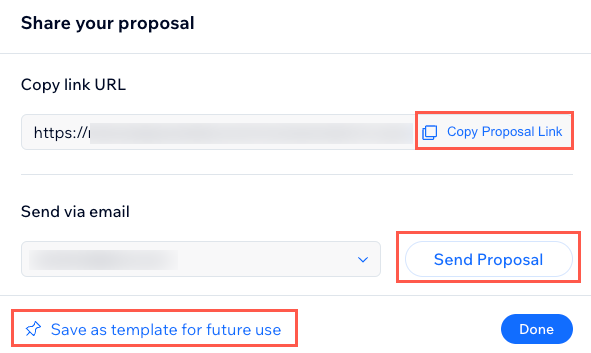
- Click Share at the top and choose the relevant option:
- Copy Link URL: Click Copy Proposal link to share the link manually, via messaging platform, for example.
- Send via email: Click Send Proposal.
- Save as a template for future use: Click to save and reuse the proposal as a template. Learn more about saving your proposals as templates.
Tip:
Learn how to save any of your proposals as templates.
Troubleshooting proposals
If you are experiencing issues with your proposal, see our solutions below.
Proposal status changed to “On hold”
Failed payments within a proposal
FAQs
Click a question below to learn more.
What happens if a client doesn't agree to the proposed terms?
How do clients accept the proposal, and what happens next?
Can I modify the payment schedule after the proposal has been accepted?

Do I need to set up taxes for my Wix Proposals?
How do I set up taxes on my Wix site?
Can I automate tax calculations on my Wix site?
Where can I find more information about tax setup for Wix Proposals?
Can I delete or cancel a proposal after it’s been accepted?
