Wix Bookings: Manually Scheduling an Appointment
- Manually adding an appointment
- FAQs
You can manually schedule appointments for your clients directly from your booking calendar. This is useful for clients who book by phone or in person, or need a follow-up appointment after a session.
- You can't book two different clients using the same email address.
- Use the steps below to manually add a single-service appointment. To add multiple services in one appointment, follow this guide instead: Scheduling and Managing Multi-Service Appointments.
Manually adding an appointment
Manually add appointments from your booking calendar. Enter client details, choose a service, and set the time. Use this for clients who book outside your online scheduling system.
To manually add an appointment:
Go to Booking Calendar in your site's dashboard.
Click Add or select a time slot on the calendar.
Select Appointment.
Click on the relevant client.
Note: For new clients, click +Add new contact, then enter their email and phone number to finish creating the contact.Select the service(s) and click Next.
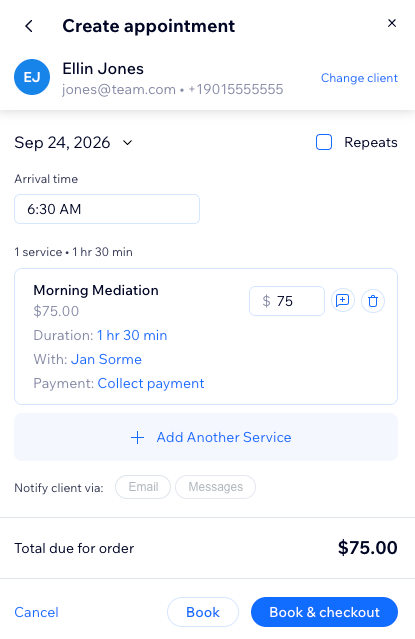
Enter the date and arrival time for the services.
Note: If the service has more than one location, select the relevant one.(Optional) For single-service appointments, click the Repeats checkbox to create a recurring appointment:
Select how often the appointments repeat from the Repeats dropdown.
Select the date the appointments stop repeating in the Until field.
(Optional) Click the relevant details on the service card to change it:
Price: Enter a new amount to override the current price.
Duration: Change the length of the appointment.
With: Change the staff member for the appointment.
Payment: Choose how or when your client is charged.
Add-ons: If this service has add-ons, you can select them here.
Payment options: Choose how or when your client will be charged, depending on which payment plan.
(Optional) Click + Add Another Service and repeat steps 6-8.
Tip: Repeat these steps for any additional services you want to add. When you click any of the services in the booking calendar, you can see the number of bookings within the same order.(Optional) Click Email, Messages, or both to notify your client of the appointment:
Email: Sends an email with the appointment details.
Messages: Sends an SMS or WhatsApp message with the appointment details.
Click Book.
A notification appears if:
- You're scheduling the appointment outside working hours.
- You haven't assigned a staff member to the service.
- Another appointment is already booked at that time.
You can still go ahead with the booking — this only helps you avoid double-booking. If you're booking a recurring session, any conflicts appear on the schedule summary page.
FAQs