


Wix Bookings: Scheduling Recurring Appointments
8 min
In this article
- Step 1 | Add the appointment to your calendar
- Step 2 | Add the client details and select a service
- Step 3 | Add the appointment details
- Step 4 | (Optional) Edit the appointment details
- Step 5 | Confirm the recurring appointment
- Step 6 | Charge your client from your Booking Calendar
- Frequently Asked Questions (FAQs)
Schedule multiple recurring appointments for your clients using the Booking Calendar. Set the details of the recurring appointment sessions and then choose how you want clients to pay. You can also change the time and date after you add the client and service details.
All the recurring appointment sessions form a single order. You can charge clients for the entire series of appointments in a single payment, or charge for each session separately.
Step 1 | Add the appointment to your calendar
Start by adding the first of the recurring appointments in your Booking Calendar. Make sure to discuss the details of the recurring appointments with your client before you begin.
Clients can update their appointments from their Members Area when needed. Or you can reschedule individual recurring appointments in your calendar at any time.
To add the appointment to your calendar:
- Go to Booking Calendar in your site's dashboard.
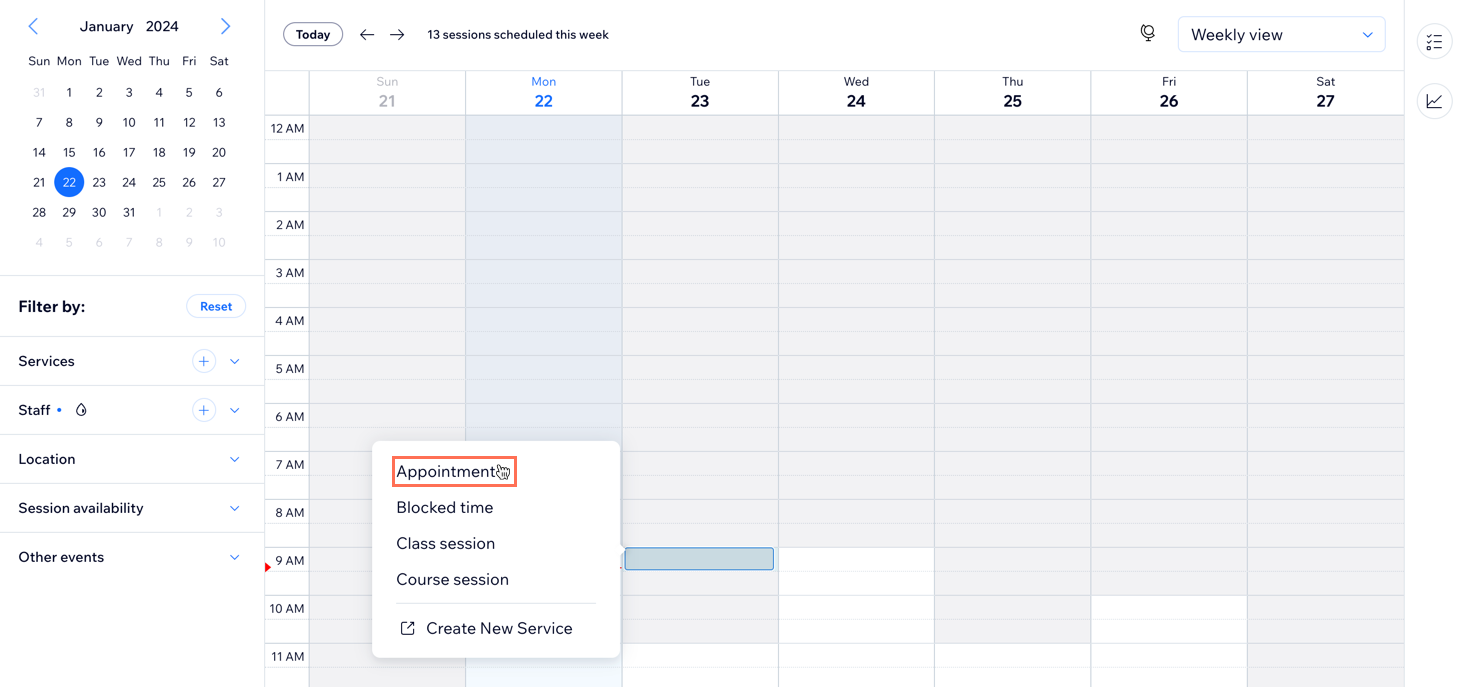
- Click the Add drop-down at the top, or click to select a time slot on the calendar.
- Click Appointment.
Step 2 | Add the client details and select a service
Once you add an appointment, select a client from your existing list or add a new one. Then select which service to schedule.
To add the client details and select a service:
- Click to select the client details from the Client Name drop-down. You can also type in a new client's name and then click + Add to contacts.
- (Optional) Add the client's phone number. This is useful if you need to reschedule any of the future recurring appointments at the last-minute.
- Click Continue.
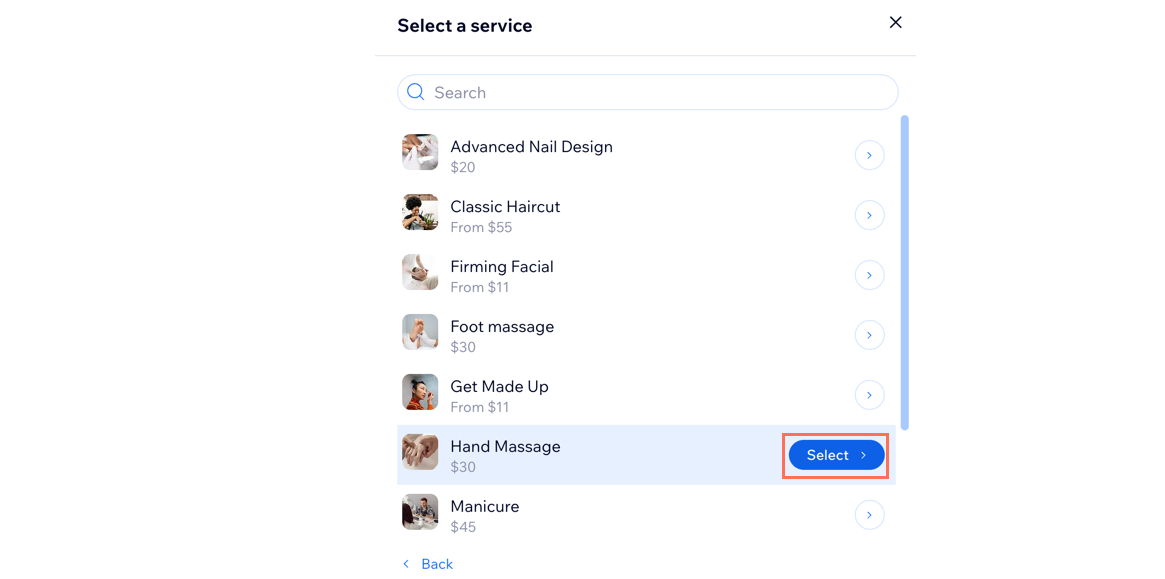
- Select a service from the service list.
Step 3 | Add the appointment details
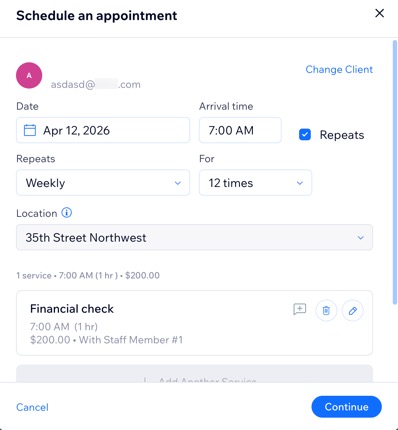
Add the appointment details for your client. You can also change the date and time, select how often the appointment repeats and choose the location of the appointment.
To add the appointment details:
- Select the Date and Arrival time of the appointment.
- Click the Repeats checkbox to make it a recurring appointment.
- Select how frequently the recurring appointments take place from the Repeats drop-down.
- Select the number of times the appointments repeat from the For drop-down.
Note: You can schedule a maximum number of 12 recurring appointments at a time. - Select the relevant Location from the drop-down.
Step 4 | (Optional) Edit the appointment details
After you add the appointment information, you can edit the session details and make adjustments to the default options. Edit the start time and duration of the session, choose a different staff member, or change how you charge the client.
To edit the appointment details:
- Click the Edit icon
 next to the appointment details.
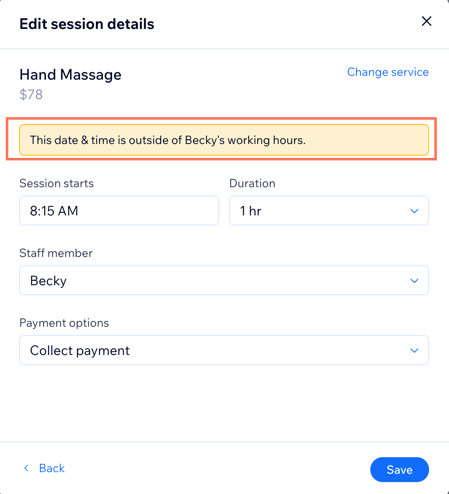
 - Edit the session details:
- Session starts: Enter the time the session starts.
- Duration: Select the duration of the appointment. You can select Custom for multi-day or late-night appointments. Then enter the end date and time in the second pair of fields.
- Staff member: Select the staff member in charge of the service from the Staff member drop-down. If there is a scheduling conflict with the selected staff member, a notification will appear.
- Payment option:
Note: The drop-down displays the price type you add when creating the appointment service. If your appointment service offers different price options, you can also choose the relevant price type. - Select the relevant option from the Payment options drop-down:
- Use client's plan now: Redeem these sessions right when you book them.
- Use client's plan later: Redeem these sessions from a client's plan using the Booking Calendar.
- Collect payment: Redeem these session through the Booking Calendar or the Orders tab.
- Click Save.
- Click Continue.
Step 5 | Confirm the recurring appointment
Once you have added the appointment, client and payment details, it's time to review and confirm the order. You can remove individual sessions in the Schedule Summary or go back to make changes to any of the order details.
To confirm the recurring appointment:
- (Optional) Click the Remove icon
 to remove any unwanted sessions.
 - Click the relevant option to choose what you want to do:
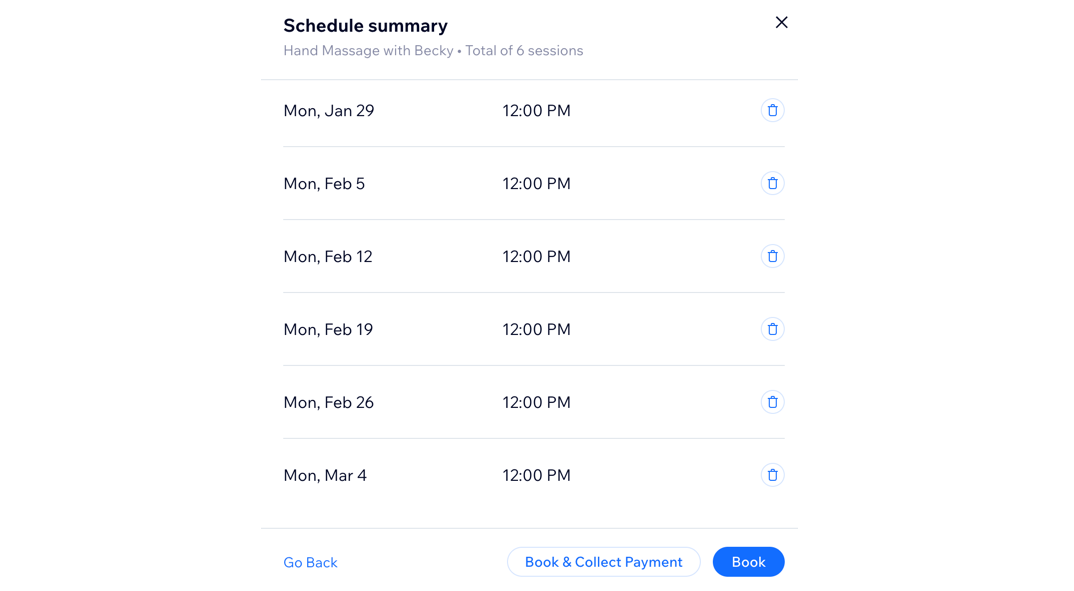
Book
Book & Collect Payment
Tip:
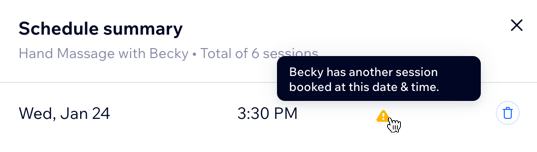
A notification appears if:
- You are scheduling the appointment outside working hours.
- You haven't assigned a staff member to the service.
- There’s another appointment booked at that time.
You can still go ahead with the booking, this notification is to help prevent double bookings. Any conflicts appear on the Schedule summary page.
Step 6 | Charge your client from your Booking Calendar
Once you schedule the recurring appointment, it's easy to charge your client from your Booking Calendar.
With the Collect Payment option, it's also possible to charge a custom amount, multiple times. You can charge for just one or only part of the sessions. If you or your client prefer, you can also redeem each session from the client's pricing plan after each session.
To charge a card manually or send an invoice, make sure you connect a payment provider that supports card payments, for example, Wix Payments.
Important:
The payment method you choose applies to all of the recurring appointment sessions and cannot be changed later. You can delete the recurring appointments manually and recreate them with the correct payment method.
To charge your client from your booking calendar:
- Select the relevant appointment from your Booking Calendar.
Note: If you selected Book & Collect Payment in the previous step, continue to step 2 below. - Select the relevant option from the Collect Payment drop-down:
Charge with pay link

Charge card manually
Charge with invoice
Mark as paid
Frequently Asked Questions (FAQs)
Click a question below to learn more about creating recurring appointments.
Can clients schedule their own recurring appointment?
Can clients cancel or reschedule recurring appointments?
Can I send an invoice per session?
Can I make bulk updates to recurring appointments?
What can I do if there are scheduling conflicts with future appointments?
Can I add multi-service appointments for recurring appointments?
