

Wix Bookings: About the Orders Tab
19 min
In this article
- Viewing & updating customer details in your Orders tab
- Manually marking an order as 'Paid'
- Requesting payment via pay link
- Requesting payment via invoice
- Creating a manual order
- Adding a note to an order
- Customizing and saving your view
- Updating multiple orders at once
- Exporting your orders
- Archiving orders & viewing archived orders
- FAQs
Every time a client books a service, an order appears in the Orders tab in your dashboard. You can use the Orders tab to access and work with orders, without viewing them in a calendar format.
Using Wix Stores too?
You also see your store's orders in the Orders tab.
Viewing & updating customer details in your Orders tab
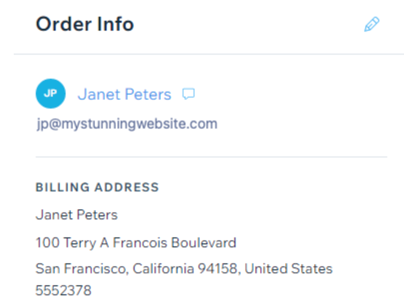
When you select an order, your customer's details appear on the right side. There you can update a customer's email address if they made a mistake during checkout. Additionally, you can go to the customer's contact card to view more details and perform a variety of actions.
Dashboard
Wix app
Wix Studio app
- Go to Orders in your site's dashboard.
- Click the relevant order.
- Choose what you want to do:
Edit client's email address
 next to Order info.
View or edit client's contact details
Manually marking an order as 'Paid'
Orders placed using the manual (offline) payment method, or if the service is set up for in-person payments, you must manually mark as 'paid'. This ensures your records stay up to date.
Notes:
- Orders marked as "Paid", cannot be changed back to "Unpaid".
- If your customer paid for the order online, it is automatically marked as "Paid".
Dashboard
Wix app
Wix Studio app
- Go to Orders in your site's dashboard.
- Select the relevant order.
- Click the Collect Payment drop-down.
- Click Mark as Paid.
- Choose what you want to do:
- Mark [amount] as Paid: Charge the full amount.
- Mark a custom amount as paid: Partially charge the client:
- Click the checkbox and enter a custom amount.
- Click Mark [amount] as Paid to confirm.
Note:
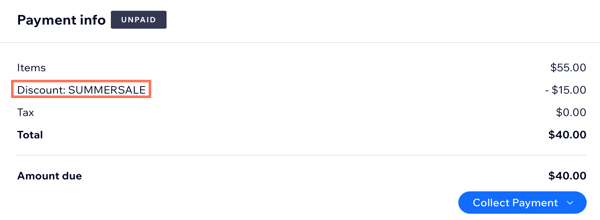
You can see if a client used a coupon or a gift card to pay for their order in the Payment info section.
Requesting payment via pay link
Create a pay link for an unpaid order and send it to your client. You can share the link directly, send it via email, or provide a QR code. Your client can then use the link to pay online using any of your available payment methods.
Dashboard
Wix app
Wix Studio app
- Go to Orders in your site's dashboard.
- Click the relevant order to edit it.
- Click the Collect Payment drop-down at the top.
- Select Charge with pay link.
- Create a custom pay link:
- Link name and price: Enter the name of the link and the price.
- (Optional) Description: Add an item description that appears at checkout.
- Click Open settings and customize the link more:
- Set an expiration date: Enable the toggle to define how long the pay link will be active and select the relevant expiration date. Once it expires, payments will stop.
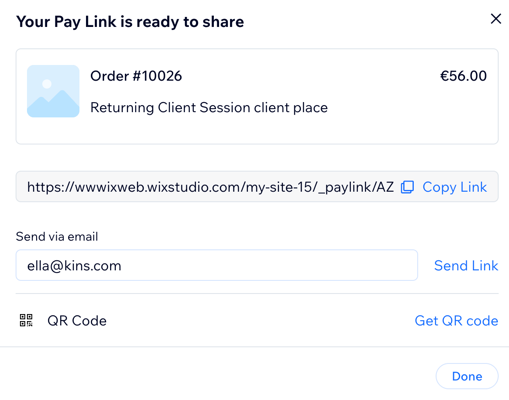
- Click Create Pay Link.
- Choose how you want to send the link to your customer:
- Copy Link: Copy the link to your clipboard and send it directly to your client.
- Send Link: Email your client the pay link. If you want to use a different email, click the email field, select a new one or add a contact, and then click Send Link.
- QR code: Click to generate a QR code that customers can scan to access your pay link.
- Click Done.
Requesting payment via invoice
You can create an invoice for an unpaid order to request payment from your client. Once you send the invoice via email or share the direct link with them, clients can click the invoice and pay online using any of your payment methods.
Before you begin:
Set up your invoice so that all your company details (e.g. business name, logo) are displayed correctly.
Dashboard
Wix app
Wix Studio app
- Go to Orders in your site's dashboard.
- Select the relevant order.
- Click the Collect Payment drop-down at the top.
- Select Charge with invoice.
- Click Create Invoice.
Tip: This creates a saved draft of your invoice. - Choose how you want to send the invoice to your customer:
Share using a link:
Print a copy of the invoice:
Send by email:
Creating a manual order
Create a manual order for any purchases you initiate. This is particularly useful if you take orders in person or over the phone. You can use it to offer and charge for a custom service that isn't in your list of services. For example, if you're a personal trainer and want to offer a personalized session.
Alternatively, you can create a manual order to book and charge for regular appointments. If you also use Wix Stores or the Wix Online Ordering (New) app, you can also sell products and menu items.
Note:
You cannot book classes and courses in a manual order.
To create a manual order:
- Go to Orders in your site's dashboard.
- Click + Add New Order.
- Choose what you want to do:
Add a custom item

 to view or edit the customer's details.
Add an appointment

Add a store product
Add a Wix Restaurants Orders (New) menu item
Adding a note to an order
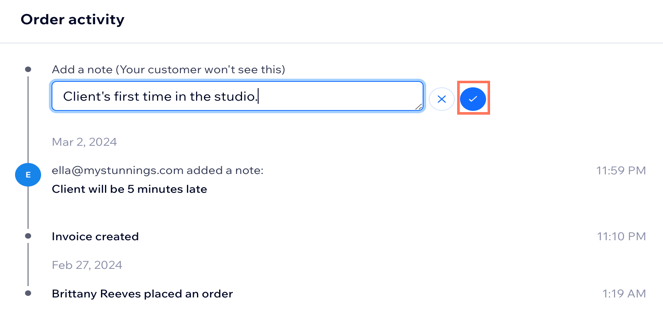
Keep track of special requests and instructions by adding notes to orders. These notes are personal and can only be seen by you and your site collaborators.
Dashboard
Wix app
Wix Studio app
- Go to Orders in your site's dashboard.
- Select the relevant order.
- Scroll down to Order activity.
- Click the Add a note field to add an internal note that your customer won't see.
- Click the checkmark to save.
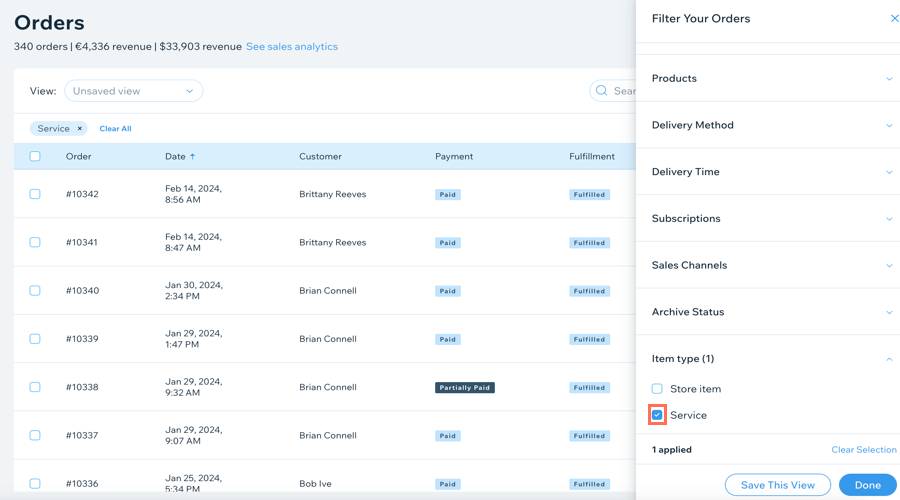
Customizing and saving your view
Customize the table you see in the order list so it only includes relevant information. Additionally, you can filter orders to view just the ones that interest you. Then, save your view to access it quickly the next time you need it.
Tips:
- The "fulfillment" column is only relevant if you also have store orders. You can hide it if you only use Wix Bookings.
- You can filter your orders to view either store items only or booking services only using the Item Type filter.
Updating multiple orders at once
Save time by performing changes on multiple orders at once.
To update multiple orders:
- Go to Orders in your site's dashboard.
- Select the checkbox next to the orders you want to update.
- Click the relevant action from the top bar:
- Fulfill: Only relevant for store orders.
- Marked as Paid: Marks the selected orders as "Paid".
- Create an Invoice: An invoice is created and appears in the Invoices tab.
- Manage Shipping Label: Create shipping label with Wix Shipping.
- Export: Click to download a CSV file.
- Print
 : Send orders to your printer.
 - Archive
 : Adds the selected orders to the archive.
 - More Actions:

Note:
You can create an invoice for up to 100 orders at once.
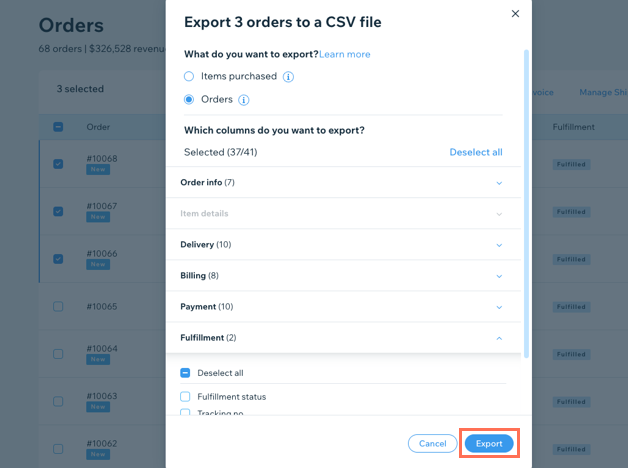
Exporting your orders
Keep track of your business by exporting your orders to a CSV file. You can export the data you need and remove the data you're not interested in at the moment.
To export your orders:
- Go to Orders in your site's dashboard.
- Select the orders you want to export:
- Specific orders: Select the checkbox next to the relevant order(s).
- All orders: Select the checkbox next to the Order column to mark them all.

- Click Export.
- Select how you want to display exported orders:
- Item purchased: Each item purchased is displayed in a separate row, even if they are part of the same order.
- Orders: Each order, excluding items purchased, will appear in a separate row.
- Deselect the columns that you do not want to include (e.g. deselect billing and payment columns if they are not relevant at the moment).
- Click Export.
- Save the file to your computer:
- Chrome: The CSV file downloads and appears on the bottom of your screen.
- Firefox: Select Open with to open or Save File to save.
- Internet Explorer: Click Save at the bottom of your screen.
- Safari: The file opens. Click cmd + s on your keyboard to save the file (with a .csv extension, and Page Source format).
Note:
The time of purchase recorded in the CSV file is always given in Coordinated Universal Time (UTC). For instance: January 01, 5:00PM (PST) = January 02, 1:00AM (UTC).
Archiving orders & viewing archived orders
If you want to remove an order from the Orders tab but still keep its records, add it to the archive. You can find it again later by viewing your archived orders.
Dashboard
Wix app
Wix Studio app
- Go to Orders in your site's dashboard.
- Select the relevant order.
- Choose what you want to do:
Archive an order
View archived orders
Unarchive an order
FAQs
Click below for answers to common questions about the Orders tab.
Where can I find manually added orders for custom items?
Where do I find manually added appointments?
How do I add a course or classes to an order?
How do I redeem a customer's plan on manually created appointments?
How can I edit or delete a note I added to an order?
