

Wix Invoices: Managing Your Invoices
7 min
In this article
- Reviewing your invoices
- Managing individual invoices
- Downloading or exporting invoices in bulk
- FAQs
Review and manage all of your customer invoices from your site's dashboard. You can edit invoices, duplicate them, resend them, share them via a unique link, and more. To simplify your accounting processes, you can charge customer credit cards directly from the invoices.
Important:
This article refers to the Wix Invoices feature. If you are looking for your invoices for payments you made to Wix, click here.
Reviewing your invoices
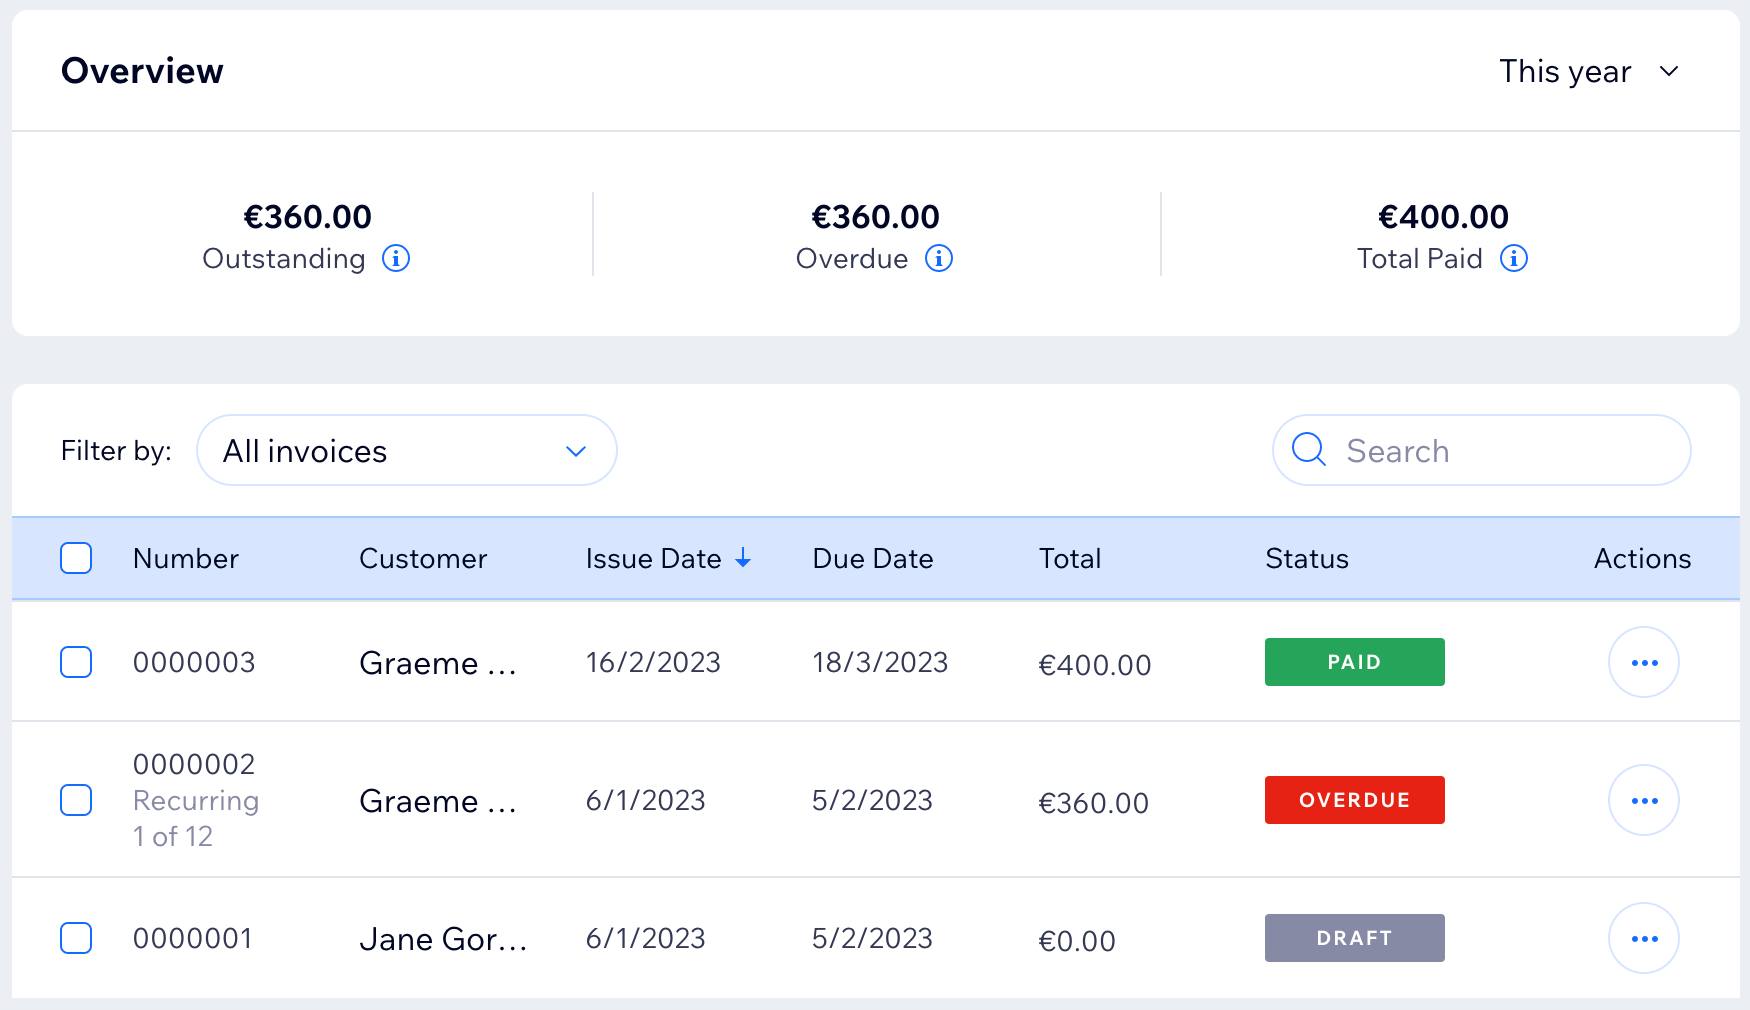
When you access Invoices in your site's dashboard, you see an overview of payments made, outstanding and overdue (within the time period selected). Below this, you'll see a list of all invoices you've created.
Filter, search and sort to find the invoices you need. Each invoice will have a status attached:
- Draft: The invoice has been saved as a draft, but has not been sent to your customer.
- Sent: The invoice has been sent to your customer. Your customer can view and print the invoice.
- Viewed: The Viewed icon
 appears if the invoice was opened by your customer. Hover over the icon for more information.
 - Paid: The invoice was paid in full online, or you manually marked the invoice as paid.
- Partial: The invoice has been partially paid. Hover over Partial in the Status column for more information.
- In Process: Your customer has begun the payment process, but the payment has not yet been confirmed. It can take up to 4 hours for the invoice to revert back to its original status or to change to Paid. While the invoice is in process, you can only view or print it.
- Overdue: The invoice has not been paid and has passed the due date.
- Void: The invoice has been canceled. Your customer can still view and print this invoice, although a Void stamp can be seen on the invoice.
Tip:
Use Wix Automations to streamline your billing process. For example, you can send automated emails to your clients every time an invoice is sent, paid or overdue.
Managing individual invoices
There are many ways you can manage the invoices you create. Make edits and then resend an invoice by email or share via a unique link. Duplicate an existing invoice to save time when creating a new one. Charge a customer's card directly from their invoice, and more.
To manage individual invoices:
- Go to Invoices in your site's dashboard.
- Click the More Actions icon
 next to the relevant invoice.
 - Choose what you want to do:
Preview
Edit
 to see the invoice your customer will receive.
Duplicate
Send / Resend via email
Share link
Print
Download PDF
Charge with credit card
Record payment
Void
Delete
Downloading or exporting invoices in bulk
Simplify your accounting processes by accessing invoice data in bulk. You can bulk download to PDF or bulk export to CSV. Bulk downloading to PDF will download each invoice as a single page in a PDF document. Bulk exporting to CSV will produce a single CSV file with a line for each invoice. You can open CSV files using tools such as Microsoft Excel and Google Sheets.
To download or export invoices in bulk:
- Go to Invoices in your site's dashboard.
- Select the checkbox next to each invoice you want to download or export. Select the top checkbox to select all invoices.
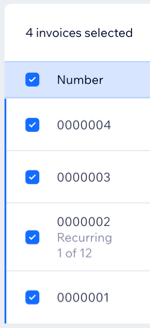
- Click Download PDF or Export to CSV.
When exporting to CSV:
- If you export a recurring invoice in Draft status, its Issue Date and Due Date will be blank. These fields are populated when the invoice is sent.
- You can open CSV files using many text editors or spreadsheet applications. Choose Open from the File menu to open in Excel or Import from the File menu to open in Google Sheets.
FAQs
Click a question below to learn more about managing your invoices.
How many invoices can I export to CSV?
Is there a maximum number of invoices I can download to PDF?
How can I ensure the service fee is visible to customers on their invoices?

