

CMS: Displaying Collection Content in Text Elements
19 min
In this article
- Connecting text elements to collection content
- Connecting collapsible text to collection content
- Connecting a text marquee to collection content
- Connecting a text mask to collection content
- Connecting text effects to collection content
With Wix's CMS (Content Management System), you can display your collection content in various text elements on your site.
Connect basic text elements like themed text, titles, and paragraphs to your collection content for a seamless, professional look. Use collapsible text to present a lot of information without overwhelming visitors, ideal for blogs or FAQs. Create dynamic visuals with a text mask that displays a video within the text, making your content memorable. Use the text marquee to display scrolling text from your CMS collection for news updates or announcements.
Want to combine formatted text with media, files, HTML code and more?
- Use the Rich Content collection field with the Rich Content element to create large blocks of content associated with your collection items.
- You can also connect the Rich Text input element to a Rich Text collection field to save formatted text that visitors submit to your collection.
Connecting text elements to collection content
Add text elements such as themed text, titles, and paragraphs to your editor. Then connect the text element to a dataset that binds to the relevant collection field.
Wix Editor
Studio Editor
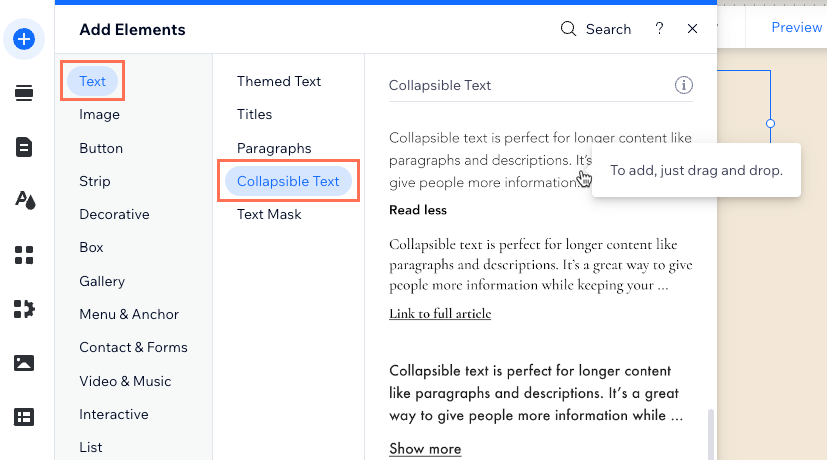
- Go to the relevant page in your editor.
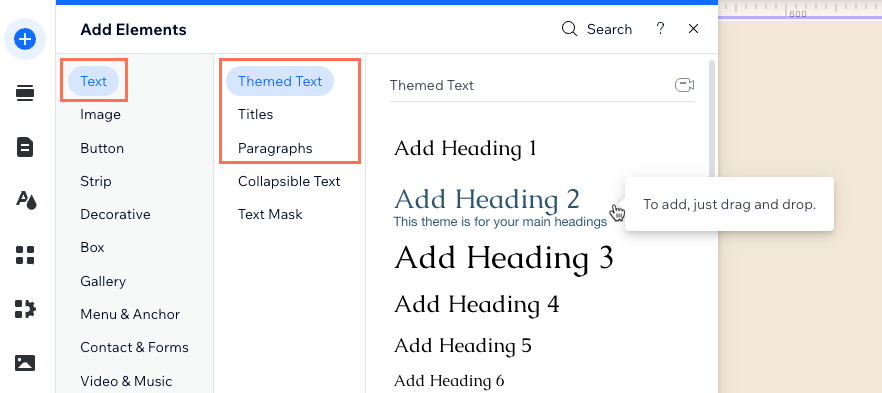
- Add a text element to your page:
- Click Add Elements
on the left side of the editor.
- Click Text.
- Click the type of text you want to add: Themed Text, Titles, or Paragraphs
- Click and drag your chosen text to add it to your page.
- Click Add Elements
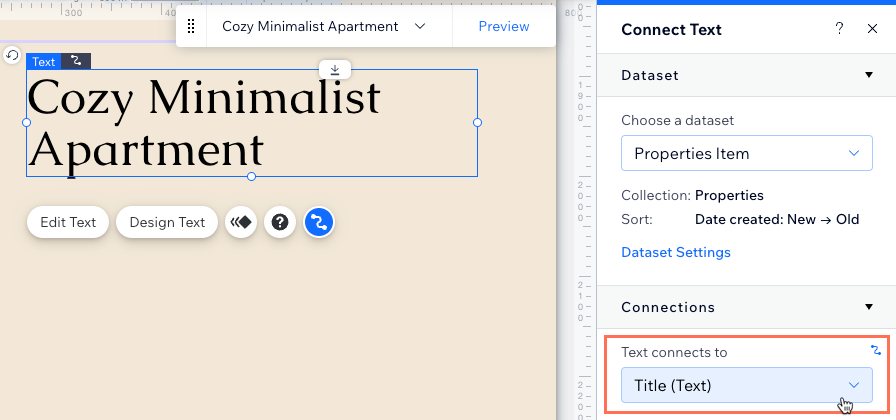
- Click the Connect to CMS icon
 on the text element.
 - Click the Choose a dataset drop-down and select an existing dataset that connects to your collection. Alternatively, select Add a Dataset, then choose the collection you want to connect.
- Click the Text connects to drop-down and select the collection field you want to connect.
Tips:
- You can connect the text to the following types of collection fields: Text, Number, URL, Boolean, Date and Time, Time, Rich Text, Address, and Tags.
- Select Item Count if you want the text to display the total number of items retrieved by the dataset.
- ('URL' field types only) Under Link options, select the relevant options:
- How does it open?: Choose how you want the link to open: In the current window or As a new window
- Rel values (SEO): Select the type of link rel attribute you want to use:
- noopener (recommended): Block access to the source page.
- noreferrer (recommended): Hide info about link source.
- nofollow: Tell search engines to ignore.
- sponsored: Mark the link as sponsored.
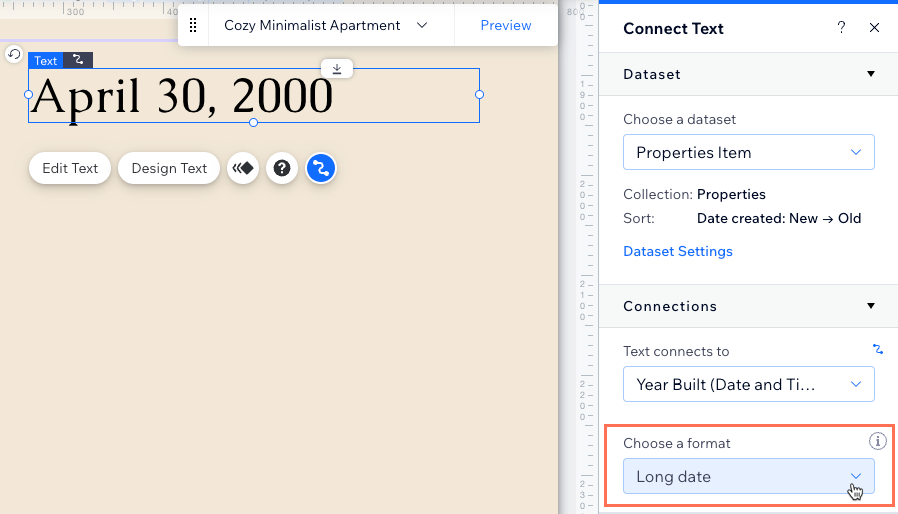
- ('Date and time' field types only) Click the Choose a format drop-down and select a format for displaying the date and time.
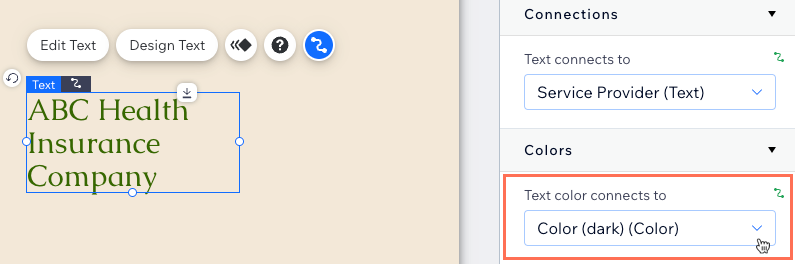
- Under Colors, click the Text color connects to drop-down and select the 'Color' field you want to connect.
- Click Preview to test your connections.
- Click Publish if you are ready to make the changes go live.
Connecting collapsible text to collection content
Add a collapsible text element that can show only the 1st few lines of text until visitors click to expand the entire text. Make sure to customize the Change Text settings to set the 'Show More' button to expand before connecting to the CMS. Alternatively, you can set the 'Show More' button to link to a single static link that opens when visitors click the link.
Wix Editor
Studio Editor
- Go to the relevant page in your editor.
- Add a collapsible text element to your page:
- Click Add Elements
- Click Text.
- Click Collapsible Text.
- Click and drag a collapsible text element onto your page.
- Click Add Elements
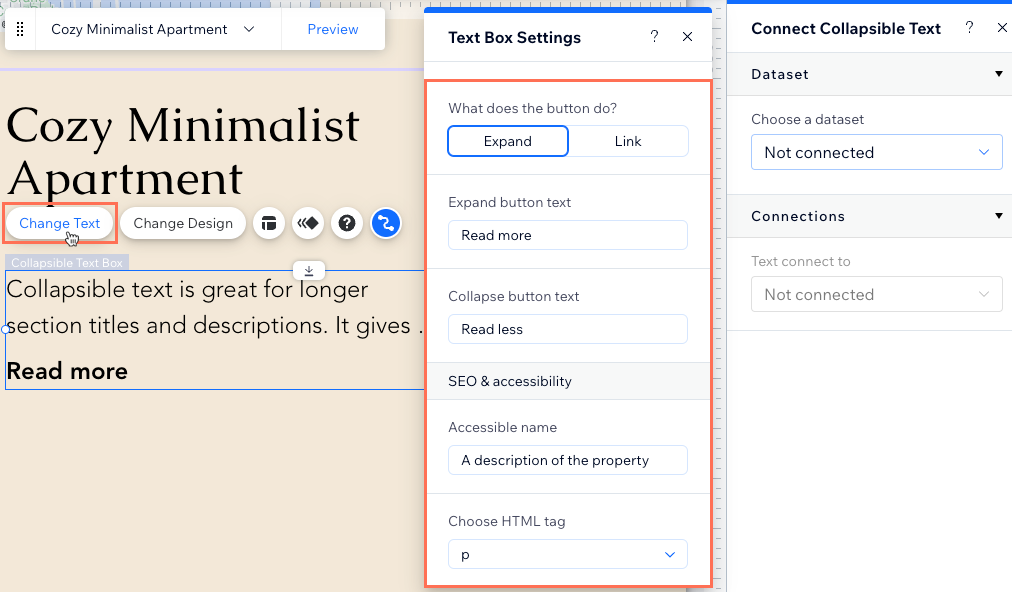
- Click Change Text and edit the collapsible text box settings:
- Change text: You do not need to edit this field since you will connect text from your CMS collection.
- What does the button do?: Choose what happens when visitors click the button:
- Expand: (Recommended) The collapsible expands to reveal the entire text. Edit the following fields:
- Expand button text: Enter text that will appear on the expand button (e.g. "Read More").
- Collapse button text: Enter text that will appear on the collapse button (e.g. "Read Less").
- Link: A static link opens. Edit the following fields:
Note: Currently, it is not possible to connect this link to a dataset or collection field.- Link button text: Enter text that will appear on the link button (e.g. "Link to article").
- Links to: Click Choose a link and choose a link destination for the button.
- Expand: (Recommended) The collapsible expands to reveal the entire text. Edit the following fields:
- SEO & accessibility: Enter an accessible name for the element and choose the HTML tag. Learn more about preparing your site structure.
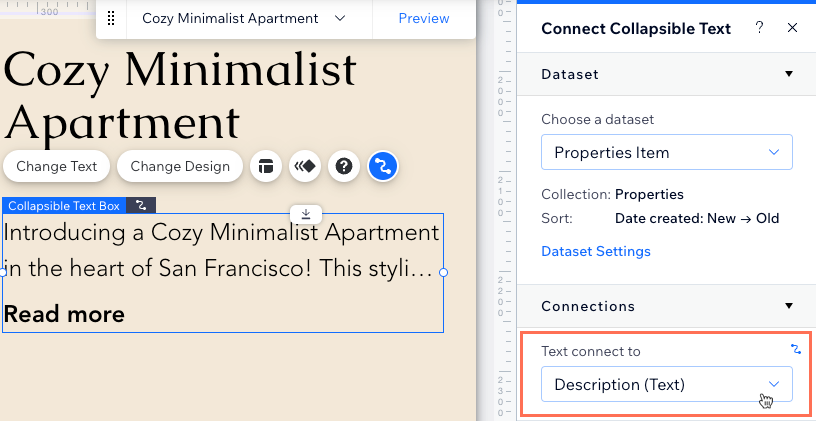
- Click the Connect to CMS icon on the collapsible text element.
- Click the Choose a dataset drop-down and select an existing dataset that connects to your collection. Alternatively, select Add a Dataset, then choose the collection you want to connect.
- Click the Text connects to drop-down and select the collection field you want to connect.
Tip: You can connect collapsible text elements to the following types of collection fields: Text, Number, URL, Date and Time, Time, Rich Text, and Address.
- Click the Layout icon
on the collapsible text and customize the layout.
- Click Preview to test your connections.
- Click Publish if you are ready to make the changes go live.
Connecting a text marquee to collection content
Add a text marquee element that displays scrolling text from your CMS collection.
Wix Editor
Studio Editor
- Go to the relevant page in your editor.
- Add a text mask element to your page:
- Click Add Elements
- Click Text.
- Click Text Marquee.
- Click and drag a text marquee element onto your page.
- Click Add Elements

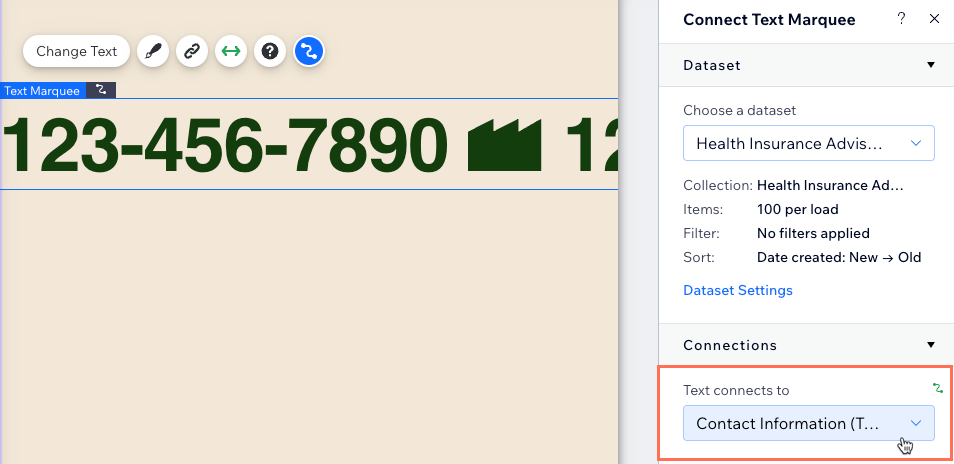
- Click the Connect to CMS icon on the text marquee.
- Click the Choose a dataset drop-down and select an existing dataset that connects to your collection. Alternatively, select Add a Dataset, then choose the collection you want to connect.
- Click the Text connects to drop-down and select the collection field you want to connect.
Tip: You can connect text marquees to the following types of collection fields: Text, Number, URL, Date and Time, Time, and Address.
- Click the Design icon
 to customize the text formatting, separator and movement used by the marquee text. Learn more about designing the text marquee.
 - Click Preview at the top right to test your connections.
- Click Publish if you are ready to make the changes go live.
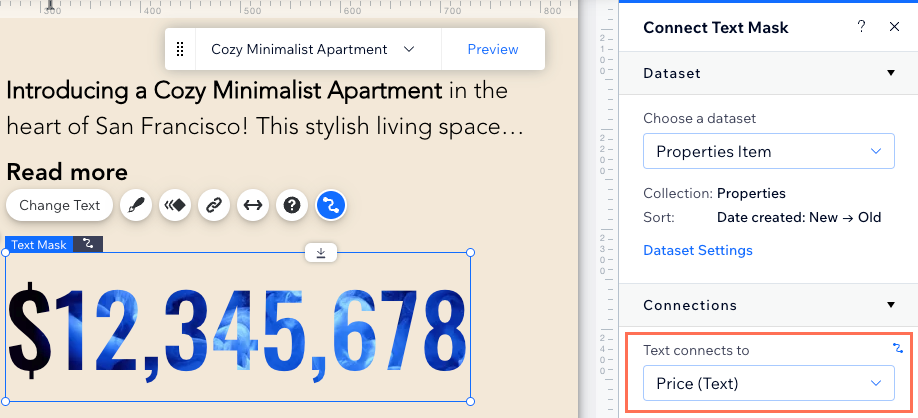
Connecting a text mask to collection content
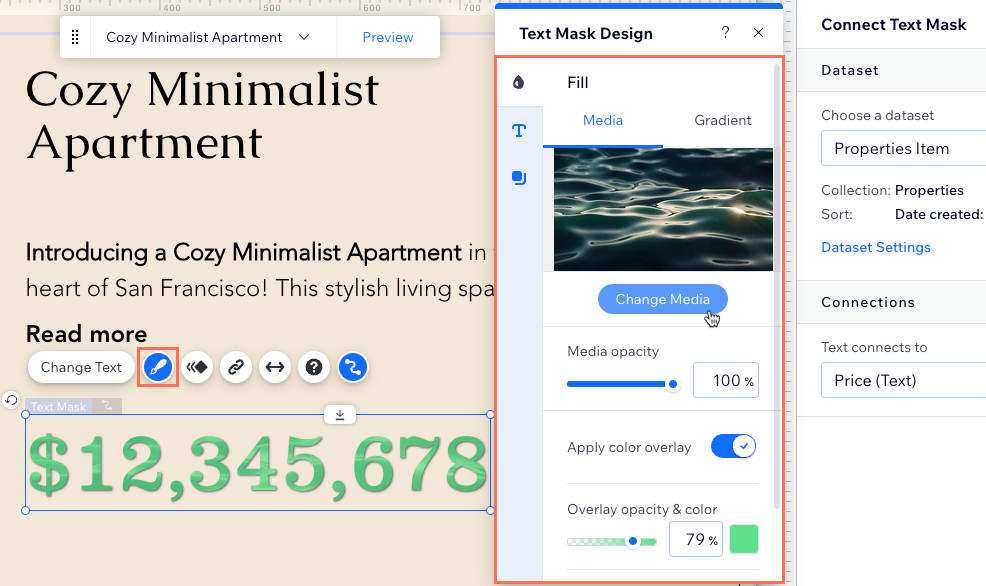
Add a text mask that displays a video within the text lettering. Connect your text mask to the CMS collection field you want to display. Then go to the Design panel to add your own video or choose a video by Wix.
Important:
Currently, it is not possible to attach text masks to repeaters.
Wix Editor
Studio Editor
- Go to the relevant page in your editor.
- Add a text mask element to your page:
- Click Add Elements
- Click Text.
- Click Text Mask.
- Click and drag a text mask onto your page.
- Click Add Elements

- Click the Connect to CMS icon on the text mask.
- Click the Choose a dataset drop-down and select an existing dataset that connects to your collection. Alternatively, click Create a New Dataset, then choose the collection you want to connect.
- Click the Text connects to drop-down and select the collection field you want to connect.
Tip: You can connect text masks to the following types of collection fields: Text, Number, URL, Date and Time, Time, and Address.
- Click the Design icon and customize the background fill, text format and shadow. Learn more about designing the text mask.
- Click Preview to test your connections.
- Click Publish if you are ready to make the changes go live.
Connecting text effects to collection content
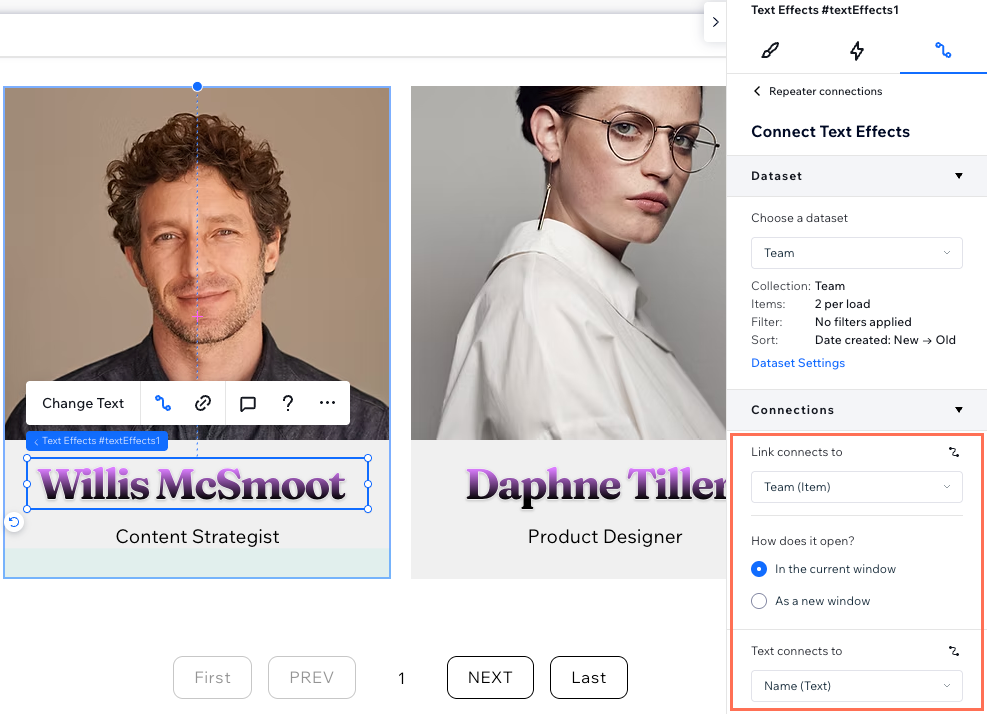
Connect the text effects element to your CMS content to display dynamic and engaging text across your site.
To connect text effects to the CMS:
- Go to the relevant page in the Studio Editor.
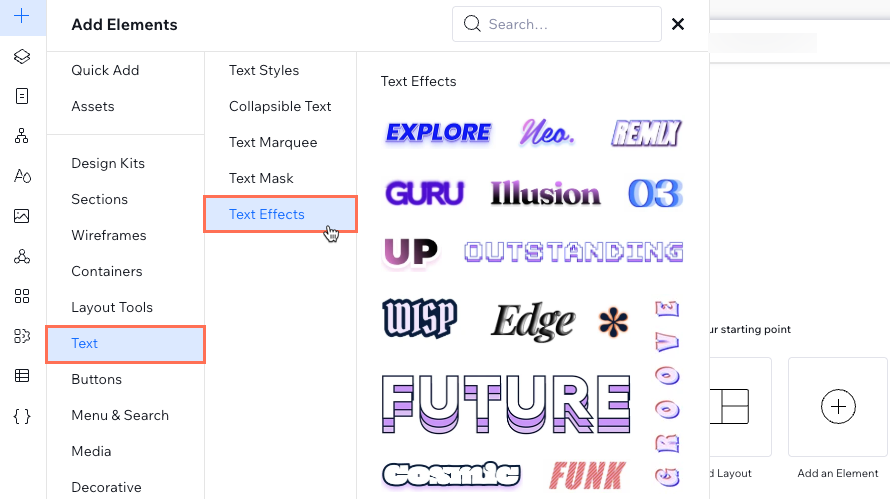
- Add a text effects element to your page:
- Click Add Elements
 on the left side of the editor.
 - Click Text.
- Click Text Effects.
- Click and drag your chosen text effects element to add it to your page.
- Click Add Elements
- Click the Connect to CMS icon on the text effects element.
- Click the Choose a dataset drop-down and select an existing dataset that connects to your collection. Alternatively, select Add a Dataset, then choose the collection you want to connect.
- Click the Text connects to drop-down and select the collection field you want to connect.
Tip: You can connect text effects to the following types of collection fields: Text, Number, URL, Date and Time, Time, and Address. - (Optional) Click the Link connects to drop-down and choose what happens when visitors click the text effects element:
- Actions: Select the dataset action that will occur when visitors click the text effects element (e.g. Load More, Apply Filters).
Note: Dataset actions are not available when the element is attached to a repeater. - Dynamic pages: Select the dynamic page that visitors will navigate to when they click the element. Then choose how the link opens: In the current window or As a new window
- Fields: Select the 'Document', 'URL', 'Image', or 'Video' field type that will open in a new tab when visitors click the element.
- Actions: Select the dataset action that will occur when visitors click the text effects element (e.g. Load More, Apply Filters).
- Design the text effect element.
- Format the text of the element.
- Click the Preview icon
 at the top right to test your connections.
 - Click Publish if you are ready to make the changes go live.
