Wix Editor: Adding and Setting Up Collapsible Text
4 min
In this article
- Step 1 | Add collapsible text
- Step 2 | Adjust the layout of the collapsible text
- Step 3 | Type and set up your text
Collapsible text is a great option if you have a lot of information that you want to display. Parts of the text are hidden, and visitors can view the full text by clicking an expand button, or a link to the full body of text.

Tip:
If you attach collapsible text to a strip, column, or container, and choose to expand it with a button, the entire container / column / strip expands with the text when visitors click it.
Step 1 | Add collapsible text
The first step is to add a collapsible text box to your site. There are a range of styles available, with different fonts, number of lines, and other settings.
To add collapsible text to your site:
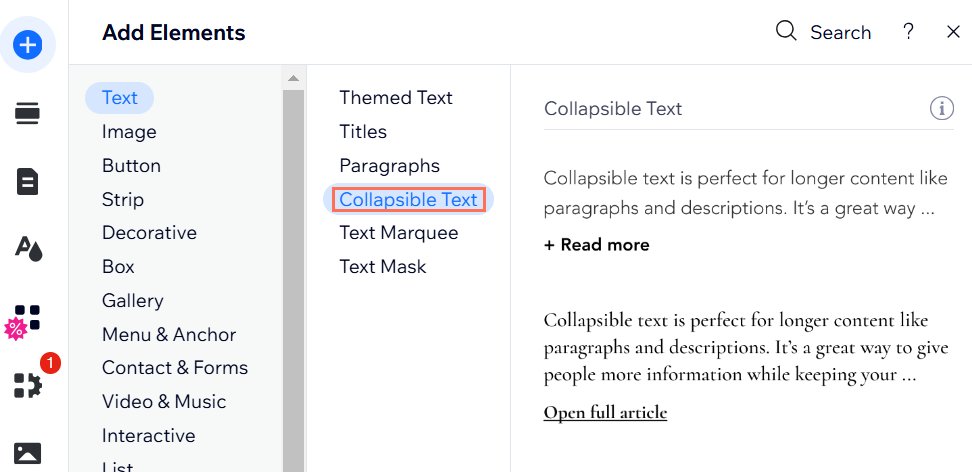
- Go to your editor.
- Click Add Elements
 on the left side of the editor.
 - Click Text.
- Click Collapsible Text.
- Click and drag your chosen text box to add it to your site.
Step 2 | Adjust the layout of the collapsible text
After adding the text box to your page, choose how your visitors can read the full body of text. Add a button that opens the full text on the current page, or a link that directs your visitors to the full piece.
You can also set the alignment, spacing, and number of lines that appear before a visitor needs to click it.
To adjust the text's layout:
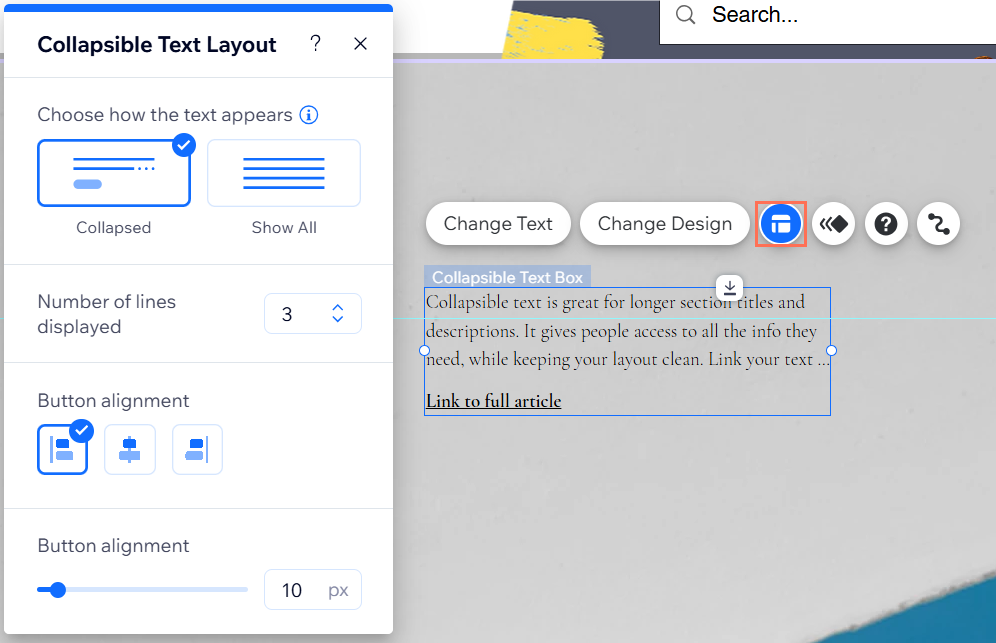
- Click the Layout icon
on the text box.
- Customize the layout using the options:
- Choose how the text appears: Choose how the entire text is displayed:
- Collapsed: A text preview is displayed, and visitors need to click an expand button or a link to read the full body of text.
- Show all: The entire text piece is displayed on your site, and is not collapsed.
- Number of lines displayed: Choose how many lines of text are displayed in the preview.
- Button alignment: Set the alignment of the expand or link button.
- Spacing between text and button: Increase or decrease the spacing.
- Choose how the text appears: Choose how the entire text is displayed:
Note:
The options displayed depend on whether you choose to collapse or display all of the text.
Step 3 | Type and set up your text
After customizing the way your collapsible text box looks and behaves, enter the full piece of text.
Edit the text on the expand and collapse buttons, or set up the link that takes your visitors to read more.
Did you know?
Collapsible text boxes can hold up to 120,000 characters, so they're great for displaying long bodies of text.
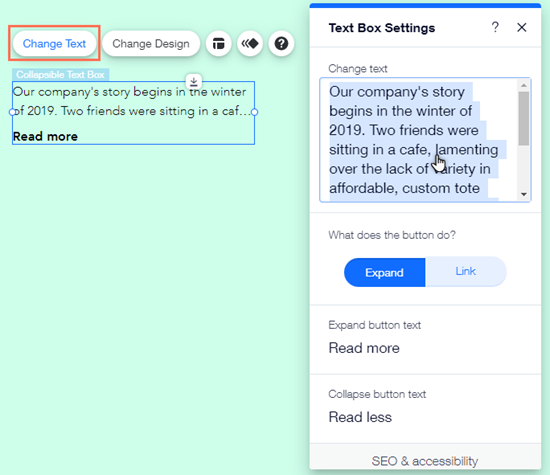
To edit and set up your text:
- Click the collapsible text box.
- Click Change Text.
- Type or paste your chosen text into the box under Change Text.
- What does the button do?: Set up how visitors view the full text, and customize it with the options:
- Expand: Visitors can view the full piece of text by clicking an expand button:
- Expand button text: Enter the text shown on the expand button, e.g. "Read More".
- Collapse button text: Enter the text shown on the collapse button, e.g. "Read Less".
- Link: Visitors can view the full piece of text by clicking a link:
- Link button text: Enter the text for the link, e.g. "Click to read more".
- Links to: Enter the details for the link to the full piece of text.
- Expand: Visitors can view the full piece of text by clicking an expand button:
- (Optional) Add a description, and select your text's HTML tag from the dropdown menu under SEO & accessibility to define its text type (a heading, paragraph, etc). Learn more about defining your text