

Wix Mobile Apps: Customizing Your Native App's Features and Content
30 min
In this article
- Customizing the header
- Customizing the navigation menu
- Adding elements to your screens
- Managing your screens
- Customizing your app's design
- FAQs
- Video tutorial
Once you've designed your own native mobile app's theme, customize its content and features. Your native app is made up of screens, similar to site pages. Choose how many screens you need as well as what each one displays.
Add elements to your screens based on your business needs, such as a Wix Stores Product page, a Wix Events list, or a Wix Bookings class schedule. Customize your screen further with buttons, images, videos, and more. You can also enhance your app's design by selecting different colors and fonts.
Choose whether to customize your app's content from your site's dashboard or by downloading the Wix app and customizing from mobile.
Customizing the header
Your mobile app's header appears on the 'Home' screen and is the first element members see after they log in to your app. Style it for your business by adding your logo, a cover photo, and a theme color to make your buttons and accents pop.
Dashboard
Wix app
Wix Studio app
- Go to Mobile App in your site's dashboard.
- Click the Your own mobile app tab or click the tab with the name of your own mobile app.
- Click Edit Mobile App.
- In the Mobile App Builder, click your app's header to open the Edit Header panel.
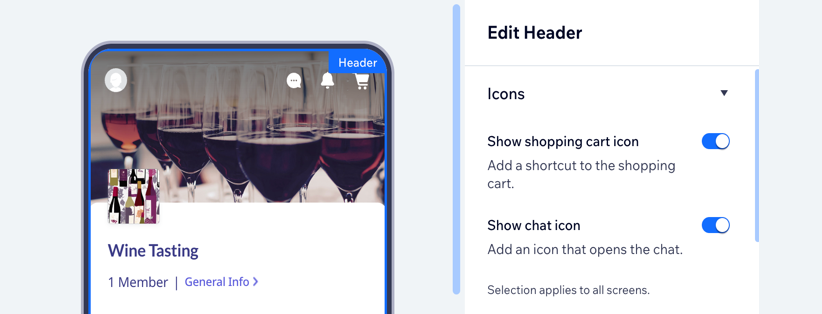
- Customize the design of your header using the available options:
- Icons: Enable the relevant toggles to add icons to your header.
Note: Depending on the Wix apps you've installed (e.g. Wix Stores, Wix Chat) you may see different customization options. - Type: Select a header design for your home screen:
- Icons: Enable the relevant toggles to add icons to your header.
Detailed
 to upload a cover photo. You can add multiple photos to create a slideshow. For slideshows, select a transition delay (in seconds) between photos.
Minimal

6. Click Save at the top right.
Customizing the navigation menu
Your own mobile app consists of screens, and the navigation menu helps visitors move between them. You can choose to place the navigation menu at the top or bottom of your app and customize its design by adding custom menu icons.
Dashboard
Wix app
Wix Studio app
- Go to Mobile App in your dashboard.
- Click the Your own mobile app tab or click the tab with the name of your own mobile app.
- Click Get started or click Edit Mobile App.
- Click the navigation bar of your app. It appears either under your app's header or at the bottom of the app.

- Choose a navigation layout:
- Top Tab Bar: Members navigate between screens at the top of your app directly under the header.
- Bottom Tab Bar: Members navigate between screens at the bottom of your app. You can add custom icons for each screen if you select this option.
- Labels: Click the toggle to show or hide the name of the screen in the navigation menu. The name appears under the screen's icon. It is recommended to include the screen name for accessibility reasons.
- Icons: Customize the icons in your navigation menu. Each icon corresponds to a screen. Hover over an icon and click Change icon to replace it.
- Click Save at the top right.
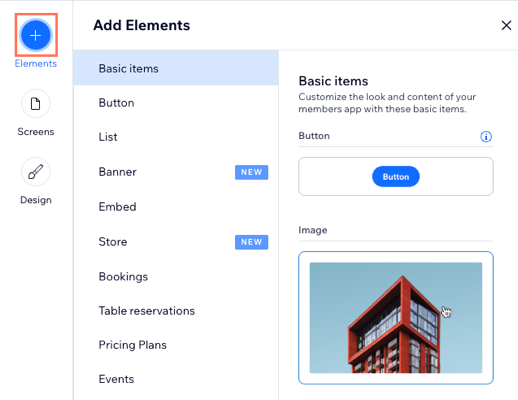
Adding elements to your screens
Elements are the building blocks of your app's content. Use them to showcase who you are, what you do, and what you offer to app users. For instance, if you own an event planning business, you can add an events element to allow people to RSVP directly from the app.
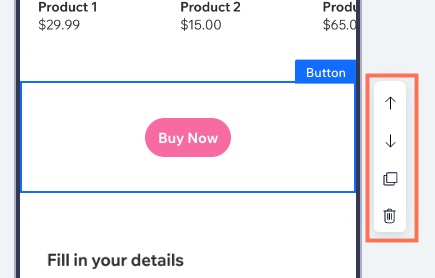
After adding elements, you can easily move them up or down on the same screen or transfer them to a different screen. You also have the option to duplicate elements, remove any that you don't want, and edit the content within each element.
Tip:
Learn more about adding elements for specific businesses such as online stores, restaurants and bookings.
Dashboard
Wix app
Wix Studio app
- Go to Mobile App in your dashboard.
- Click the Your own mobile app tab or click the tab with the name of your own mobile app.
- Click Get started or click Edit Mobile App.
- Click Elements on the left.
- Browse through the catalog and click an element to add it to your app.
Tip: In Basic Items you can add elements to design and organize your app like buttons, images, divider lines and videos.
- Click the element in the app preview to customize its display and content settings.
Note:
Not all elements can be customized in the Mobile App Builder. You may need to update some elements from the Wix app or Wix Studio app.
- (Optional) Manage the element further using the available options:
Note: The options vary depending on the elements you add.
Element Visibility
Reorder an element
Duplicate an element
 .
. Move the element to a different screen
 .
.Delete an element
 next to the element.
8. Click Save at the top right.
Managing your screens
Update your native app's screens including the total number of screens you want to show in your navigation bar, the order of the screens, and the screen names. You can also create screens that are hidden from your app's main menu.
Dashboard
Wix app
Wix Studio app
- Go to Mobile App in your dashboard.
- Click the Your own mobile app tab or click the tab with the name of your own mobile app.
- Click Get started or click Edit Mobile App.
- Click Screens on the left.
- Choose what you want to do:
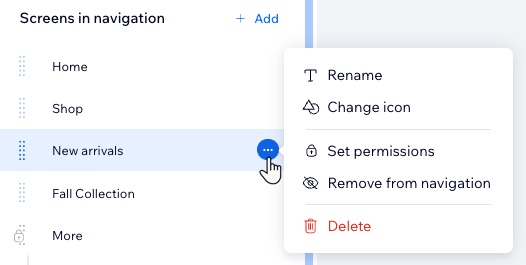
Add a new screen

Reorder a screen
Rename a screen
 next to the relevant screen.
Change a screen icon

Set screen permissions
Remove a screen from navigation
Delete a screen
Manage your system screens
Customizing your app's design
Personalize your own native mobile app's colors and fonts to align with your brand. Select an app theme or handpick colors and fonts to show your unique brand design.
Dashboard
Wix app
Wix Studio app
- Go to Mobile App in your dashboard.
- Click the Your own mobile app tab or click the tab with the name of your own mobile app.
- Click Get started or click Edit Mobile App.
- Click Design on the left.
- Choose what you want to customize:
Tip: Click Change App Theme to choose a pre-designed combination of colors and fonts.

- Color theme: Customize the colors of your app by selecting a color theme or individually choose the primary color, app background and text icons.
- Text theme: Customize your font by selecting a text theme or adjust the fonts for the headings and body individually.
- Header style: Customize the color of your header to match your primary color or your background color.
- Click Save.
FAQs
Click a question below to learn more about customizing your own native mobile app's features.
How do I change my app language?
Why do I need to download the Wix app?
If I make changes to the features and content of my native app, do I have to resubmit it for review?
Video tutorial
