Wix Editor: Applying Page Permissions
3 min
Choose who has access to your site's pages. You may want to restrict access to some of your pages to those who have a password or are approved site members.
To apply permissions to a page:
- Go to your editor.
- Click Pages & Menu
 on the left side of the editor.
 - Click the More Actions icon
 next to the relevant page.
 - Click Settings.
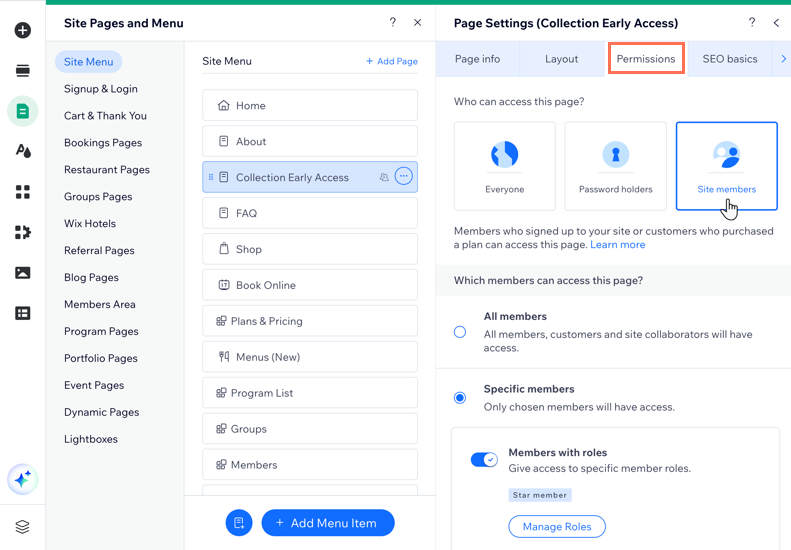
- Click the Permissions tab.
- Select one of the following options under Who can view this page?:
- Everyone: The page is public and open to all visitors.
- Password Holders: Only people who have the password can view this page.
- Set a password under What's the page's password?.
- Site Members: Your site visitors have to be members to see this page. They are asked to sign in or register if they try to access this page. Choose which members can access the page:
- All members: Any logged-in member can view the page.
- Specific members: Select members with specific roles and / or pricing plans. Click the toggle to enable an option.
- Members with roles: Give access to members with specific roles. Click Manage Roles to select which roles can access your member pages. If you don't have any roles, click Create Role to add new roles.
- Members with plan subscriptions: Give access to customers who bought a pricing plan. Click Manage Plans to select which plans grant access. If you don't have any plans, click Create Plan to add new plans.
Important:
If you select Specific members, be sure to add a Members Area to your site.

FAQs
Click a question to learn more about page permissions.
Do password protected pages appear in search results?
Why can't I see the option to change my page from 'Members Only'?
Can I customize my signup page?
Can I customize my member login page?


 .
.