

Wix Stores: SEO for Category Pages
6 min
In this article
- Optimizing your title tags, meta descriptions, and URL slugs
- Preventing search engines from indexing the page
- Managing canonical URLs
- Managing social share settings
- Adding additional meta tags
Important:
This article is about the new version of product categories. If your category creation page doesn't have SEO settings, you have the original version. If so, click this link to learn how to add, display, and manage categories.
Each category page has its own URL (e.g. www.mysite/category/shirts). This helps search engines understand what you're selling and how your site is organized, making it more "SEO friendly.
You can further optimize the SEO settings for your store's category pages to help get your store found online.
Note:
Changes you make to SEO settings do not appear immediately in search results. To help changes appear faster, you can submit your sitemap to Google.
Optimizing your title tags, meta descriptions, and URL slugs
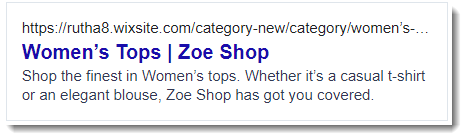
Category pages, like other site pages, include a title tag, meta description, and URL slug to help search engines and social networks show relevant information.
There are default SEO settings that Wix automatically adds to your category pages:
- Title tag: The category name and site name
- Meta description: The first approx. 160 characters of the category description
- URL slug (ending of the category page URL): The category name
To edit the category page's SEO settings:
- Go to Categories in the dashboard.
- Select the category you want to edit.
- Click Edit SEO Settings under Marketing & SEO.
- Edit any of the following:
- Title tag: Add a title that summarizes what the category is. We recommend giving concise category names (maximum 60 characters) that help potential customers understand the category.
- Meta description: Add a short description of your category (maximum 156 characters). This description helps users who read the description in search engine results decide if the page is relevant to them.
- URL Slug: This text is the last part of your page's direct link. You should only change this if it's necessary to reflect the content of your page. We recommend keeping it short and easy to read. Tip: When you change a Category Page URL slug, make sure manually create your own redirect so the previous link redirects to the new one.
- Click Save.
Preventing search engines from indexing the page
In most cases, you'll want search engines to index your shop's categories and display them in search results, however, you may want to hide specific ones.
For example, if you display a category only on a password-protected page that isn't available to the general public, you may not want it to appear in search engine results.
To prevent search engines from indexing the category page:
- Go to Categories in the dashboard.
- Click the category you want to edit.
- Click Edit SEO Settings under Marketing & SEO.
- Disable the Let search engines index this page toggle.
Managing canonical URLs
The URL for each category page is automatically generated according to the category name. In addition, you can edit a category's URL slug (see above).
The canonical URL is a meta tag that defines the primary URL of a given page. In other words, if there are multiple versions of your page's URL, this meta tag tells search engines which version they should index and show to potential site visitors. Learn more about canonical tags.
Wix automatically creates a default canonical URL for all of your pages. You can customize it in the Advanced tab.
To edit the category page's canonical URL:
- Go to Categories in the dashboard.
- Click the category you want to edit.
- Click Edit SEO Settings under Marketing & SEO.
- Click Advanced.
- Click Additional tags.
- Click the Edit icon
 next to canonical.
 - Enter the URL in the text box under Tag value.
- Click the Checkmark icon
 .
. - Click Save.
To restore the default Canonical URL:
Delete all text in the Canonical URL text box then press Enter on your keyboard. Learn more about removing canonical tags.
Managing social share settings
Optimize the image, titles, and description that appear when people share your category on social media.
By default, the category's og:image, og:title and og:description are used for social media. You can edit these settings to meet your needs.
To manage the category page's social share settings:
- Go to Categories in the dashboard.
- Click the category you want to edit.
- Click Edit SEO Settings under Marketing & SEO.
- Click the Social Share tab.
- Choose which social share settings you want to edit:
Category image
 to open the Photo Studio.
 .
.Title
Description
X settings
Adding additional meta tags
Meta tags are snippets of HTML code that describe your page’s content. While not visible on the page itself, they appear in the code and tell search engines how to display the page in search results.
Wix automatically adds all the required meta tags to your categories based on common SEO best practices. Some examples of these are your category's title tag and your category's meta description. You can add your own meta tags if required.
Important:
- You can only use the following tag types: <meta> and <link>.
- You can add up to 10 tags, but can't add a meta tag that Wix already created for you.
- If you want to add an additional meta tag that is not supported, you can use the Custom Code section.
- You can also add tags to your site's SEO Settings.
To add more meta tags to the category page:
- Go to Categories in the dashboard.
- Select the category you want to edit.
- Click Edit SEO Settings under Marketing & SEO.
- Click the Advanced tab.
- Click Additional tags.
- Click + Add New Tag.
- Enter your tag in HTML format.
- Click the Apply icon
 .
. - Click Save.
Tip:
You can access the URL of an image or any other site file to add it to an additional meta tag. Click Site files below the text box to open your Media Manager and copy the URL.
Next steps:
- Read more about SEO best practices.
- Learn how to use keywords effectively.
