

Wix Restaurants: Adding and Setting Up a Loyalty Program
7 min
In this article
- Step 1 | Create your loyalty program
- Step 2 | Choose how customers earn points
- Step 3 | Set up rewards
- Step 4 | (Optional) Activate email automations
- Step 5 | Review your loyalty program
- Step 6 | Add the loyalty widget to checkout
- FAQs
Encourage repeat orders and reward loyal diners by adding a loyalty program to your restaurant site. Choose how customers earn points, such as placing online orders, and let them redeem rewards like discounts on future meals.

Note:
To launch your loyalty program, you need upgrade to a plan that includes accepting payments.
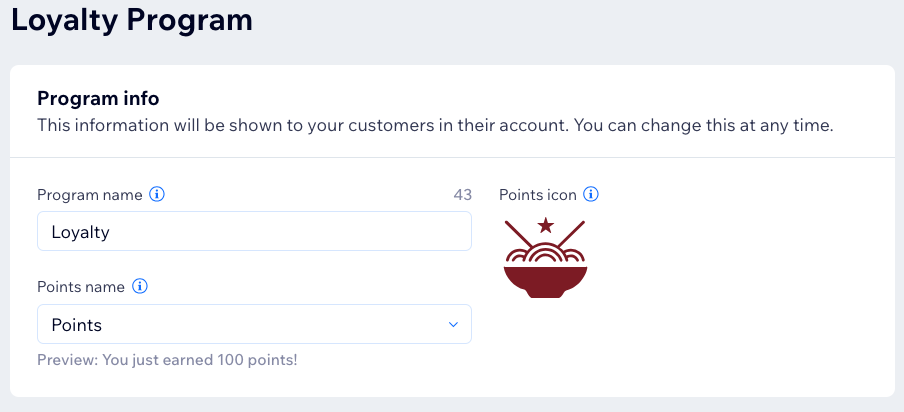
Step 1 | Create your loyalty program
Start by naming your program, customizing the points, and choosing an icon to represent them.
Dashboard
Wix app
- Go to Loyalty Program in your site's dashboard.
- Click Start Now.
- Enter your program details:
- Program name: Enter your loyalty program name.
- Points name: Click the drop-down and choose the term you want to use to describe "points" on your site:
- Points: The default "Points" term is used to describe loyalty points.
- Custom name: Enter the name you want to use to describe loyalty points (e.g. "Stars" or "Hearts").
- Points icon: Select a loyalty points icon or upload your own.
- Click Continue to Setup.
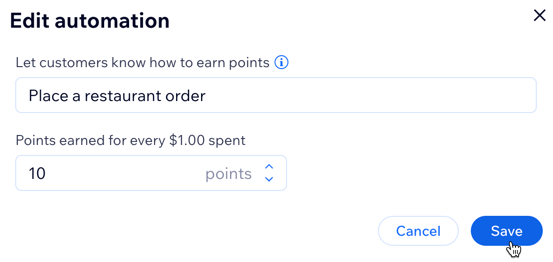
Step 2 | Choose how customers earn points
Let customers earn points for actions like signing up or placing orders. You set how many points are awarded for each action.
Example:
Award 1 point for every $1 spent (excluding delivery fees and taxes).
Note:
Points are rounded down to the nearest whole number. For example, if you reward 10 points per $1 and a customer spends $4.99, they earn 40 points.
Dashboard
Wix app
- Scroll to the Points section.
- Hover over Place a restaurant order and click Edit.
- Enter your points settings:
- How to earn points: Let customers know how to earn points.
- Points earned for every $1 spent: Enter the amount.
- Click Save.
- (Optional) Click + Add Way to Earn to add more actions customers can earn points for.
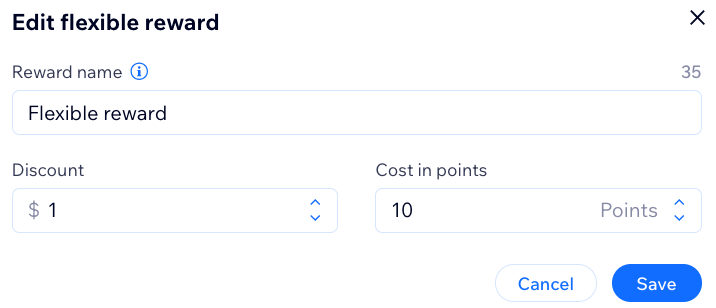
Step 3 | Set up rewards
Define what customers receive in exchange for their points, like discounts on future orders.
Dashboard
Wix app
- Scroll down to the Rewards section.
- Hover over Flexible reward and click Edit.
- Enter your rewards settings:
- Reward name: The name shown to customers.
- Discount: The discount value (e.g. $1 off).
- Cost in points: How many points are needed to redeem it.
- Click Save.
- (Optional) Click Create Reward to add more rewards.
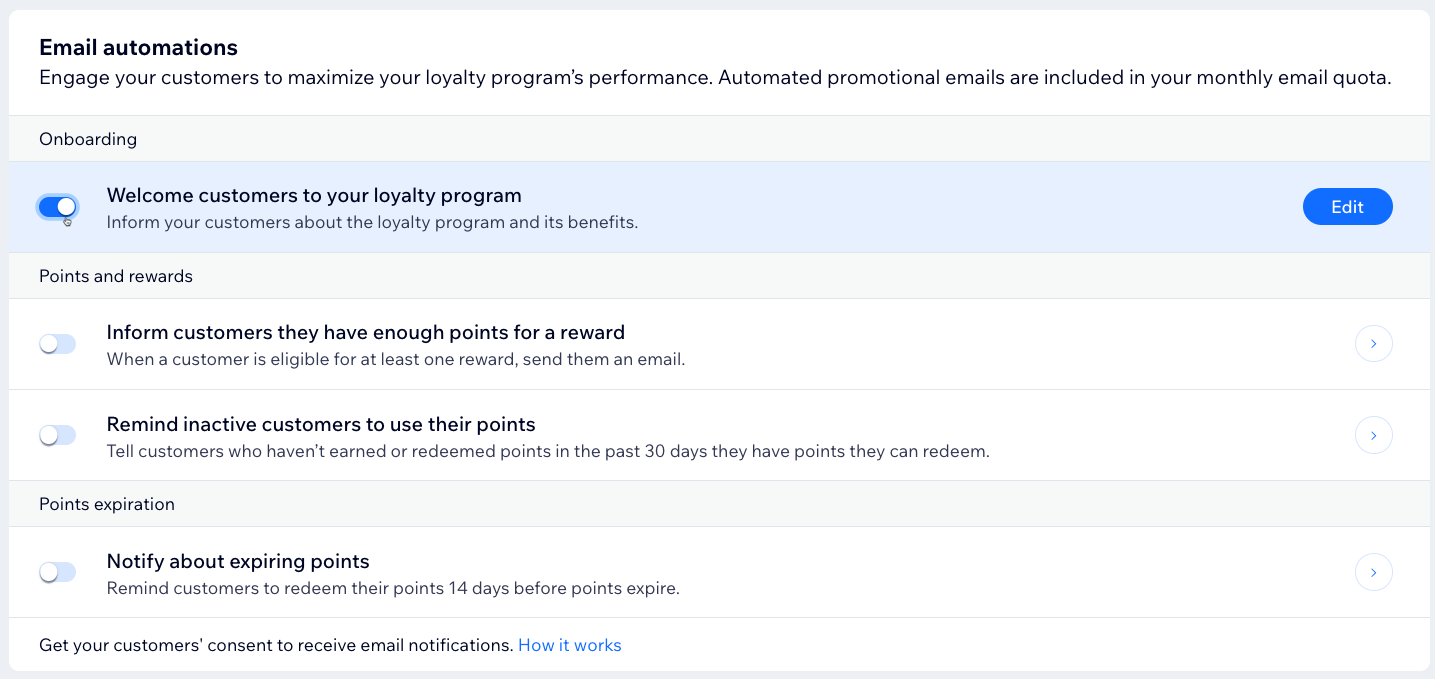
Step 4 | (Optional) Activate email automations
Use automations to let customers know when they’ve earned or can redeem rewards.
Notes:
Email automations come pre-installed. The options available depend on how you’ve set up points, expiration rules, and tiers.
Dashboard
Wix app
- Scroll down to the Email automations section.
- Toggle each automation on or off:
- Enabled: Customers receive emails automatically.
- Disabled: Email won't be sent.
- (Optional) Hover over an automation and click Edit to customize the email.
Step 5 | Review your loyalty program
Review the details of your loyalty program before launching it. Check that you're happy with the ways customers can earn points and redeem points.
Dashboard
Wix app
- Review your Program details and click Edit Details to make any changes.
- Review the Points, Rewards, and Email automations sections. Click Edit on any item to make changes.
- Click Launch Program at the top right.
- Click Launch Program again to confirm.
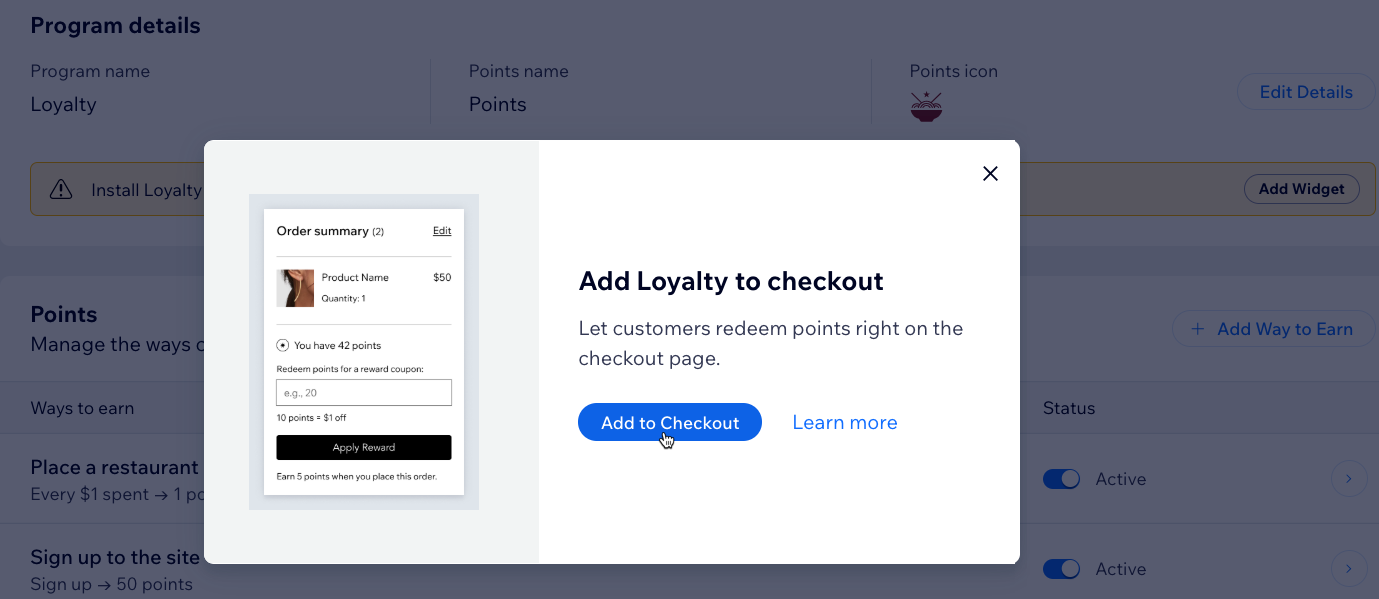
Step 6 | Add the loyalty widget to checkout
Setting up a loyalty program automatically adds two new pages to your site. Your new Loyalty Program page shares details of your program with site visitors. Your new My Rewards page is where loyalty program members keep track of their points and rewards. Add the loyalty widget to your checkout page so customers can redeem points while placing an order.
Notes:
- These new pages won't be live and accessible to visitors until you publish your site.
- Click Go to Editor to add the loyalty pages to your site.
To add the loyalty widget:
- Go to Loyalty Program in your site's dashboard.
- Click Add Widget.
- Click Add to Checkout.
- Click Add Plugin to confirm.
- Click Go to Live Site to view your site pages, or Stay in Dashboard to keep editing.
Tip:
You can also add a loyalty widget to your site’s header, so customers can quickly access their points and rewards from any page.
FAQs
Click on a question below to learn more about the loyalty program.
Can customers redeem points for delivery fees or tips?
Can I deactivate the loyalty program?
Can I delete the loyalty program entirely?
How can I install the Loyalty program if I already have the Wix Restaurants Orders app?
How does the Order Discount reward work in the Loyalty program?
