Facebook Ads: Creating a New Campaign
4 min
In this article
- Step 1 | Choose a campaign goal
- Step 2 | Customize your ad content
- Step 3 | Choose your ad audience
- Step 4 | Set your monthly budget
- Step 5 | Review your campaign and launch
Create targeted campaigns for Facebook and Instagram and get your business in front of thousands of people. Your Facebook Ads campaign is entirely in your control: design your ad, choose a monthly budget and set a specific target audience. Wix's AI also creates lookalike audiences to help get more eyes on your business.
Before you begin:
Make sure you've already done the following:
- Connected your Facebook Page
- Upgraded to a Premium Plan
- Published your site
- Connected a domain
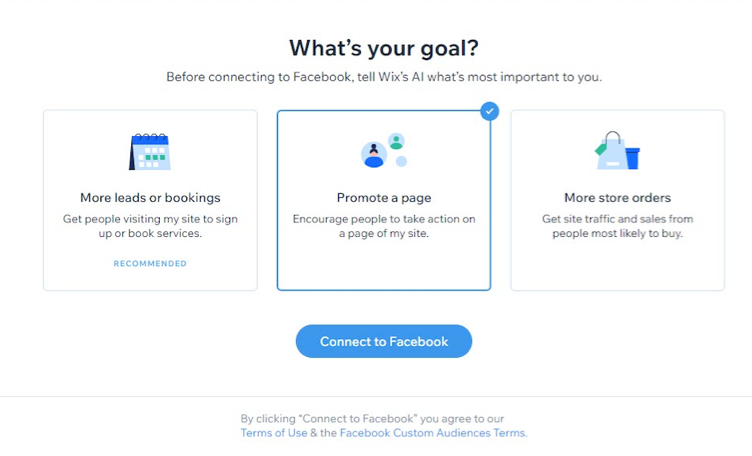
Step 1 | Choose a campaign goal
Once you've connected your Facebook page to Wix, the first step of creating a campaign is choosing a campaign goal. Depending on your business you can focus on getting more store orders, bookings to your site, or to increase views and traffic to a page.
Important:
Once you choose a campaign goal for your business you cannot change it.
To choose a campaign goal:
- Go to Facebook Ads in your site's dashboard.
- Click Let's Start.
- Click the goal you want to use for this campaign. Learn more about the different types of campaign goals.
- Click Continue.
Note: If this is your first time creating a campaign, you need to first complete the campaign setup steps. If you've already done this, click Create Ad.
Step 2 | Customize your ad content
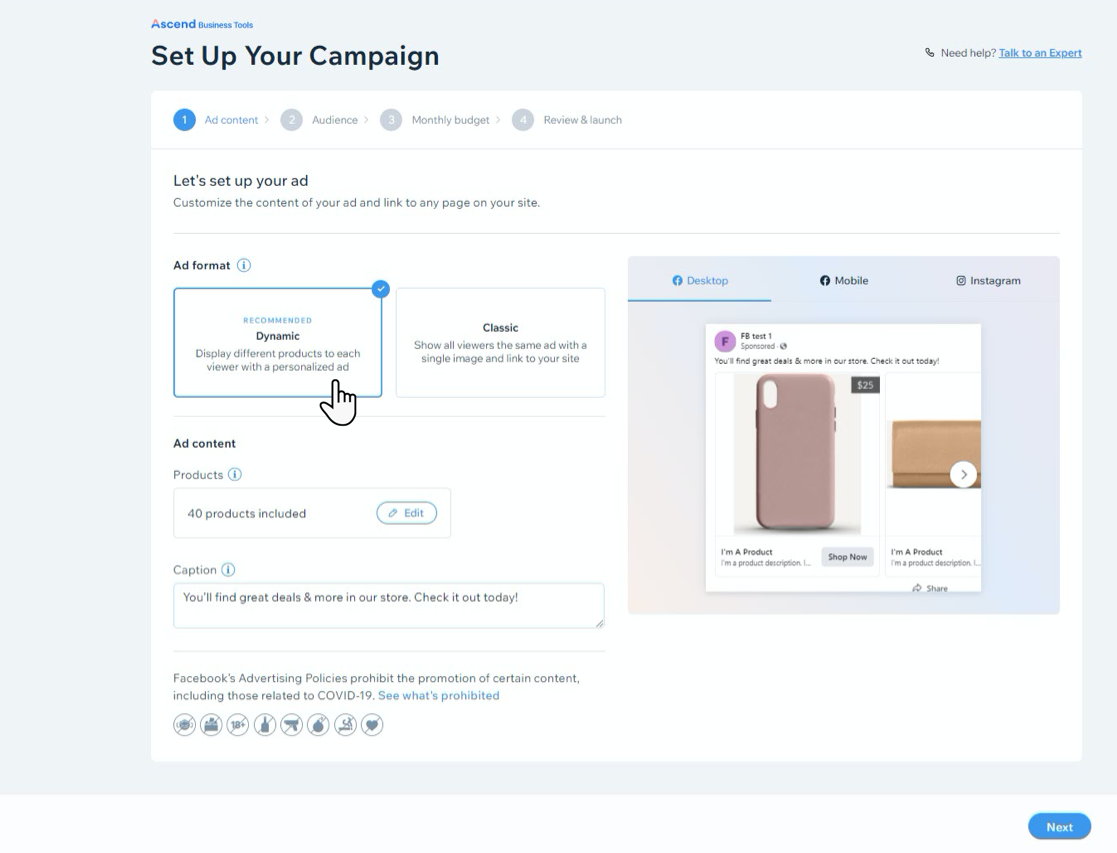
Choose an ad format for your campaign and update the ad's creative. Depending on the ad format you choose, you will see different options.
Note:
You can only choose an ad format for the 'more store orders' campaign goal (if you have an online store). For the 'promote a page' goal or 'more leads or bookings' goals, you only have the option of creating a classic ad.
To customize your ad content:
- Select the ad format you want to use for your campaign. Learn more about what ad format to choose.
- For dynamic ads:
- Click Edit under products to select which store products should be included in your dynamic ad.
- Create a caption for your dynamic ad that appears at the top of the product carousel.
- For classic ads:
- Add a caption for your ad in the text box under Caption. You can add up to 150 characters.
- Choose an image or video for your ad. Depending on the campaign goal, the ad image is pulled from your site homepage, Facebook page, or products. Hover over the image and click Change media to upload your own. Learn more about best practices for image and video ads.
- (Optional) Add a headline in the text box under Headline.
- Add a URL under Set a Destination URL to choose the webpage that opens when someone clicks the ad (e.g. homepage or products/services page). You can also click the drop-down to select from any an existing URL on your site (doesn't work for password protected pages).
- Click the drop-down under Button Text to choose a call-to-action for the ad (e.g. Learn More).
- For dynamic ads:
- Click Next when you're done creating your ad.
Step 3 | Choose your ad audience
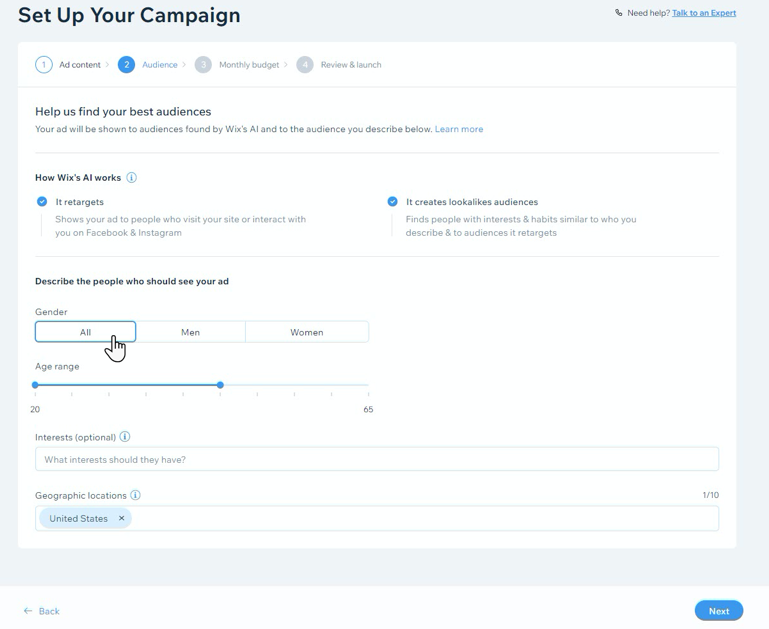
Pick a target audience using parameters like gender, age range and location. Once you pick an audience, Wix's AI uses the information to create lookalike audiences to help expose your campaign to more people. Learn more about choosing the right ad audience.
To choose your audience:
- Under Gender, select who your campaign will be exposed to: All, Men or Women.
- Drag the Age range slider to set the age range you want to target for your audience.
- (Optional) Add up to 10 interests for your target audience. These are things your audience might search for online. For example, if you're running an online store for children's clothing, add interests like children's clothes, children's books, children's toys, etc.
- Choose up to 10 geographical locations where your audience might be browsing from.
- Click Next.
Step 4 | Set your monthly budget
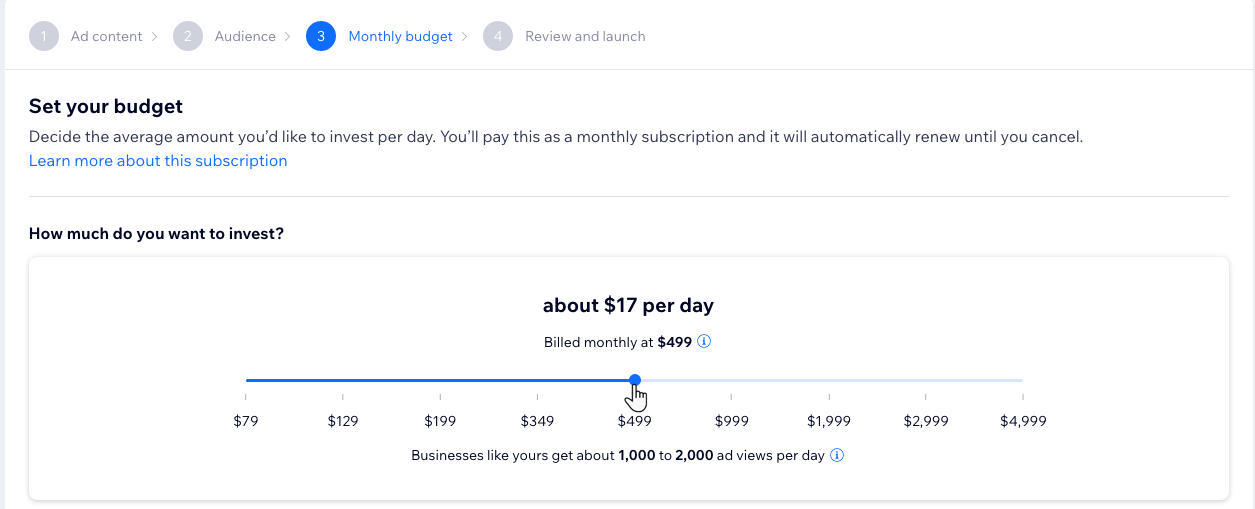
Choose a campaign budget that best suits your business goals. Your monthly subscription includes your ad spend and the 15% fee Wix takes to run your ads and optimize your campaign. Learn more about what your subscription includes.
To set your budget:
- Drag the How much do you want to invest? slider to choose a monthly budget amount. You have the option of choosing a subscription from $79-$4999 (USD) a month.
- Click Next.
Tip:
You can also increase or decrease your monthly subscription while your campaign is running.
Step 5 | Review your campaign and launch
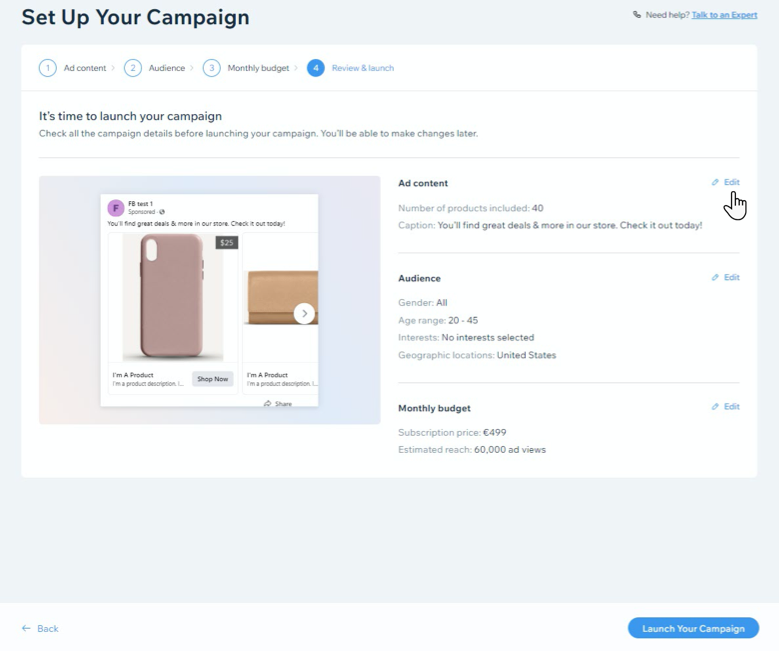
Review your campaign details and edit any section to make more changes. When you're ready to launch, enter your payment details to purchase the subscription. After the purchase is complete, your campaign is submitted for review.
To review your campaign and launch:
- Review the campaign details under Ad content, Audience and Monthly budget. Click Edit next to a section to make changes.
- When you're ready click Launch Your Campaign.
- Review your payment details and click Submit Purchase.
Your campaign now goes into review for Wix and Facebook approval. This process could take up to 72 hours.
Want some inspiration creating your campaign?
Here are some great examples of Facebook Ads with Wix campaigns.


