

Enterprise Solution: Getting Started with the Marketing Suite
12 min
In this article
- Creating a campaign
- Managing your campaigns from the Campaigns page
- Managing blog posts for campaigns
- Managing apps and third-party integrations
- Managing automations
- Launching your campaign
- Viewing campaign analytics
- FAQs
Welcome to the Marketing Suite, the ultimate platform designed to help your organization streamline the creation and management of marketing campaigns. Use AI-powered tools to transform your ideas into launch-ready campaigns in minutes.
From visually stunning landing pages to compelling blog posts, create high-quality marketing assets that align with your vision, goals, and brand across every touchpoint. Integrate Wix tools and third-party apps to track performance, analyze traffic, and optimize conversions—all from one centralized dashboard.

Creating a campaign
Bring your vision to life by sharing details about your campaign, choosing the relevant assets based on your goals, and defining your brand style. Upload a brief to generate your campaign, or have a conversation with the AI wizard to get started. You can edit the campaign details and assets at any time during the process.

To create a campaign:
- Go to Marketing Suite in your enterprise dashboard.
- Click Create New Campaign in the top right, or Create Campaign if it's your first time.
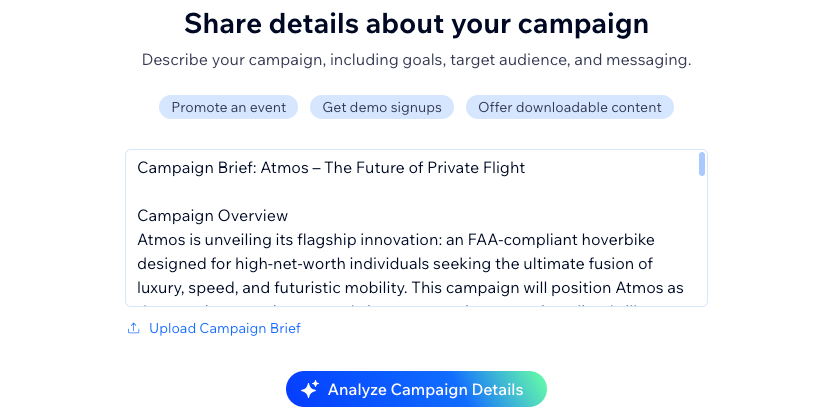
- (Optional) Select one of the existing goal tags for the campaign: Promote an event, Get demo signups, Offer downloadable content.
- Choose how you want to start creating your campaign:
- Upload a Brief: Share an existing campaign brief document.
- I Don't Have a Brief: Describe your campaign, including goals, target audience, and messaging.
Note: Clicking another goal tag overrides the text in the input box.
- Click Analyze Campaign Details.
- Review and edit your campaign outline including the Campaign name, Goals, Description, Target audience and messaging, and then click Continue.
- Select the relevant assets for your campaign. You can add and customize as many assets as you need per campaign.
- Click Continue.
- Choose a brand kit for the campaign:
- Choose an existing brand kit: Select from the brand kits you’ve previously uploaded.
- Create a Brand Kit: Let the AI assistant create a brand kit:
- Create Brand Kit: Paste in the link to your website in the Enter site URL field, then enter sample copy in the Add tone of voice example, and then click Create Brand Kit.
- Add manually instead: Import your site's assets, such as logo, colors, and fonts, or add them manually.
- Use Default Theme: Start with a standard layout that you can customize later.
- Click Continue.

- Choose a light or dark color theme for your pages. Your choice here impacts the effect background and color options.
- Choose up to 3 words to define the look and feel of your assets, as well as the overall layout and design of your assets.
- Click the box under Add reference images to upload up to five image samples. These images act as references for the AI wizard to generate images with a similar look, feel, composition and color scheme. The images you upload will not appear in your campaign assets, but can add them later if you need.
- Click Generate Campaign.

- Preview your assets and then click Continue to campaign.
What's next?
Once you generate your campaign, you can preview all assets individually, receive feedback from key stakeholders in your organization and make any necessary updates from the campaign page. Click the More actions icon  to Edit, Preview or Rename any page.
to Edit, Preview or Rename any page.Managing your campaigns from the Campaigns page
Easily customize and track your campaigns while staying focused on results. Share key details, choose the right assets, and set your campaign’s style—all designed to streamline your marketing. Whether launching something new or refining existing campaigns, the Campaigns page helps you filter, view, and manage everything in one place.
To manage your campaigns:
- Go to Marketing Suite in your enterprise dashboard.
- Hover over the relevant existing campaign.
- Click Manage Campaign.
- Choose what you want to do:
Add launch date

Change campaign URL

Activate Enterprise plan

Renaming and archiving campaigns
Generate asset
Filtering and searching for campaigns


Managing blog posts for campaigns
When creating blogs as part of a campaign, a dedicated blog site is created to host all your blog posts across campaigns. Each blog post is accessible directly from its relevant campaign and from the main blog site.
Important:
To make your blog content visible, you first need to publish the blog site itself. Afterward, ensure that each blog post is published individually for it to appear in your campaigns and on the blog site.
To manage blog posts for a campaign:
- Go to Marketing Suite in your enterprise dashboard.
- Click Manage Campaign under the relevant campaign.
- Click Blog posts under Campaign assets.
- Choose the relevant option:
- Customize your blog: Click Edit Post. This takes you to your editor where you can customize your blog's design and update the copy as needed.
- Manage your blog feed: Click the More Actions icon and then click Manage blog to go to Blog Overview in the dashboard. From there, you can review your organization's latest posts, create categories, import existing posts, and more. Learn more about managing your blog posts.

Managing apps and third-party integrations
Manage and integrate apps seamlessly within your Wix Marketing Suite to enhance your enterprise marketing efforts. Connect powerful third-party tools, customize integrations, and streamline workflows—all from one centralized dashboard.
Tip:
Apps and automations provide the key tools for integrating with your chosen CRM, such as Salesforce, or HubSpot. By installing the relevant CRM app and setting up an automation, you can seamlessly export collected contacts to your CRM for better lead management and tracking.
Learn more about integrating:
To manage apps and third-party integrations:
- Go to Marketing Suite in your enterprise dashboard.
- Click Manage Campaign under the relevant campaign.
- Scroll down to Apps and integrations.
- Choose what you want to do:
- Open an existing app: Click Open under any installed apps to manage them, e.g. Wix Forms.
- Install a recommended app: Click Install under any recommended app and follow the on-screen instructions to complete installation.
- Manage Apps: Go to the Manage Apps page in your site's dashboard.

Managing automations
Automate your marketing workflows with ease using Wix Marketing Suite’s powerful automation tools. Set up triggers and actions to streamline tasks like sending follow-ups, segmenting audiences, and nurturing leads—all without manual effort.
To manage automations:
- Go to Marketing Suite in your enterprise dashboard.
- Click Manage Campaign under the relevant campaign.
- Scroll down to Automations.
- Choose what you want to do:
- Use a recommended automation: Click Use This Automation to set up a recommended automation for your campaign, by following the on-screen instructions. Learn more about Wix Automations.
- Manage Automations: Click to go to Automations in your site's dashboard.

Launching your campaign
You can launch any of your organization's campaigns whenever you choose, regardless of the launch date, by publishing the assets.
The assets then appear on a standalone page that feeds data and analytics to your dashboard.
Important:
If you need to change the URL of your campaign, you first need to activate the campaign. Activation unlocks the ability to connect a specific domain, create routing, or edit the campaign’s URL, ensuring it aligns with your branding. Once activated, you can launch your campaign with custom URLs.
To launch your campaign:
- Go to Marketing Suite in your enterprise dashboard.
- Click Manage Campaign under the relevant campaign.
- Click Edit page under the relevant asset.
- Click Publish in the top right.

Viewing campaign analytics
Track the performance of your marketing campaigns in real time from the Campaigns page in Wix Marketing Suite. View key analytics, monitor engagement, and measure success with detailed insights—all in one place.
To view your campaign analytics:
- Go to Marketing Suite in your enterprise dashboard.
- Click Manage Campaign under the relevant campaign.
- Scroll down to Analytics.

Tips:
Click View under any metric for a more detailed breakdown, or click View Analytics to go to Analytics Highlights in your site's dashboard.
FAQs
Click a question below to learn more about the Marketing Suite.
What types of assets can I create with the Marketing Suite?
Can I edit my campaign details after it's generated?
What should I include in my campaign brief for optimal results?
How can I preview my campaign assets?
What should I do if I don’t have a campaign brief?
How do I track the performance of a campaign?
What third-party apps can I integrate with my campaigns?

Is there a limit to the number of campaigns I can create?
What happens if I want to make changes after publishing my campaign?
