

AI Tools: Managing the Front Desk Agent
12 min
In this article
- Recommended actions
- Inbox direct communications
- Highlights & insights
- FAQs
Use the Front Desk Agent dashboard to keep track of customer activity and focus on the actions that move your business forward. Follow AI‑recommended actions, review and approve AI‑generated replies, and spot trends in your customers’ questions with weekly highlights and insights.
Recommended actions
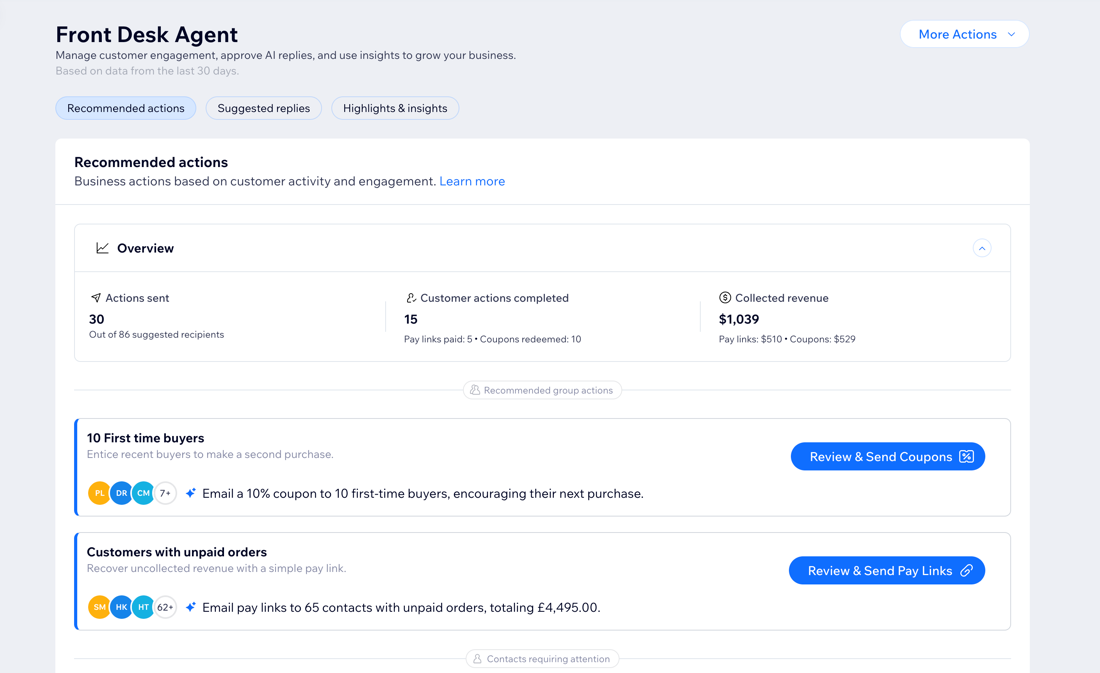
The Recommended actions section helps you turn customer activity into concrete business results. Juno analyzes your customers’ recent behavior and surfaces opportunities such as sending pay links to collect revenue or coupons to encourage future purchases.
In the overview, you can view data on:
- Actions sent: The total number of suggested actions you reviewed and sent to your customers in the last 30 days.
- Customer actions completed: The number of pay links paid and coupons redeemed by customers.
- Collected revenue: The amount of revenue from orders paid using pay links and coupons.
Actions are grouped into Bulk contact actions and Contact briefs & actions:
- Bulk contact actions: Each group has a single suggested action that you can send in bulk to all included contacts.
- Contact briefs & actions: The contacts listed here have more than one suggested action, so you choose how to follow up with each person. To help you decide, each contact includes an AI-generated contact summary of their recent activity and history.
What to know about sending pay links:
- You need to publish and upgrade your site so you can accept online payments and use pay links. If your plan expires, your active pay links will be on hold.
- In order to accept payments, you must also set up a payment method. If you've already set up a payment method for Wix Stores, Wix Bookings or Wix Events, you do not need to set one up again.
To review and approve actions:
Dashboard
Wix app
- Go to the Front Desk Agent in your site's dashboard.
- Choose how you want to start:
- Go to Bulk contact actions to review actions for a group of contacts.
- Go to Contact briefs & actions to review actions per contact.
- Choose what you want to do:
Send pay links
Send coupons
 to change the discount amount.
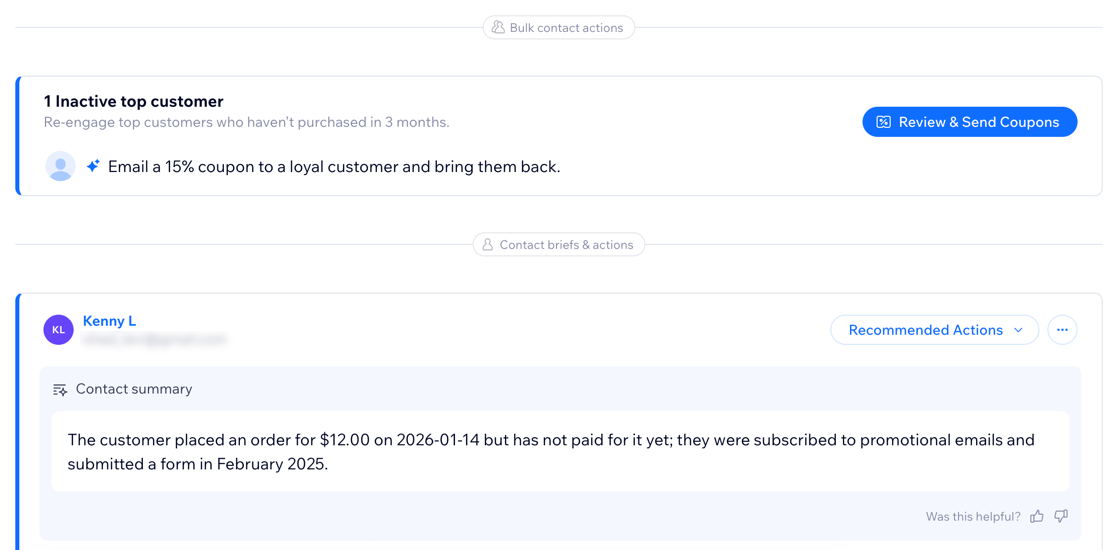
Note:
To remove suggestions for individual contacts, click the More Actions icon  and click Remove recipient.
and click Remove recipient.Inbox direct communications
Review and approve AI-generated replies before they’re sent, so you stay in control of your brand’s voice and your customers’ experience. You can see incoming messages by priority, edit suggested replies, and choose which channel to send them through.
Tip:
Every time there's an incoming message from a customer that hasn't been answered yet, a new item is created in this section.
To review and approve messages:
Dashboard
Wix app
- Go to the Front Desk Agent in your site's dashboard.
- (Optional) Select a priority level under Review & Approve to review conversations according to their level of urgency: High priority or Other.
- Click Review & Approve on a conversation to open it and review the agent's suggested reply.
- (Optional) Customize the message and contact using the following actions:
- Improve the agent's response by adding more context or changing the message's tone of voice. Learn more about enhancing a message with AI.
- Get more insights about a contact when they reach out by clicking Summarize Contact in an item (e.g. view their recent activity or purchase history).
- Click Add note to contact to keep track of important information, like if you offered them a discount.
- Click the Priority icon
 to edit the priority level of the conversation.
 - Change the channel you're sending the message from by clicking the drop-down next to Message via.
- When you’re ready, click Send to send the reply.

Tip:
- Click the drop-downs on the left of the message window to review each priority level's messages.
- Each message is also tagged with a specific topic type (e.g. "Financial", "Bookings") so you get an idea, at a glance, for what the conversation's about.
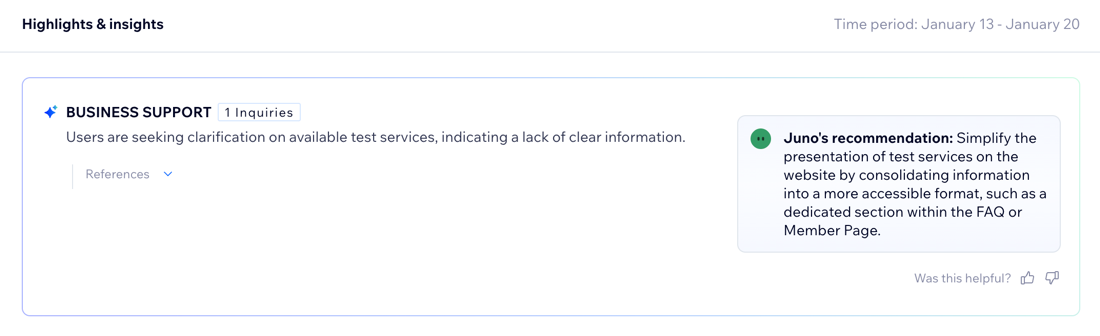
Highlights & insights
The Highlights & insights section gives you a clear overview of your top customer issues so you can spot trends and fix issues, without combing through every message. Once a week, your agent automatically summarizes the main concerns from the last 7 days (e.g. "shipping delays" or "refunds") and offers practical recommendations for next steps you can take to improve the customer experience.
If you want more context, click or tap the References drop-down to review which conversations are included in each highlight. You can also mark each AI recommendation as helpful or not helpful to train your agent and improve suggestions over time.
To view highlights & insights:
Dashboard
Wix app
- Go to the Front Desk Agent in your site's dashboard.
- Scroll down to Highlights & insights.
FAQs
Click a question below to learn more.
Can I deactivate the agent?

What happens if I remove a suggested reply?

How do I add an email address for a contact who is missing one?
 next to a contact and select Edit.
Can I send pay links for more than one order?
Why can't I see a section in the Front Desk Agent dashboard?
Where can I see a history of the pay links and coupons I sent?
