

Wix Stores: Selling Wholesale with SparkLayer
8 min
In this article
- Step 1 | Prepare your store
- Step 2 | Add the SparkLayer app
- Step 3 | Set up your B2B pricing
- Step 4 | Create customer groups
- Step 5 | Set up your B2B contacts
- Step 6 | Test your setup & start selling
- FAQs
SparkLayer brings powerful B2B functionality to your Wix store—transforming it into a business that caters to both retail and wholesale customers. B2B wholesale customers can log in, place orders, and seamlessly manage their accounts. Both types of customers, wholesale and retail, enjoy a tailored shopping experience, with unique pricing, payment options, and other customized features.
Check out this video to learn more about how SparkLayer can help you turn your existing retail business into an efficient B2B store.
Learn about current limitations to using SparkLayer in Wix
Step 1 | Prepare your store
To use SparkLayer with your Wix store, certain settings need to be in place in addition to regular setup necessary for a functional store (e.g. connecting a payment method).
To prepare your store:
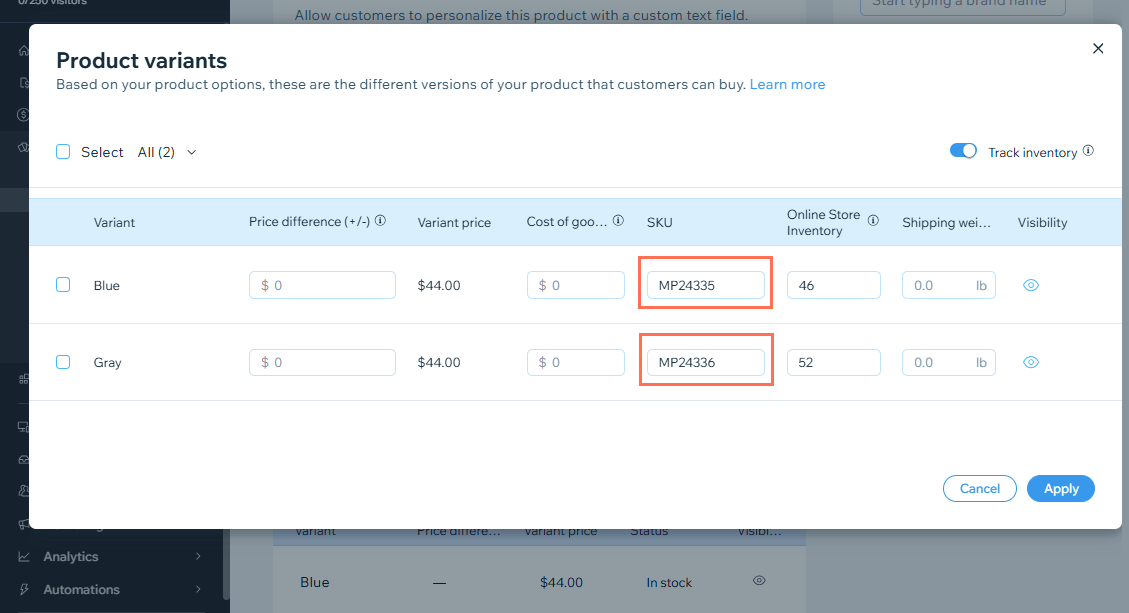
- Add a unique SKU to every product or product variant (see the FAQ below for instructions):
Important: Unique SKUs for each product and variant are essential for selling B2B. - Make sure your site has a Members Area. If you removed it, add the members area to your site.
- Make sure you've connected a payment method.
- Set up one or more shipping rules.
Step 2 | Add the SparkLayer app
Now that your store is ready, you can add the SparkLayer app.
Dashboard
Wix Editor
Studio Editor
- Go to the SparkLayer app in the Wix App Market.
- Click Add to Site.
- Create a SparkLayer account (or log in if you already have one).
Note: Make sure you remember which email address you used to sign up. - Accept the billing plan in Wix to begin your free trial.
Note:
Once you've installed the app, SparkLayer will automatically sync your product and customer info.
Step 3 | Set up your B2B pricing
Next, go to SparkLayer and start setting up your B2B pricing. If you decide to set up multiple customer groups, you can set up separate pricing rules for each one.
To set up pricing:
- Go to Manage Apps in your site's dashboard.
- Click Open next to the SparkLayer B2B & Wholesale app.
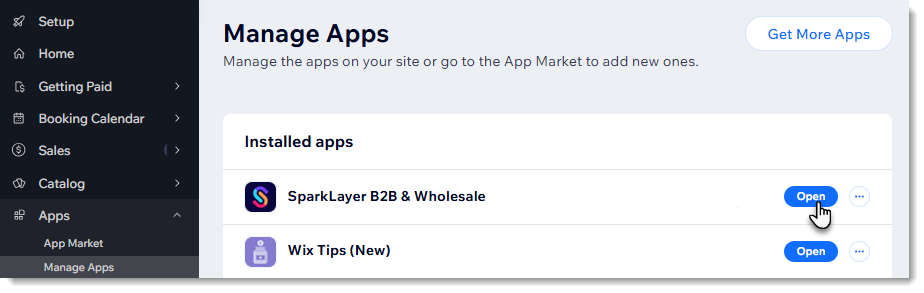
- Click Go to Dashboard to set up pricing.
Tip:
SparkLayer offers manual, automatic, and integrated pricing options. Learn more about managing pricing in SparkLayer.
Step 4 | Create customer groups
You need to create at least one customer group in SparkLayer to sell wholesale. You then have the option of creating additional customer groups, for example, you can create groups for new or VIP customers. This allows you to offer different groups of customers separate pricing, different payment methods, and more.
Notes:
- Every B2B customer needs a 'B2B' label.
- If you created additional customer groups, you need to create additional labels for them in step 5. You can choose your own label text.

Learn how to set up customer groups in the SparkLayer dashboard.
Step 5 | Set up your B2B contacts
In order for your site to recognize B2B customers, they need to be in your Wix contact list. Additionally, each B2B customer needs to have a B2B label and must be a site member. You can add contacts manually to the Contacts page in your Wix dashboard or you can import a contact list.

To set up B2B contacts:
- Add your customers to Wix Contacts:
Note: Make sure you complete all the address fields.- Add contacts manually
- Import contact using a CSV file, or from Gmail.
- Create a B2B label.
- (Optional) Create additional labels, one for each customer group (if you created more than one).
- Assign the label(s) to each B2B customers.
- Set the contact as a member.
Notes:
- Check the FAQ below to learn more about creating and assigning labels.
- Customer addresses are synced once when the b2b label is first added to a Wix contact. When you add additional contacts or edit existing ones, you need to update your changes manually in SparkLayer.
- You can use SparkLayer's address book to add and edit addresses in the My Account area.
Step 6 | Test your setup & start selling
Before you go live, we recommend you test the process to make sure it's working smoothly. Use the SparkLayer Launch Checklist to make sure your store is ready.
After testing, wholesale customer can log in and make purchases.

FAQs
Click a question below to learn more about SparkLayer and Wix Stores.
How can SparkLayer help me with setup?
How can I create a label and apply it to my wholesale customers?

How can I add SKUs to my products and variants?

Can I offer different sets of prices to different B2B customers?
What types of payment methods can my customers select at checkout?
How can my customers view their purchase history?

Can sales agents make orders on behalf of customers?
How can I show products only to retail or wholesale customers?
How do I restrict products for specific groups?
How can I invite my wholesale customers to my site?
