Adding text (titles and descriptions) to your gallery items, helps site visitors get a better understanding of your media. Titles and descriptions help give context to your images and videos and shape your visitors' experience.
You also have the option to add alt text to your media.
Alt text helps search engines understand your content and improve your SEO, and is important for accessibility purposes. Some of your site visitors might be using screen readers, which read out the alt text to describe the media on your site.
Adding text to gallery items
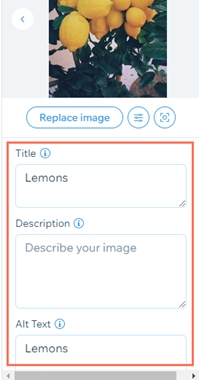
You can add a title, description and alt text to your Wix Pro Gallery media.
To add text:
- Go to your editor.
- Click the pro gallery element on your page.
- Click Manage Media.
- Select an image or video.
- Enter the image's title, description and alt text in the relevant fields.
- Click Done.
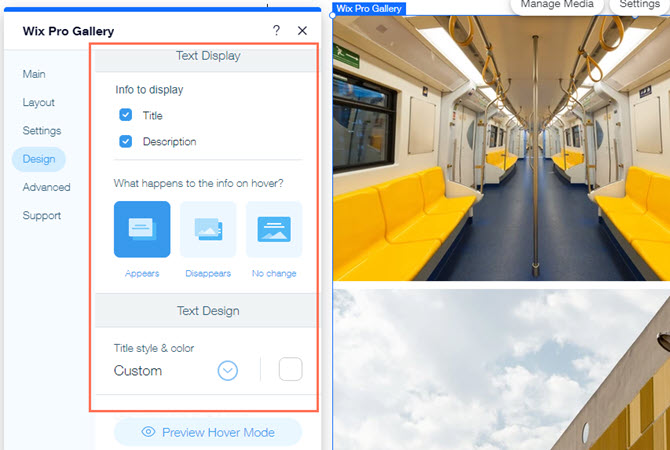
Customizing the design of the text
You can also make further customizations to the text by changing the design. You can adjust the colors, use your own fonts, change the layout and much more. This helps blend the text in nicely with the image so that it complements the style of your brand.
To customize the design of the text:
- Go to your editor.
- Click the pro gallery element on your page.
- Click Settings.
- Click the Design tab.
- Click Texts.
- Choose which text you want to display: Title and / or Description.
- Customize the following options:
- Info position: Choose where to position the text: Underneath, Above, On image, Left or Right.
- What happens to the info on hover?: Choose how the info displays: Appears, Disappears, or No change.
- Title style & color: Click the drop-down to change the theme, font, size or formatting of the title. Click the color box to change the text's color.
- Description font style & color: Click the drop-down to change the theme, font, size or formatting of the description. Click the color box to change the text's color.
- Horizontal alignment: Choose how you want to align the text horizontally; left, right or center.
- Vertical alignment: Choose how you want to align the text vertically; top, center or bottom (appears only when text is shown on the image).
- Adjust text box height: Choose how you want the text box height to be adjusted when resized:
- Automatically: The text box is automatically adjusted to suit the amount of text.
- Manually: The text box is adjusted manually by dragging the slider to change the height of the text box.
Note: The text box feature is only available when you select Underneath, Above, Left or Right as the info position in the Text tab of the Design settings panel. Learn more about customizing text boxes in your gallery
- Text vertical padding: Drag the slider to change the space between the text and the vertical edges of the image.
- Text horizontal padding: Drag the slider to change the space between the text and the top and bottom of the image.
- Space between titles & description: Drag the slider to increase / decrease the same between titles and descriptions.
Troubleshooting text issues in your gallery
Text on your gallery might not appear properly if there isn't enough space for it. This might be related to your gallery design and font settings. Ensure a balance between font, image, and text box size to display all image text.
Click an issue below to learn how to resolve it:
Text is cut off, not visible, or flashes briefly and then disappears
Text may get cut off, not be visible at all or flash briefly then disappear if there's not enough room for it in the gallery. To troubleshoot this you can try one or more of the following suggestions:
- Decrease the font size of the title and / or description in the Design tab.
- (Info position is set to "on image") Increase the size of the images in your gallery. Depending on the layout you choose, you can do this by adjusting the Thumbnail resize, Images per row, Spacing options and more in the Layout tab.
- (In the Slideshow layout) Adjust the size of the info bar in the Layout tab.
Text set to appear on hover with a partial overlay get's cut off
Gallery text may get cut off if you set it to appear on hover with only a partial overlay. To ensure your text is visible, you can make the overlay bigger.
- Go to your editor.
- Click the pro gallery element on your page.
- Click Settings.
- Click the Design tab.
- Click Overlay & Icons.
- Select Percent under Set size in.
- Drag the slider under Size to increase the overlay until your text appears.

Text set to display above or underneath image get's cut off
When you set gallery text to appear above or underneath images, and the font size is too large, it can result in titles and descriptions being cut off.
You can adjust the text box size so that all the text appears.
To increase the text box size:
- Go to your editor.
- Click the pro gallery element on your page.
- Click Settings.
- Click the Design tab.
- Click Texts.
- Select Manually under Adjust text box size.
Note: This setting is only available if you chose to display the text Underneath or Above the image (under Info Position). - Drag the slider to increase the Text box size until your text appears.

Tip: You can also show gallery text that is missing by increasing the size of the gallery itself using the grab handles.
FAQs
Click a question below to learn more about adding and customizing text in the Wix Pro Gallery.
How can I upload my own fonts?
How do I customize text in the Expand Mode?
Can I add a link to description text?
Currently, it is not possible to hyperlink the text of a gallery item's description.
Vote for this feature if you would like to see in the future.
Can I add collapsible text to my gallery?
How can I make sure items I add to my gallery keep their original file names?
- Click the pro gallery element on your page.
- Click Manage Media.
- Click the Settings for New Media icon
 .
. - Select the checkbox next to Same as file name under What title do new items have?