

Wix Bookings: Managing Your Outbound Client Emails
9 min
In this article
- Types of outbound client emails
- Managing your outbound client emails
- Customizing your outbound client emails
- Adding variables to your outbound client emails
- Automatically send pay links in email notifications
- FAQs
With Wix Bookings, you can choose which email notifications you want to send to your clients.
This includes the following outbound client emails: confirmation, cancellation, and reminder emails.
You can manage and customize these emails from your site's dashboard, and ensure they contain all the relevant details. This allows you to streamline your client communications, and maintain your brand's style and voice.
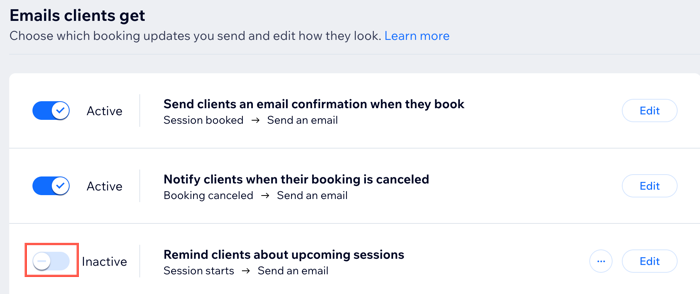
Types of outbound client emails
There are several types of outbound client emails you send from your site dashboard when you or your clients take a specific action related to your services. These automated emails are set to active by default, but you can deactivate the toggle next to any automation to disable it.
- Send clients an email confirmation when they book
- Notify clients when their booking is canceled
- Remind clients about upcoming sessions
- Notify clients of changes to their booked appointment or class
- Notify clients when there's a change to their course
- Let clients know that their appointment is pending confirmation
- Let clients know that their appointment request has been approved
- Let clients know that their appointment request has been declined
Want to know more?
Learn more about Wix Automations.
Managing your outbound client emails
Manage your automated emails in the dashboard, so your clients are up-to-date on the status of their upcoming bookings.
To manage your outbound client emails:
- Go to Booking Settings in your site's dashboard.
- Click Notifications you send.
- Click the Emails tab at the top.
- Select the toggle next to the relevant email notifications you want to activate or deactivate.
Tip:
You can also manage order emails, such as emails sent when you initiate a refund or update an order. To access these emails, go to Checkout settings in your site's dashboard and click the Emails & Notifications tab at the top.
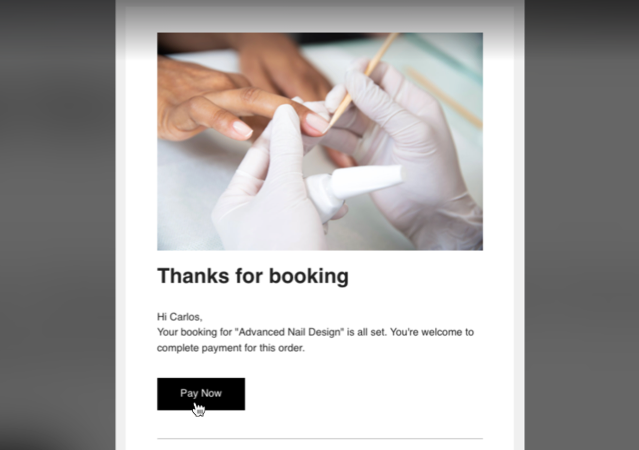
Customizing your outbound client emails
You can customize all of your automated emails to better fit your brand and style. You can add text, images, videos and more to make your emails more personalized and informative for your clients.
Notes:
- You can only customize or edit certain parts of the pre-installed email automations. This is to ensure uninterrupted delivery of important session information to your clients.
- The main image in your automated emails is the same as the image you select when creating a service.
- Read more about customizing your automated Wix emails.
To customize your outbound client emails:
- Go to Booking Settings in your site's dashboard.
- Click Notifications you send.
- Click the Emails tab at the top.
- Click Edit next to the automation you want to customize.
- Click the Send an email action in your flow to open the panel.
- Choose what you want to customize:
Sender details
 and select Edit.
 Create an email
Email attachments
Set email type
Set recipients
7. Click Apply, Save, or Publish Changes.
Adding variables to your outbound client emails
Variables, or dynamic values, are pieces of code that display different information to each client based on their contact data.
Dynamic values can display personalized text (for example, the client's name) or information related to your business relationship (for example, the service price, staff member in charge or location).
To add variables to your outbound emails:
- Go to Booking Settings in your site's dashboard.
- Click Notifications you send.
- Click the Emails tab at the top.
- Click Edit next to the relevant automation.
- Click the Send an email action in your flow to open the panel.
- Click Create an email.
- Click Edit.
- Choose where you want to add a dynamic value:
- In the subject line of the email:
- Click Edit next to the subject.
- Click + Dynamic Value below the subject and select the relevant values from the drop-down. For example, with a cancellation email, you might want to include the creation date, when the client first scheduled the canceled booking.
- Enter the fallback text. Clients see this text when no data is available for the dynamic value you chose.
- Click Add.
- (Optional) Click the Preview text field and enter the text that will appear after the subject line in the recipient's inbox.
Note: You can also click + Dynamic Value to add a value from the drop-down to your preview text. - Click Save.

- In the content of the email:
- Click the relevant text field.
- Click + Add Dynamic Value on the Customize text panel on the left.
- Select a value from the drop-down menu.
- (Optional) Enter the fallback text that will be used in case there is no data available for the variable selected. For example, you can add "valued client" in case the customer's name is unknown.
- Click Add.
- In the subject line of the email:
- When you've finished customizing your email, click Save & Continue at the top right.
- (Optional) Click the More Actions drop-down and select Preview & test to generate a preview and send yourself a test version.
- Click Send Test Email.
- Enter the relevant details for the test email.
- Click Send.
- Click Done.
- Click Back to Editing at the top.
- Click Save & Continue to finish adding variables to your email.
- Click Save at the top.
Automatically send pay links in email notifications
Make it easy for clients to pay for their bookings by including pay links directly in their email notifications. When you enable this option, clients receive a unique pay link for any unpaid sessions, streamlining the payment process and helping you get paid faster.
For example, this is helpful for collecting payments for services set to be paid in person, or for letting clients pay the remaining balance of a deposit paid online.
To automatically send pay links:
- Go to Booking Settings in your site's dashboard.
- Click Notifications you send.
- Click More Actions at the top right.
- Click Send automatic pay links.
- Enable the toggle.
- Click Save.
Important:
If you customized any bookings automations, pay links are not added automatically when you enable the toggle. To include pay links, you need to revert your automation to the default template. This removes all previous customizations, so you will need to recreate your custom automation.
To add pay links to your edited automation:
- Go to Automations in your site's dashboard.
- Click the App automations tab.
- Click the More Actions icon
 next to your edited automation and select Duplicate.
 - Click the More Actions icon
 next to the original automation and select Revert to default.
 - Copy your custom changes from the duplicate back into the original automation.
- Delete or disable the duplicate.
FAQs
Click a question below to learn more.
How do I prevent my automated emails from going to my clients' spam folders?
Can I send automated emails from different email addresses?
Can I see if people have received and opened my automated emails?
What is an ICS file?
How can I ensure booking confirmations include the correct time and details?
Why don't my clients see pay links in their booking emails?
