Wix Bookings: Managing Email Notifications You Send to Clients
5 min read
With Wix Bookings, you can also choose which email notifications to send to your clients. Whether it's a confirmation email, a reminder, or a follow-up, you have full control over the types of messages that your clients receive. You can also create automations to customize your automated emails even more.
In this article, learn more about:
Editing the default booking confirmation emails
Editing your confirmation email is a great way to welcome clients to your business. You can add a personal touch to make the message fit your brand.
To edit your default confirmation emails:
- Go to the Booking Settings tab.
- Click Emails & SMS reminders.
- Hover over the Confirmation email option and click Edit.
Tip: Alternatively, you can use Automations to send custom confirmation emails. Disable the Confirmation email toggle and see the next section to set up an automation. - Click the relevant tab to choose the service type: Appointments or Classes & courses
- (Optional) Enable the Email video conferencing link toggle to add a video conferencing link to this email.
- Choose which field to edit:
- Subject: Customize the email subject line to entice your clients to open it.
- Message: Edit the text of the email to include any information your clients need to know before attending.
- (Optional) Click Send Test Email to send yourself a preview of the email.
- Click Save.
Notes:
- The confirmation emails you receive display your business's time zone. The emails you send to your clients display the time zone they select.
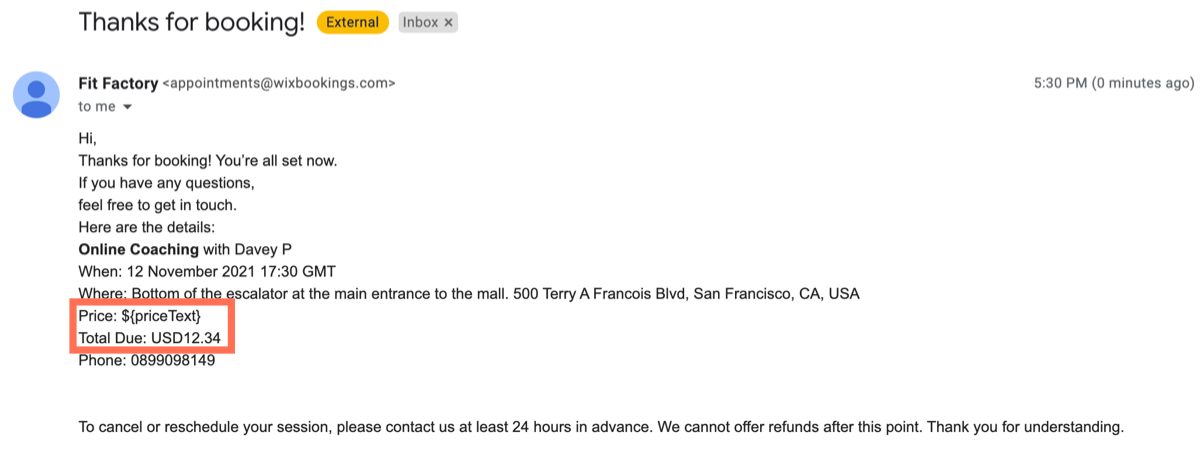
- Test emails display ${priceText} and $12.34 as the service price and total. This will not appear in your actual confirmation emails.
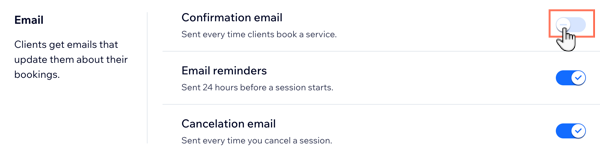
Disabling default booking confirmation emails
You can disable the default booking confirmation emails at any time. This can be useful if you set up custom automated emails and don't want to overwhelm your clients.
Note:
Make sure you have some method of informing clients that their booking is confirmed before disabling the default booking confirmation emails.
To disable the booking confirmation emails
- Go to the Booking Settings tab.
- Click Emails & SMS reminders.
- Click to disable the toggle next to Confirmation Email.
Using automations to customize booking emails
Stay in touch with your clients whenever specific booking-related actions occur. For example, you can send an email when a client checks in for the 1st time, or to congratulate them for reaching a milestone number of sessions.
Important:
- Appointments that require approval do not send customized confirmation emails.
- Clients' confirmation emails are sent from appointments@wixbookings.com. When customers reply to this email, the message goes to your email address.
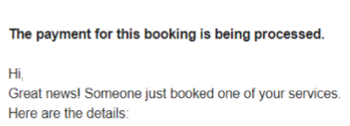
- When a customer books a service, you receive a notification email to the email address that you set in the business details section. If the service is assigned to a staff member, both you and the staff member receive the notification email (once you have entered their email address).
- To display your cancellation policy in confirmation emails, add the text to your Cancellation & Rescheduling settings.
To customize booking emails with automations:
- Go to Automations in your site's dashboard.
- Click + New Automation.
- Click + Start from Scratch.
- Click the title at the top and enter a name for the automation.
- Click Wix Bookings in the Trigger section.
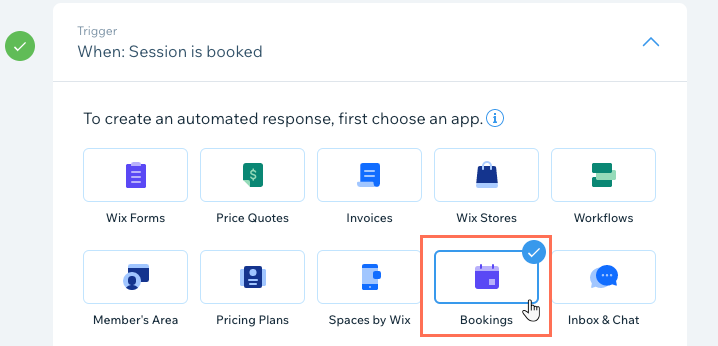
- Select the trigger you want to use. Learn more about the booking triggers in Wix Automations.
- Select the service(s) the trigger applies to from the drop-down menu(s).
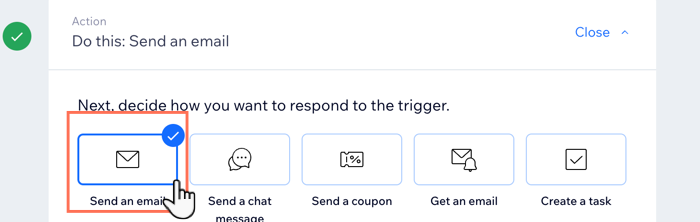
- Select Send email to contact in the Action section.
- Click Edit under Customize Your Sender Details to edit the sender details:
- From name: Edit the name that appears as the email sender.
- Reply-to email: Edit the email address that replies to the email are sent to.
- Click Save.
- Click Edit under Create an email to customize the appearance of your confirmation emails.
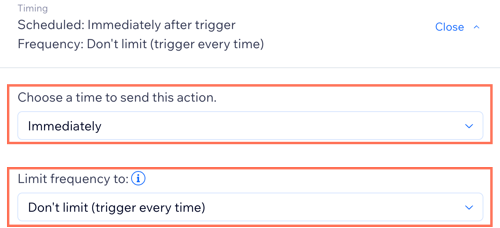
- Click Edit next to Timing.
- Choose the timing and frequency for sending the emails from the drop-downs.
- (Optional) Click + Add Follow-up Action to add another action that happens when the trigger occurs.
- Click Activate.
What your clients see when they book services
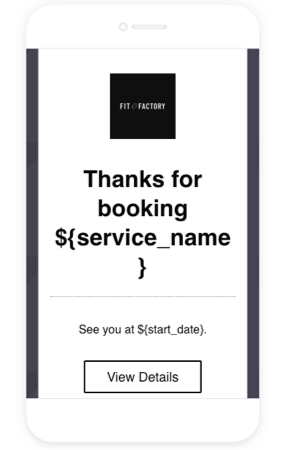
Wix sends your clients confirmation emails when they book one of your services. Depending on which method you chose above, the email shows as plain text or includes things like your company logo and additional graphics.
Important:
If your clients book a service and there is a delay or failure in processing their payment, you receive an email to let you know.
When this happens with online services, the confirmation email your client receives will not include a Zoom link to the service. Instead, you can send the link manually from your Booking Calendar once the payment is completed by clicking the session in the calendar and clicking Copy link.
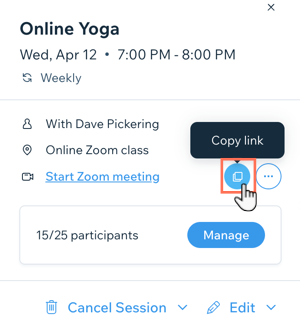
When this happens with online services, the confirmation email your client receives will not include a Zoom link to the service. Instead, you can send the link manually from your Booking Calendar once the payment is completed by clicking the session in the calendar and clicking Copy link.
Did this help?
|