

Verifying Your Site with the Wix Site Verification Tool
4 min
In this article
- How the site verification tool works
- Getting verification meta tags from search engines
- Adding verification meta tags to your site
- Updating a verification meta tag
- Deleting a verification meta tag
Verifying your site on search engines confirms your ownership, and helps your site's presence in search engine search results.
With the Wix Site Verification Tool, you can quickly add verification meta tags for Google Search Console, Pinterest, Bing Webmaster Center, Yandex Webmaster, and Naver Webmaster Tools. After you've verified your ownership with a search engine, you can use their webmaster tools to help manage your site's presence in that search engine results.
For example, you can use Google Search Console to see how your site is performing in Google search results. You can also request a crawl of your site after you update your site so that the latest version of your pages appear in search results.
How the site verification tool works
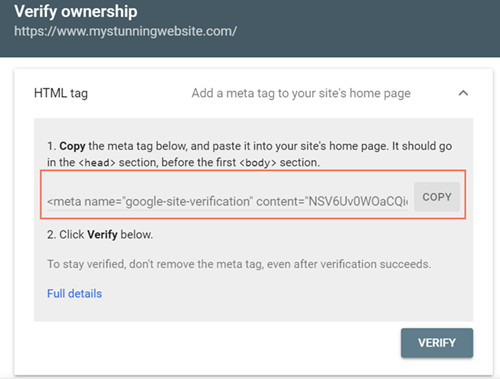
The site verification tool uses a special meta tag that you get from a search engine's webmaster tools. This tag is a piece of HTML code that contains the name of the search engine and a unique string of letters and numbers.
After you add the meta tag to the site verification tool and save it, the tool adds this tag to your homepage's header code.

You can then go back to the search engine's webmaster tools and request it to verify your ownership by scanning your homepage's header for the meta tag. If it finds the tag, it confirms you as the owner. Depending on the search engine, you'll also then have access to a range of tools and data about your site's performance in search results.
Important:
Search engines periodically check if the verification meta tag is still in your homepage's header. You should leave the verification tag for as long as you want you to remain verified as the owner. Removing it may mean you lose your verification and access to the search engine's webmaster tools.
Getting verification meta tags from search engines
Each search engine has their own method for getting the meta tag that you need to verify your site. For example, Google requires you to add a property in Google Search console to get a verification meta tag.
You can learn more about how to get verification meta tags for each search engine in the articles below:
Adding verification meta tags to your site
You can add verification meta tags to your site in the Site Verification section of your site's SEO & GEO dashboard.
To add a verification meta tag:
- Go to SEO & GEO in your site's dashboard.
- Scroll down to Tools and settings.
- Click Site Verification.
- Click a search engine to expand.
- Enter the meta tag relevant to that search engine.
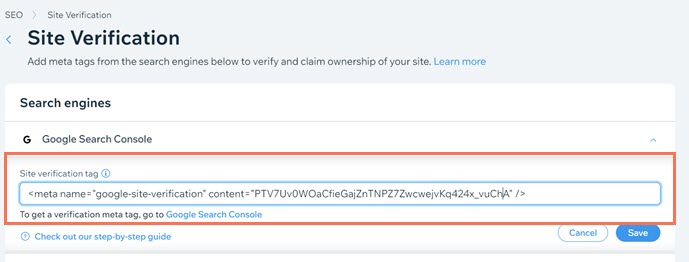
- Click Save.
Important:
- The tag must be in a valid HTML format.
- The format should be <meta name=”XX” content=”XX”/>
- Missing or extra attributes such as ‘<’, or ‘ “ ‘, will create an issue.
- The tag must belong to the right webmaster tool. For example, if you try to verify with Google Search Console using a Bing verification meta tag, it won't work.
Updating a verification meta tag
You can update verification meta tags to your site in the Site Verification section of your site's SEO & GEO dashboard.
To update a verification meta tag:
- Go to SEO & GEO in your site's dashboard.
- Scroll down to Tools and settings.
- Click Site Verification.
- Click a search engine to expand.
- Replace the existing meta tag with your new meta tag.
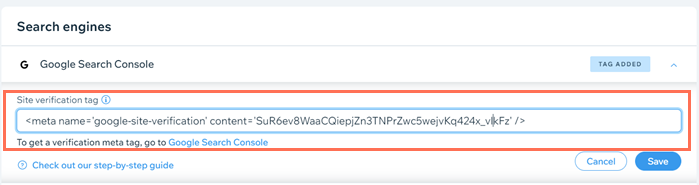
- Click Save.
Important:
- The tag must be in a valid HTML format.
- The format should be <meta name=”XX” content=”XX”/>
- Missing or extra attributes such as ‘<’, a ‘ “ ‘, will create an issue.
- The tag must belong to the right webmaster tool. For example, if you try to verify with Google Search Console using a Bing verification meta tag, it won't work.
- The tag will work when the site is published.
Deleting a verification meta tag
You can delete verification meta tags to your site in the Site Verification section of your site's SEO & GEO dashboard.
Important:
- Deleting a verification meta tag permanently removes it and it's not possible to recover it. If you want to use the tag again, you will need to re-add it.
- If you previously verified your site with Google using the SEO Setup Checklist, you won't be able to delete your verification meta tag in the Site Verification tool.
To delete a verification meta tag:
- Go to SEO & GEO in your site's dashboard.
- Scroll down to Tools and settings.
- Click Site Verification.
- Click on a search engine to expand.
- Delete the text in the Site verification tag field.
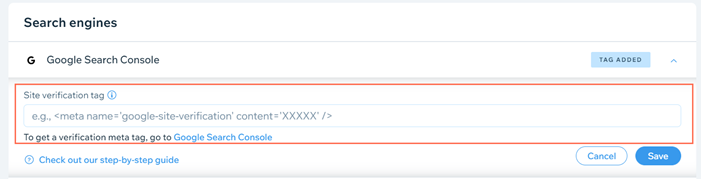
- Click Save.
