When clients arrive for a session they have booked, you can use your point of sale to accept payment for the session.
Step 1 | Select a session
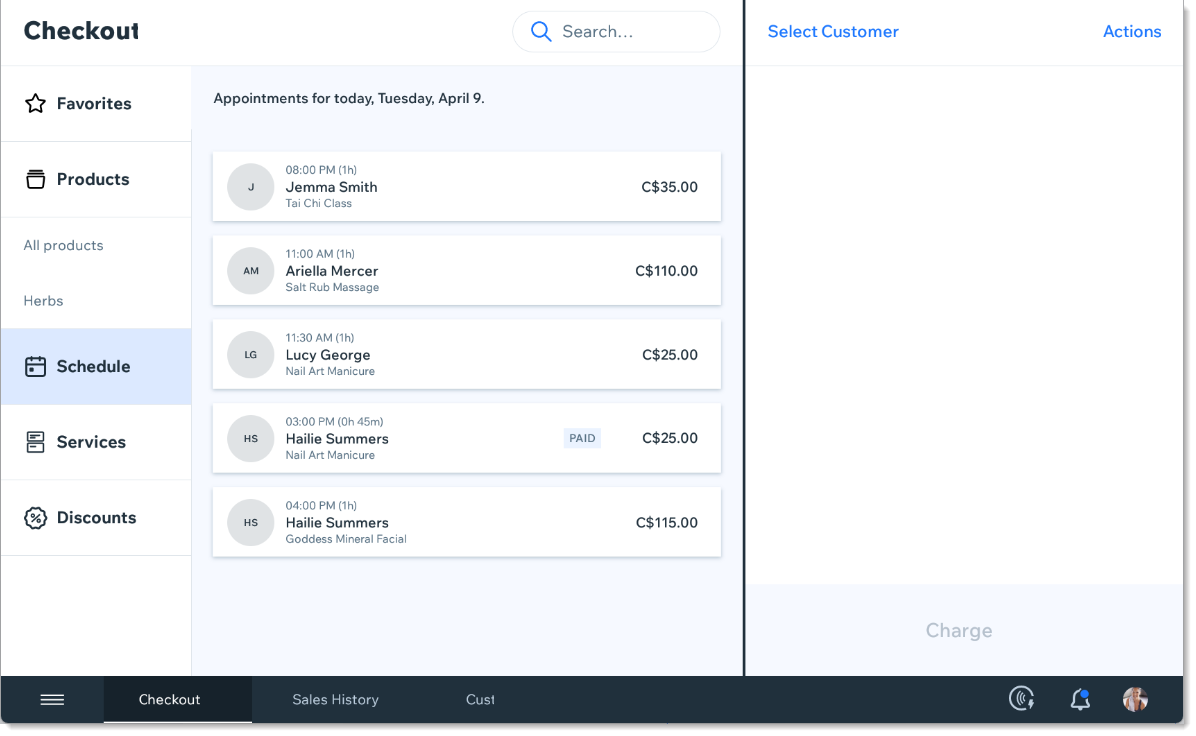
Start by going to the Schedule tab and selecting the session you want to accept payment for. You can use the arrows to select a day.
To select a Wix Bookings session:
- Open the POS tablet.
- Tap Checkout on the bottom bar.
- Tap Schedule on the left.
- Tap the relevant session.
Tip: You can use the arrows to navigate to a different day. - (Optional) Mark attendance or edit the sale:
- Tap Actions.
- Edit sale: Remove a session from an order with multiple sessions.
- Mark attendance: Mark the customer as Checked-in or No-show.
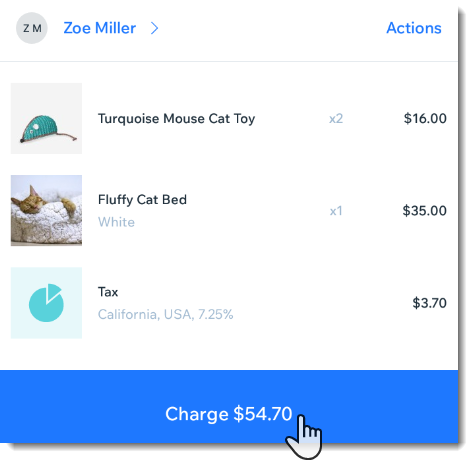
Step 2 | Accept payment and complete checkout
Accept cash payments or credit cards using your card reader. You can even accept payment from 2 or more payment methods (e.g. 2 credit cards).
To accept payment:
- Tap Continue to Checkout.
- (Optional) Edit the payment amount.
- Choose the relevant payment method:
Accept credit card payment
- Tap Add to Checkout.
- Tap Charge.
- Select Card.
- Use the card reader to swipe, dip (insert) or tap the card.
Note: Swiping is not available for all card readers. - (Optional) Do one or more of the following:
- Tap Email Receipt, enter the email address if prompted, and tap Send.
- Tap Print Receipt.
- Tap Add a Note: Enter an internal note (not visible to your customer) and tap Save.
- Tap Done.
- Tap Add to Checkout.
- Tap Charge.
- Select Cash.
- Select the amount received from your customer.
Note: If you can't find the right amount, tap Other to enter a custom amount. - (If applicable) Give your customer their change listed under Change Due.
- (Optional) Do one or more of the following:
- Tap Print Receipt.
- Tap Email Receipt, enter the email address if prompted, and tap Send.
- Tap Text Receipt, enter the number, including country code, and tap Text Receipt.
- Tap Add a Note: Enter an internal note (not visible to your customer) and tap Save.
- Tap Done.
Notes:
Accept payment by gift card
To accept payment by gift card:
- Tap Add to Checkout.
- Tap Charge.
- Select Gift Card.
- Enter or scan the gift card code and tap Apply.
- If there is still money owed to complete the purchase, Tap Add Payment and process the balance using another payment method, such as cash or a credit card.
- (Optional) Do one or more of the following:
- Tap Print Receipt.
- Tap Email Receipt, enter the email address if prompted, and tap Send.
- Tap Text Receipt, enter the number, including country code, and tap Text Receipt.
- Tap Add a Note: Enter an internal note (not visible to your customer) and tap Save.
- Tap Done.
Notes:
Manually enter credit card details
Important: Entering credit card details manually is the least secure way of accepting card payments. We recommend accepting manual payment only from buyers you trust. Note that in case of fraud, it is the merchant who is liable.
Learn more
To manually enter credit card details:
- Tap Add to Checkout.
- Tap Charge.
- Select Manual Card Entry.
- Enter all the credit card details and tap Charge.
- (Optional) Do one or more of the following:
- Tap Print Receipt.
- Tap Email Receipt, enter the email address if prompted, and tap Send.
- Tap Text Receipt, enter the number, including country code, and tap Text Receipt.
- Tap Add a Note: Enter an internal note (not visible to your customer) and tap Save.
- Tap Done.
Notes:
- To minimize the fraud risk, as soon as the value of your transactions adds up to over 30% of your gross payment volume (GPV), they start to be declined. If you want to make changes to this limitation, contact Wix Customer Care.
- To read notes and view receipts, go to your Sales History.
- Learn how to enable text receipts.
Accept split payment (more than one payment method)
Using split payments, customers can pay using more than one payment method (e.g. using 2 credit cards or both cash and credit card).
To process split payments:
- Tap Add to Checkout.
- Tap Charge.
- Select Split Total at the top right.
- Enter the first payment amount.
- Tap Continue.
- Select a payment method (e.g. cash) and complete the first part of the payment.
- Tap Continue.
- (Optional) Edit the second payment amount.
Tip: To balance left to pay is calculated for you. You can edit the amount if the customer wants to split the payment into more than 2 payments.
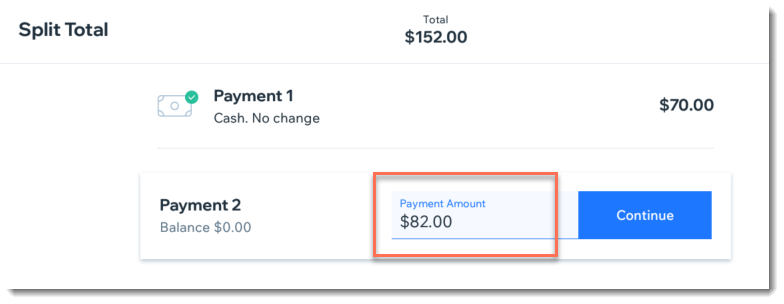
- Tap Continue.
- Select a payment method (e.g. card) and complete the 2nd part of the payment.
- Tap Continue.
- (Optional) Do one or more of the following:
- Tap Print Receipt.
- Tap Email Receipt, enter the email address if prompted, and tap Send.
- Tap Text Receipt, enter the number, including country code, and tap Text Receipt.
- Tap Add a Note: Enter an internal note (not visible to your customer) and tap Save.
- Tap Done.
Notes:
Accepting partial payment (deposit)
You can accept a partial payment now and charge your customer the rest in one or more payments made later.
To accept the first partial payment for an order:
- Tap Add to Checkout.
- Tap Charge.
- Select Split Total at the top right.
- Enter the first payment amount.
- Tap Continue.
- Select a payment method (e.g. cash) and complete the first part of the payment.
- Tap Continue.
- Tap Mark as Partially Paid.

- Tap Mark as Partially Paid to confirm.
- (Optional) Do one or more of the following:
- Tap Print Receipt.
- Tap Email Receipt, enter the email address if prompted, and tap Send.
- Tap Text Receipt, enter the number, including country code, and tap Text Receipt.
- Tap Add a Note: Enter an internal note (not visible to your customer) and tap Save.
- Tap Done.
To collect additional payment(s):
- Tap Sales History from the bottom bar.
- Select the relevant sale.
- Tap Collect.
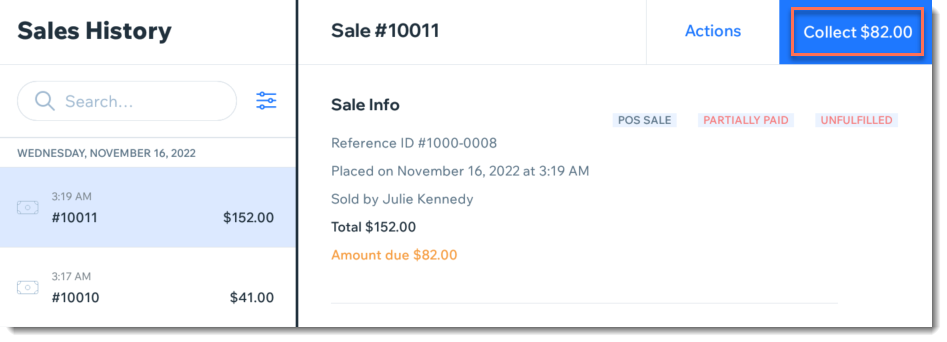
- Select a payment type:
- Collect the balance owed: Process payment as you would for any other sale. The balance amount appears automatically.
- Collect another partial payment: Tap Split Total and collect another partial payment.
Accepting other types of payment
The other payment option lets you accept payment through a payment method which is not integrated with your POS system (e.g. though an app or physical gift card).
Important: Since you receive direct payment from your client, you do not receive this amount as a Wix POS payout.
To process other payment types:
- Tap Add to Checkout.
- Tap Charge.
- Select Other.
- Enter a brief note documenting how the customer paid you (e.g. Venmo payment).
Note: The note appears in customer's receipts and in the Sales History tab in the tablet. - Tap Record Payment.
- (Optional) Do one or more of the following:
- Tap Print Receipt.
- Tap Email Receipt, enter the email address if prompted, and tap Send.
- Tap Text Receipt, enter the number, including country code, and tap Text Receipt.
- Tap Add a Note: Enter an internal note (not visible to your customer) and tap Save.
- Tap Done.
Notes:
Redeem payment from a plan
- Tap to select the session.
- Tap Redeem Session.
- Select the relevant plan.
- Tap Redeem.
FAQs
Click a question below to learn more.
Can I add tax to a completed POS sale?
No, it's not possible to add tax after you've completed POS transaction.
Can I accept payment for a session that'll take place on another day?
Yes. Use the left and right arrows to navigate to the relevant day.