Manage your groups using the Wix app to connect with new members and keep existing ones up-to-date. Set permissions for members, invite others to help you manage the group, update your group privacy settings, and enhance your community experience.
Editing your group details
From the Wix app, you can edit your group's name, description, and cover image. Set the group's privacy to choose whether anyone can view the group or only specific member types.
To edit your group details:
- Go to your site in the Wix app.
- Tap Manage
 at the bottom.
 - Tap Groups.
- Tap the relevant group.
- Tap Edit next to the name of your group.
- Edit the following details:
- Group name.
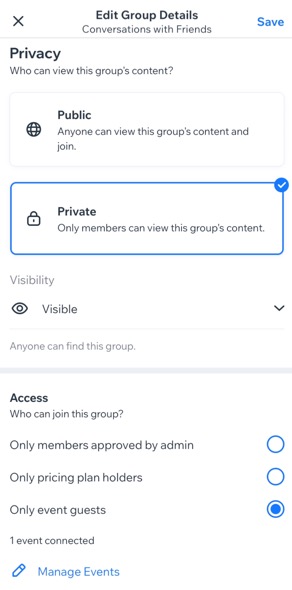
- Choose who can view this group's content under Privacy:
- Public: Anyone can view the group's content and join it too.
- Private: Only members can view the group's content. Tap the Visibility drop-down and select an option:
- Visible: Anyone can find this group on the Groups page of your live site. Choose who can join this group:
- Only members approved by admin.
- Only pricing plan holders: Tap Select Pricing Plans to connect an existing plan or create a new one.
- Only event guests: Tap Select Events to set up this option, then tap Done.
Tip: If you don't have any events yet, you can create an event from the Wix app.
- Hidden: Only group members can see the group's content.
- Tap Save.
Managing your group members
Manage member permissions and decide who can post, invite or add people to the group. You can also make a member an admin to help manage your group.
To manage your group members:
- Go to your site in the Wix app.
- Tap Manage
 at the bottom.
 - Tap Groups.
- Tap the relevant group.
- Choose from the following options:
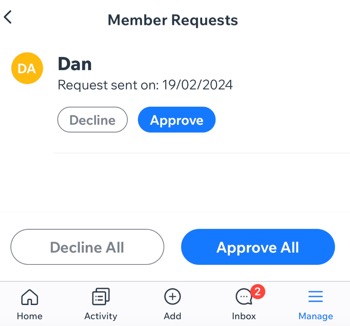
Select which member requests to approve to join your group.
- Tap Requests to join under Members.
- Choose who you want to approve:
- Tap Approve or Decline under the relevant person.
- Tap Decline All or Approve All.
Manage member permissions
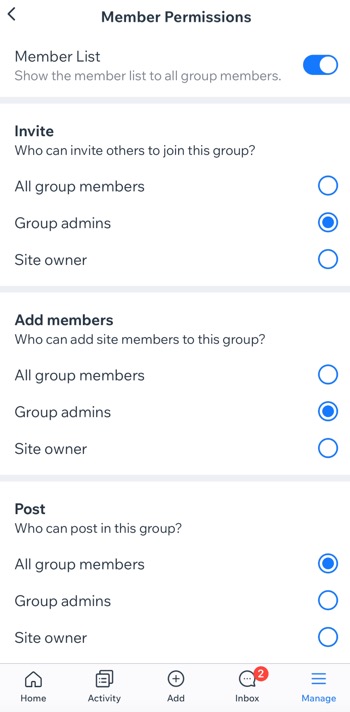
Choose who can post, invite or add members to this group.
- Tap Permissions under Members.
- (Optional) Tap the Member List toggle to show or hide the member list to all group members.
- Select the relevant option for each type of member permission:
- Invite: Decide who can send out invitations to join this group.
- Add members: Decide who can add members of your site to this group, without an invite.
- Post: Decide who can post and publish in this group.
Suggest this group to new members with a shareable link, or add members from your contact list to your group.
- Tap + Invite Members under Members.
- Choose how you want to invite people:
- Send a direct link: Tap Create next to Invite link. This copies the link to your clipboard, so you can paste it anywhere you want.
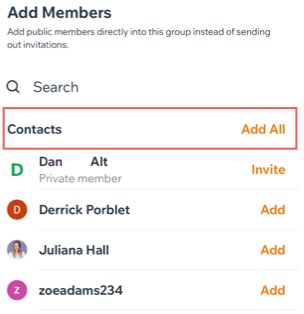
- Add your site's contacts: Tap Add Members at the top right. Then, tap Add next to the contacts you want to invite.
Tip: Click Add All to simply add all of your site's contacts to the group. Public members are automatically added to your group. For members with private profiles, you'll need to send them invitations.
Tip: Members can see a list of all available groups in their
Members app. Existing site members can join any group regardless of whether they have a public or private profile.
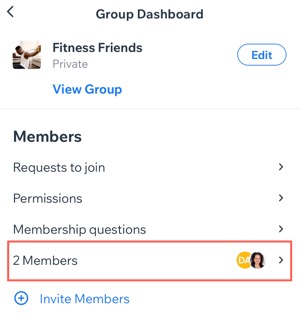
When you assign an admin, they can create topics, pin important posts, approve new member requests, and moderate group discussions.
- Tap (#) Members under Members.
- Tap the More Actions icon
 next to the relevant member.
 - Tap Make admin to give them admin permissions.
Create membership questions, edit existing ones and choose which questions are mandatory for your members to answer before joining your group.
- Tap Membership questions under Members.
- Choose from following options:
- Add a question:
- Tap + Add a Question.
- Enter your question.
- (Optional) Enable the Make this question required toggle to make this question mandatory.
- Tap Create.
- Edit a question:
- Tap the More Actions icon
 next to a question.
 - Tap Edit.
- Edit your question in the text field.
- Tap Save.
- Delete a question:
- Tap the More Actions icon
 next to a question.
 - Tap Delete, then tap Delete again to confirm.
Managing group content
Managing your group involves empowering its content to stand out and align with your brand identity. You can customize access levels for members, fostering seamless interaction and engagement in discussions, media sharing, and updates.
Additionally, establishing group guidelines, arranging tabs to showcase new content, and organizing discussions by topic enhance organization and community vibrancy.
To manage your group content:
- Go to your site in the Wix app.
- Tap Manage
 at the bottom.
 - Tap Groups.
- Tap the relevant group.
- Choose what you want to manage under Content:
- Tap Description.
- Edit what your group is all about.
- Tap Save.
Set group rules to ensure members post responsibly and respectfully.
- Tap Rules.
- Tap Add Group Rules.
- Select a rule template or create one from scratch.
- Tap Create.
You can change the order of the tabs that appear on your group page, rename them and create custom ones with your own content.
- Tap Tabs.
- Choose what you want to do:
- Update content tabs: Hide, rename, reorder or create custom tabs.
- Tap the More Actions icon
 next to the relevant tab.
 - Tap the relevant option:
- Show/Hide Tab: Tap the relevant option.
- Rename: Edit the tab name on your group page.
- Settings: Update the relevant tab settings (e.g. member permissions, group description).
- Reorder content tabs: Change the order of your groups' tabs to your liking.
- Tap Edit.
- Tap and drag a tab to reorder it in the list.
- Tap Save.
Tip: Tap + Add Custom Tab to add a tab with your own content.
Set posts to show automatically in the group in specific situations. For example, when new members join or when you change the group description.
- Tap Auto posts.
- Choose whether to automatically post or not in the group discussion when:
- New members join.
- The cover image or description is changed.
- A new event was connected.
Add a new topic to organize posts in the group feed.
- Tap Topics.
- Choose what you want to do:
- Add a topic:
- Tap + New Topic.
- Enter the topic name and tap Create.
- Edit an existing topic: Tap the More Actions icon
 next to the relevant topic and choose what to do next:
- Tap Edit to make the desired changes, then tap Save.
- Tap Delete to remove a topic, then tap Delete to confirm.
Note: Removing a topic will also remove it from any assigned posts.
FAQs
Click a question below to learn more.
Can I give members permission to create a group?
Yes, you can allow members to create a group. Once you choose the members, they can create a group from the relevant member app.
- Go to your site in the Wix app.
- Tap Manage
 at the bottom.
 - Tap Groups.
- Tap Group preferences.
- Select the relevant option under Group Creation:
- All members: Any member of your site can create a group with other members.
- Members with approval: Any member of your site can create a group, but it requires your approval.
- Only admins: Members aren't allowed to create groups.
Only site owners and group admins can delete a group.
Important: Deleting a group erases all of its content, which cannot be restored.
- Go to your site in the Wix app.
- Tap Manage
 at the bottom.
 - Tap Groups.
- Tap the relevant group.
- Tap Delete Group under Notifications.
- Tap Delete to confirm.
 at the bottom.
 at the bottom.
 at the bottom.


 next to the relevant member.

