

Setting Up Google Tag Manager with Wix
4 min
In this article
- Step 1 | Connect Google Tag Manager to your Wix site
- Step 2 | Set up a Tag in Google Tag Manager
- a | Add a configuration tag
- b | Add a trigger to the configuration tag
- Step 3 | Configure Page View in Google Tag Manager
- a | Create a Page View tag and add the configuration tag
- b | Set up Page View trigger
- Important information about using Google Tag Manager
Before you begin:
Working with Google Tag Manager (GTM) is an advanced feature that requires special knowledge and skills. If you have no prior experience implementing a tag management system, we recommend using Google Analytics that handles all recommended Google events out of the box.
Implement a tag management system using Google Tag Manager to keep your tags and third-party code snippets updated and organized in one convenient location.
Wix ensures a pageview event is sent to the Google Tag Manager data layer every time a user visits a new page on your site. Follow the steps below to set up a Google Tag Manager tag to collect pageviews.
Step 1 | Connect Google Tag Manager to your Wix site
To set up Google Tag Manager with Wix, first follow the steps in this article to connect your site to Google Tag Manager. Connect in Marketing Integrations in your site's dashboard to start tracking visitor events on your site.
Note:
Do not use custom code to connect Google Tag Manager.
Once you have connected Google Tag Manager to your Wix site, proceed to Step 2 of this article.
Step 2 | Set up a Tag in Google Tag Manager
The next step is to set up a Google Tag in Google Tag Manager. This includes adding a configuration tag and then adding a trigger to that configuration tag.
a | Add a configuration tag
- From the Google Tag Manager account page, click Tags from the left hand side menu.
- Click New.
- Enter a name for the tag (e.g. GA4 Config).
- Click Choose a tag type to begin setup under Tag Configuration.
- Select Google Tag.
- Add your Tag ID. We recommend creating a constant variable that contains the tag ID.
- Click Configuration Settings.
- Under Configuration Parameter click Add Parameter.
- Enter “send_page_view” into the Configuration Parameter field and "false" into the Value field.

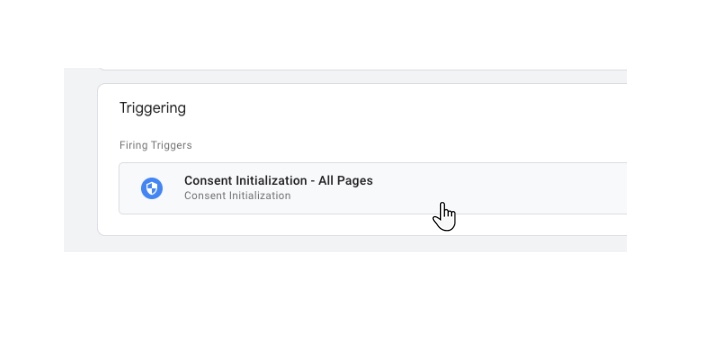
b | Add a trigger to the configuration tag
- In the Triggering section click "Initialization - All Pages." Learn more about consent.
- Click Save.
Step 3 | Configure Page View in Google Tag Manager
The final step is configuring Page View, which includes creating a Page View tag and then adding the configuration tag. The final step is setting up Page View as a trigger.
a | Create a Page View tag and add the configuration tag
- Set up a Page view tag.
- Click Tags from the left hand side menu.
- Click New.
- Enter a name for the tag (e.g. Page View).
- Click Choose a tag type to begin setup under Tag Configuration. (Google Analytics >> Google Analytics: GA4 event)
- Add a Measurement ID. We recommend creating a constant variable that contains the tag ID.
- Add the Event Name “page_view”.
b | Set up Page View trigger
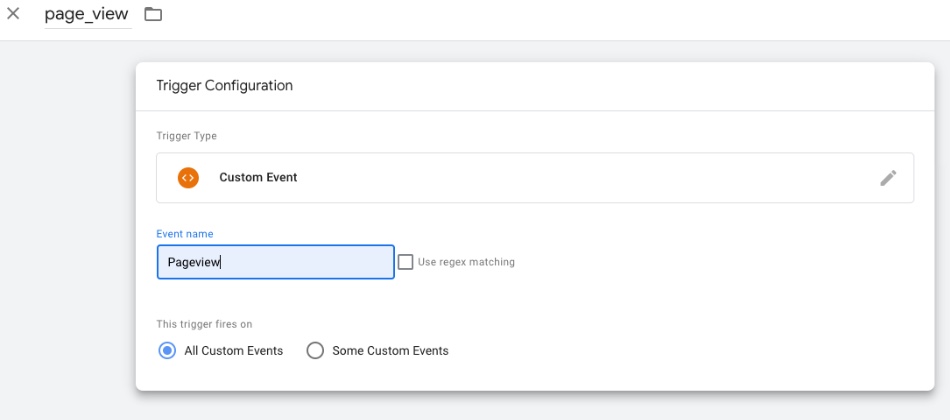
- Set up a Custom event trigger.
- Enter "Pageview" as the name for your custom trigger.
Note: Never use the built in “All Pages” trigger, since it is not compatible with Single Page Applications. - Click Save.
- Click Tags from the left hand side menu.
- Click the Page View tag.
- In the Triggering section click "Pageview - Custom Event".
- Click Save.
- Click Submit.
Important information about using Google Tag Manager
Important:
By using this service, you are engaging directly with a third-party service provider. We recommend reviewing the service provider's Privacy Policy and Terms of Use prior to your use of such third-party service. You acknowledge that we are not liable for any loss or damage resulting from your use of such third-party service, including any liability arising from any personal data exchanged between you and such third-party.
- This feature is only available for sites with a connected domain.
- It is not possible to track events for business solutions pages (e.g. Wix Restaurants, Wix Bookings, etc.)
- If you've previously set up a preset tracking code using Google Tag Manager (e.g. a Facebook pixel), you must disable the tracking code in your Wix account. Running the same code in Google Tag Manager and on your Wix site may cause the code to misreport or malfunction.
- Wix is a Single page application. That means the tracking setup with Google Tag Manager is different than other platforms you may be familiar with.
- Wix does not provide support for technical issues with third-party code snippets. If you have an issue with your code snippet, please contact the provider directly.
