

Studio Editor: Designing Menus
8 min
In this article
- Designing horizontal menus
- Designing vertical menus
- Designing anchor menus
- Designing hamburger menus
- Adding animation packages
In the Studio Editor, you can customize the look and feel of the menu down to the smallest detail. Access the Inspector panel to design the menu for each individual state (e.g. hover, selected), adjusting settings like the fill color, text style, shadow and much more.
Using hover interactions?
When adding a hover interaction to a menu, it doesn't appear on tablets and mobile devices. You can add a click interaction instead, if you want it to display on all breakpoints.
Designing horizontal menus
From the Inspector panel, you can design horizontal menus for 3 different states – Regular, Hover and Selected / Current page – so visitors get a more interactive navigation experience.
Depending on the chosen preset, use the available options to make the menu match the site's look and feel. For example, some horizontal menus include buttons or separators which you can customize.
To design a horizontal menu:
- Select the horizontal menu.
- Click the Open Inspector arrow
 at the top right of the Editor.
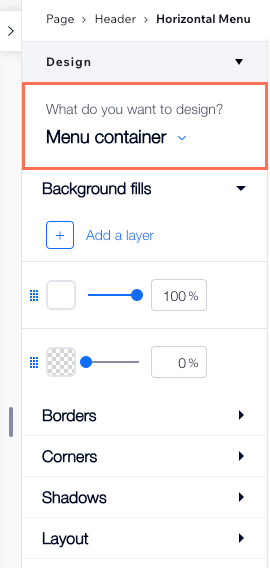
- Scroll down to Design.
- Depending on whether you have the old or new menu experience, select the element you want to design from the drop-down:
- Menu container
- Menu items
- Submenu container
- Submenu items
- Dropdown items
- Dropdown container
- Dropdown menu container
- (Menu / submenu / dropdown items) Select the relevant state: Regular, Hover or Current page / Selected.
- Design the menu using the available options:
- Background fills: Change the background color of the menu / submenu / dropdown, and adjust the opacity to your liking. If your design includes separators, you can color them from here.
- Borders: Adjust the width and color of the menu's borders.
- Corners: Make the corners of the menu / submenu more round or rectangular by adjusting the radius.
- Shadows: Add shadow to the menu and customize its angle, color, distance and more.
- Text: Adjust the style and formatting of the menu and submenu / dropdown items.
- Layout: Adjust the padding around the menu items.
Note: This option is only available on older horizontal menus. To learn more about adjusting the layout of our latest menu component, please click here.
Tip:
Make your client's site look sleek on smaller screens by replacing the horizontal menu with a hamburger menu. From the Layers panel, you can hide the horizontal menu on the small breakpoint(s), and the hamburger menu on the large breakpoint(s).
Designing vertical menus
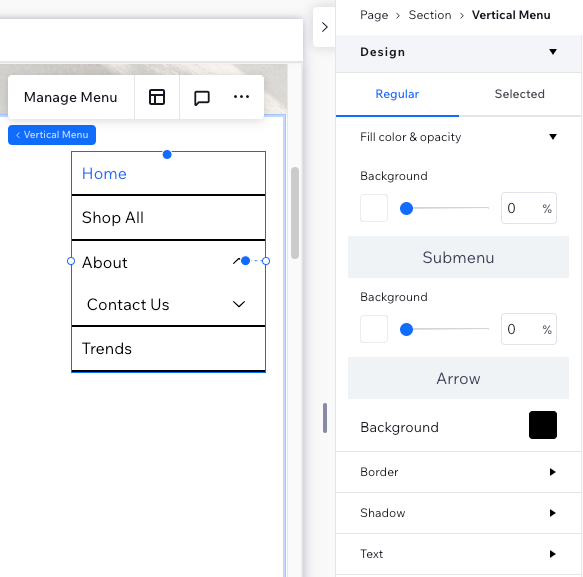
You can design vertical menus for three different states (Regular, Hover, and Selected) so visitors always know where they are on the site, and the item they're about to select. Change the fill color of the menu, submenu/dropdown and arrow (when applicable) and customize other areas like the text, border, shadow, etc.
Notes:
- The available settings depend on the specific menu you've selected from the Add Elements panel.
- Don't see the Hover option? You may have an older version of the menu on the site. Learn how to update to the latest menu experience.
To design a vertical menu:
- Select the vertical menu.
- Click the Open Inspector arrow at the top right of the Editor.
- Scroll down to Design.
- Select the part of the menu you want to design, and choose the state
- Design the menu using the available options:
- Fill Color & Opacity: Change the background color of the menu / submenu, and adjust the opacity to your liking. If your design includes an arrow, you can color it from here.
- Border: Select a style for the menu's border and adjust its width and color.
- Shadow: Add shadow to the menu and customize its angle, color, distance and more.
- Text: Adjust the style and formatting of the menu and submenu items.
- Spacing: Adjust the vertical spacing between the menu items, as well as the text and submenu offset (in px).
Tip:
You can pin the vertical menu to the page so it stays floating as visitors scroll up and down.
Designing anchor menus
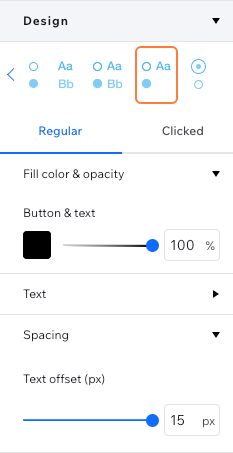
Choose what to show on the anchor menu by selecting a preset in the Inspector panel. You can display text, buttons, or a preset that combines the two. One preset even lets you show the anchor's name when visitors scroll to that specific area.
You can then customize the design for two separate states – Regular and Clicked – so visitors get a clear indication of the anchor they're currently viewing.
To design an anchor menu:
- Select the anchor menu.
- Click the Open Inspector arrow at the top right of the Editor.
- Scroll down to Design.
- Select a preset at the top.
- Select the relevant state: Regular or Clicked.
- Design the menu using the available options:
- Fill Color & Opacity: Change the background color of the menu / submenu, and adjust the opacity to your liking. If your design includes an arrow, you can color it from here.
- Text: Adjust the style and formatting of the menu and submenu items.
- Spacing: Adjust the vertical spacing between the menu items, as well as the text and submenu offset (in px).
Designing hamburger menus
Hamburger menus include several elements that you can design to your needs – the menu itself, its container and the icons that open and close it.
To design a hamburger menu:
- Select the hamburger menu.
- Choose what area of the menu you want to design:
Menu icon
Menu container
The actual menu
The "Close Menu" button
Adding animation packages
Have a new menu on your site? Add an animation package to the items. This plays an effect when visitors hover over an item on the live site.
Important:
Animation packages can only be added to new menus. Learn more about new menus in the Studio Editor.
To add an animation package:
- Select the menu in your editor:
- Vertical and horizontal menus: Click the menu.
- Hamburger menus:
- Click the menu icon.
- Select Edit Menu.
- Click the menu.
- Click the Settings icon
.
- Choose the animation you want:
- Underline: The menu item is underlined.
- Wash: A background color washes over the item.
- Bullet: A bullet appears next to the menu item.
- Wave: A wave of background color fills the menu item.
- Circle: A background color appears in the middle, and spreads to fill the item.

What colors are used?
The colors that are displayed in the animation are taken from the design of the items (in the Hover state):
- The item text color is used in the Underline and Bullet animations.
- The background fill color is used in the Wash, Wave, and Circle animations.
