When
creating your standalone form, you can customize the fields, adjust the flow, and make changes anytime to ensure your form collects the information you need. Add contact and basic fields, then edit or reorganize them to meet your exact needs.
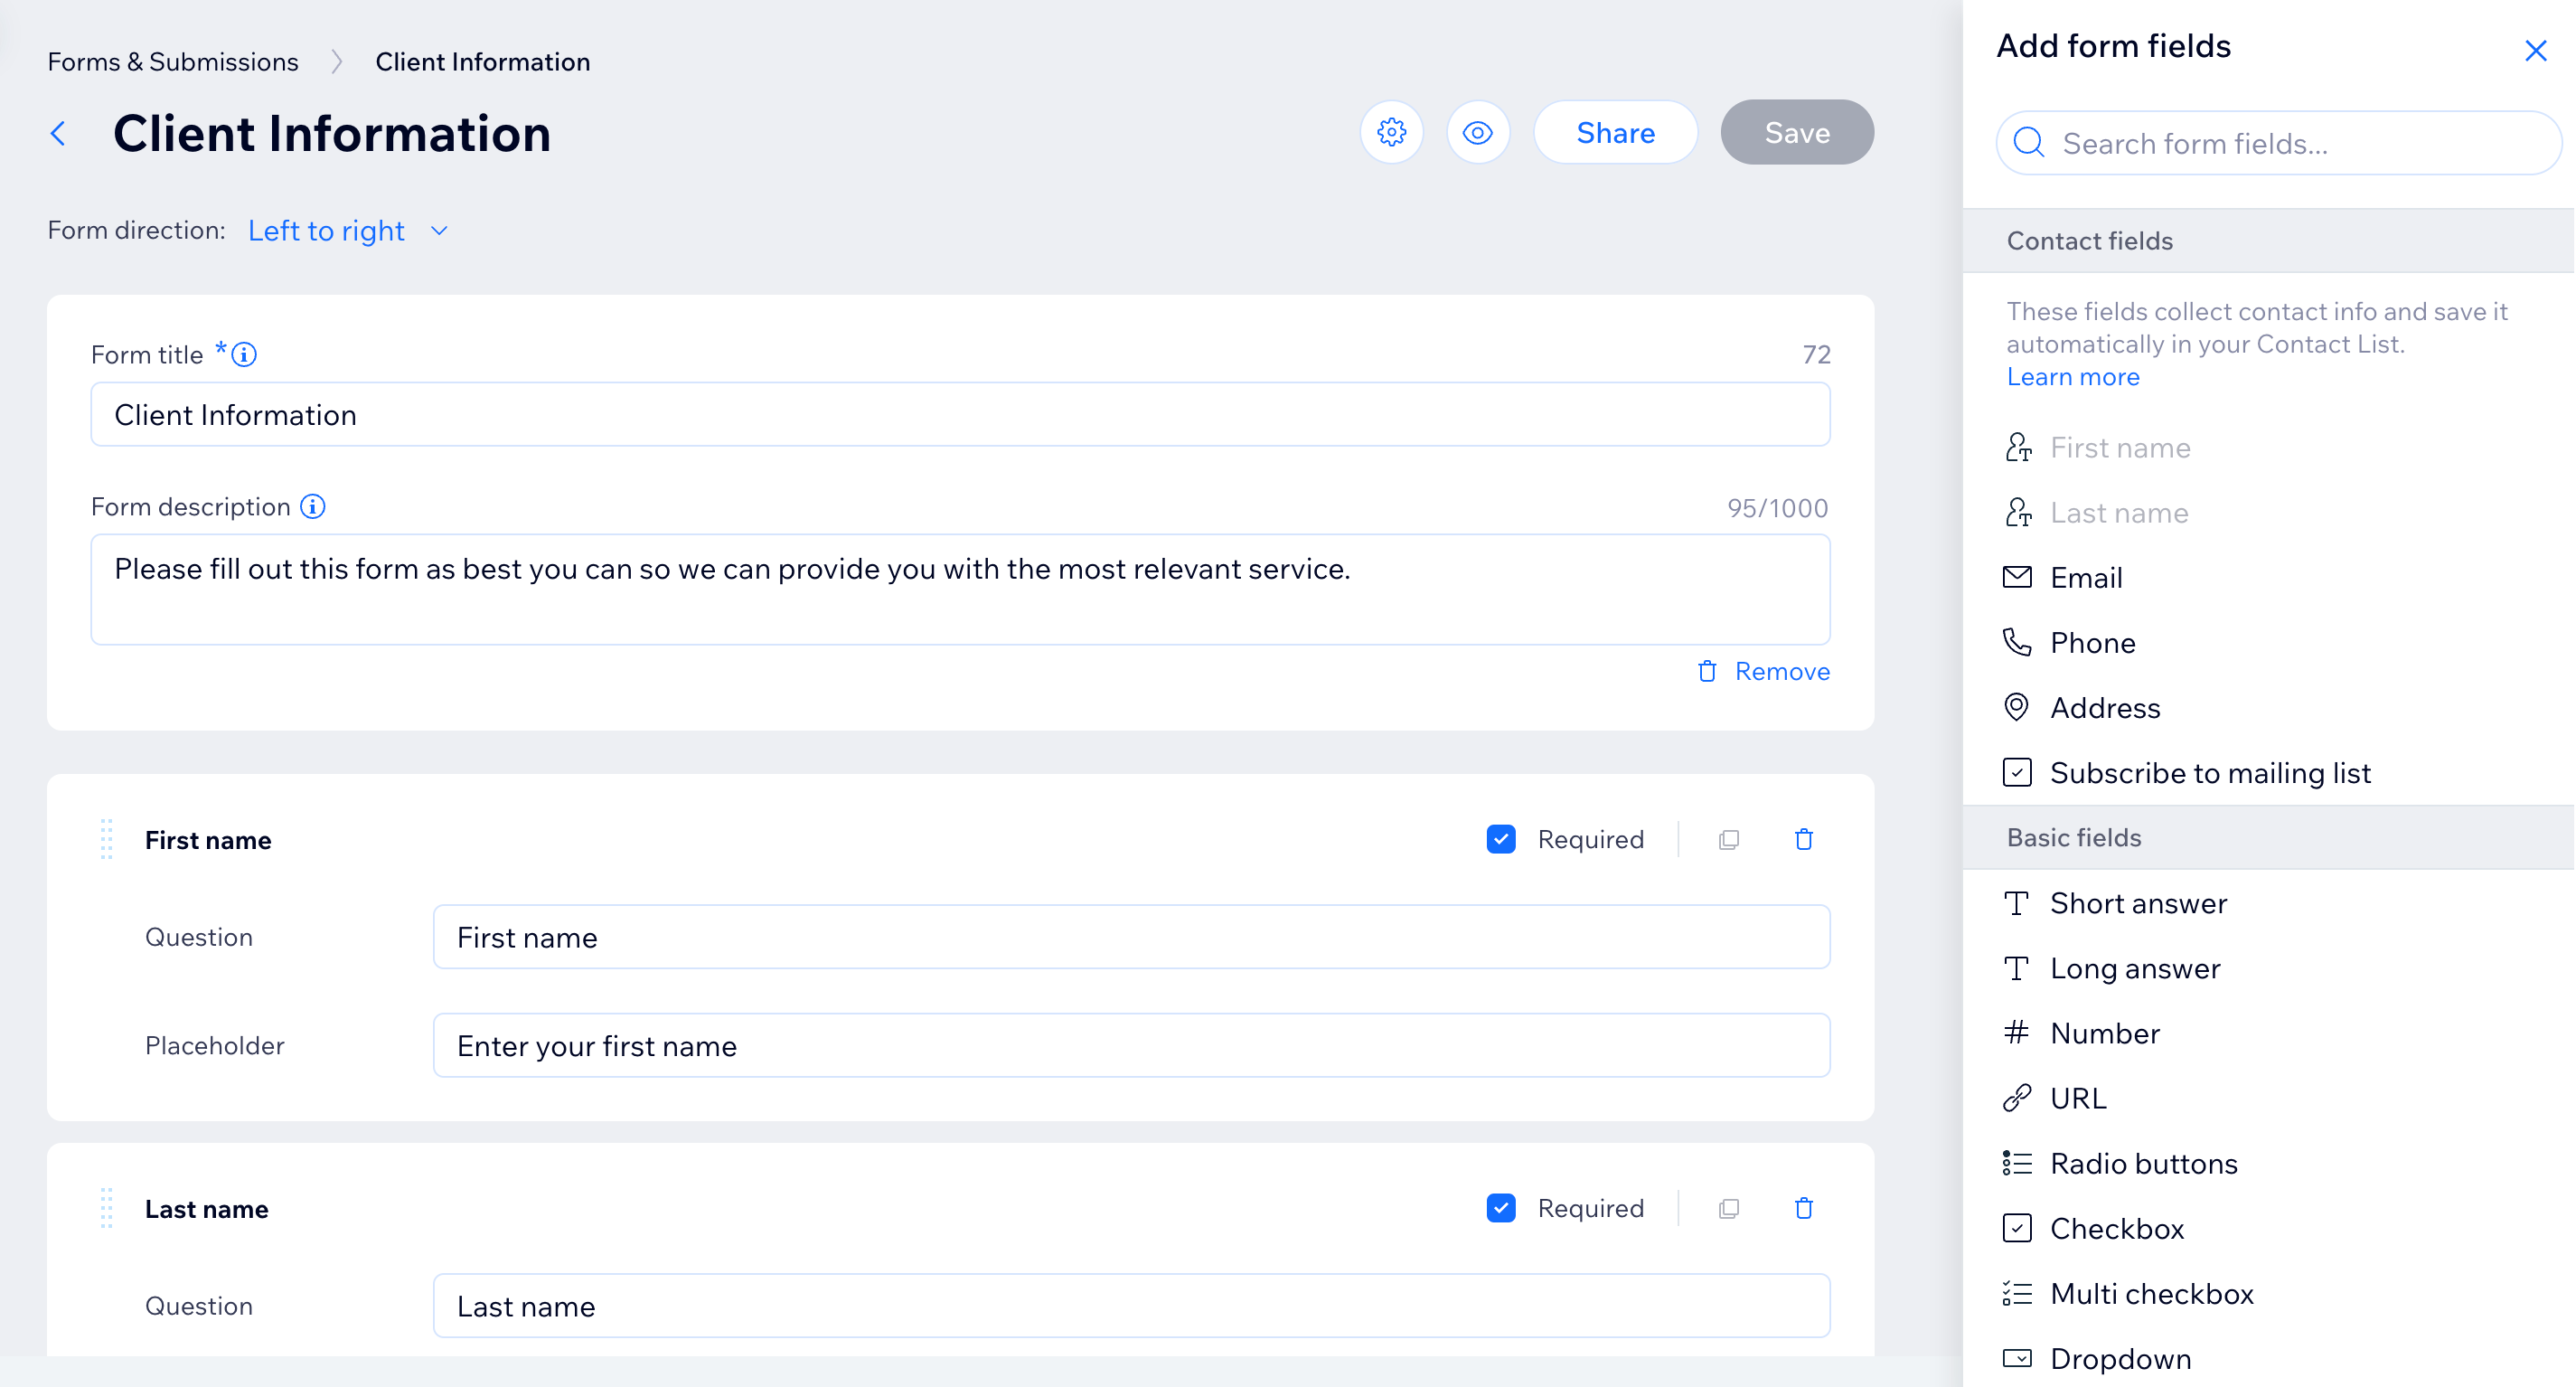
Adding fields to your standalone form
Pick form fields to collect the right information for your business needs. Form fields are grouped by contact fields, basic fields, and other elements (such as payments or buttons).
To view and add more form fields:
- Go to Forms & Submissions in your site's dashboard.
- Create a new standalone form or click Edit next to an existing form.
- Click the Add
 icon to open the fields panel.
 - Drag or click fields to add them to the form:
Add contact fields to your standalone forms to collect contact info from site visitors. Contact fields are useful because the data collected is automatically saved in your contact list. If a lead fills out a contact field, a new contact card is created with the information in your dashboard.
The contact fields you can add to your form include:
- First name
- Last name
- Email
- Phone
- Birthday
- Address
- Multi-line address
- Subscribe
- Company name
- Position
- VAT ID
General fields include all the common types of fields you can add in Wix Forms such as text fields, number fields, date fields, and selection fields like checkboxes and dropdown lists.
You can use these fields for whatever info you want to collect. For example, a date field can be used to ask about date of birth, date of sign up, event date, and more.
General fields include:
- Text (short or long answer)
- Number
- Link
- File upload
- Signature
- Star rating
Choice fields let you add selection-based questions to your standalone form. Use them when you want visitors to choose one or more options, for example, selecting a service type, preferred contact method, or areas of interest.
The choice fields you can add to your form include:
- Single choice
- Multi choice
- Image choice
- Dropdown
- Tag picker
- Checkbox
Date fields let you collect a specific date, time, or both in your standalone form. These fields are useful for things like preferred appointment dates, event dates, birthdays, and more.
The date fields you can add to your form include:
- Date picker
- Date
- Date and time
- Time
Scheduling fields let visitors book an available time as part of submitting your form. This is useful when you want to combine form submission with scheduling in one place.
Payment fields let you collect payments directly through your standalone form. You can use them to charge a fixed amount, let visitors enter a custom amount, accept donations, or add a product for purchase.
The payment fields you can add to your form include:
- Product
- Fixed price
- Custom price
- Donation
Buttons let visitors submit their completed form. Every standalone form needs a submit button so visitors can send their response.
You can add a text element to help explain a field in your form. Include your terms and conditions, for example, or additional legal info for health waiver forms. Your audience can only read this field and not interact with it.
Layout elements include:
- Header: Breaks up the sections of your form
- Text: Allows you to style the text with a rich content editor (e.g. bold, hyperlink, make a bulleted list)
- Cover image: Add a main image to help your form stand out and give visitors visual context.
Configuring your form fields
While some fields just need you to enter the question and placeholder text, others require extra customization or important details. You can set options for a dropdown, mark a question as required, or adjust other settings to make sure people interact with your form the way you want.
To customize a form field:
- Go to Forms & Submissions in your site's dashboard.
- Click Edit next to the form you want to edit.
- Select the relevant field and customize it:
Every form field includes a few key settings to help you collect information clearly and securely from your visitors.
- Required field: Make the field mandatory so visitors can’t submit the form without filling it in.
- Placeholder text: Add example text to guide visitors on what to enter in the field.
- Field description: Give extra details or instructions about the field to help visitors fill it out correctly.
- PII (Personally Identifiable Information): Mark the field as collecting personal data to help you handle sensitive information appropriately.
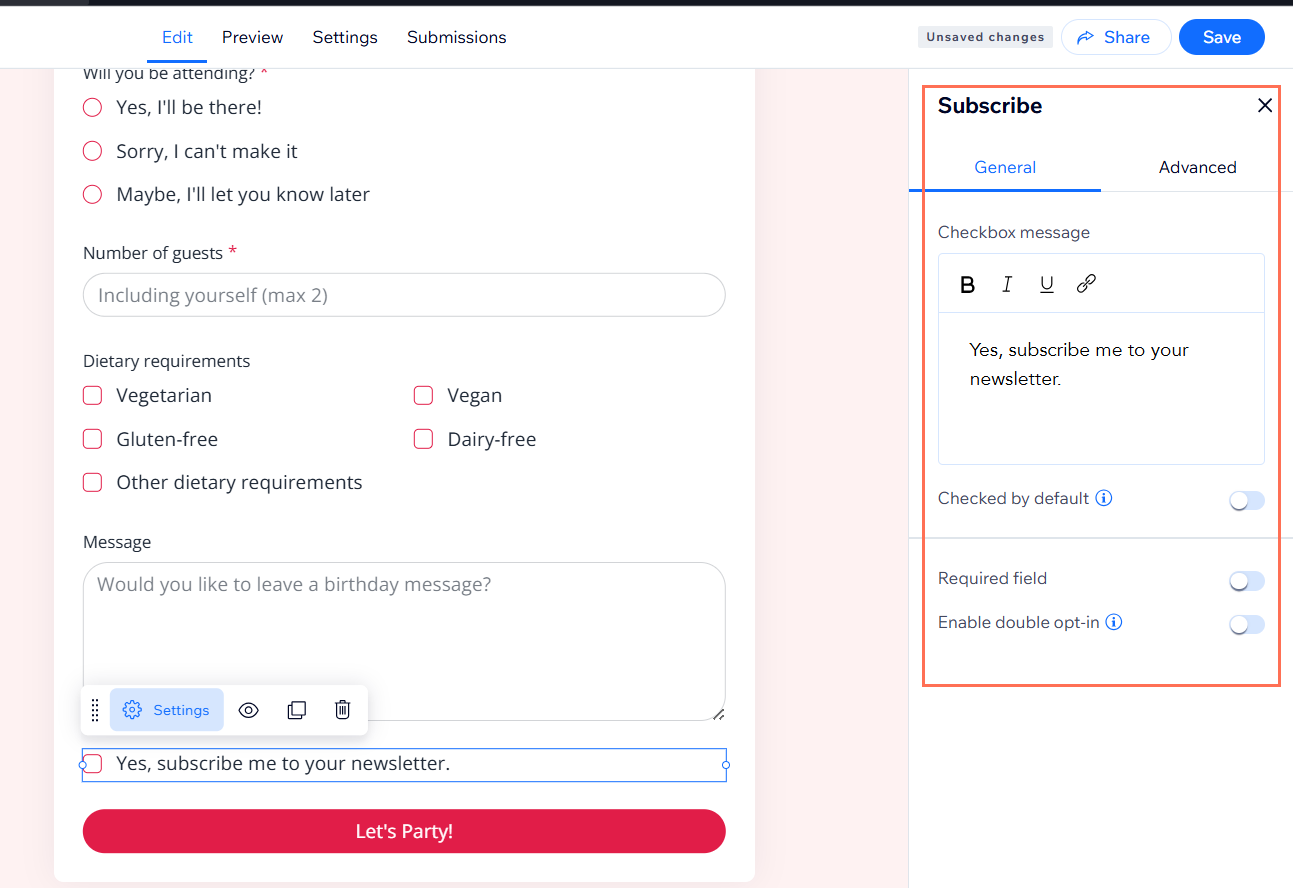
Subscribe to mailing list field
You can turn any standalone form into a way to grow your mailing list by adding a subscribe checkbox for your visitors. You can control how the subscription works by clicking the existing subscription checkbox on your form and choosing from the available options:
- Checkbox message: Edit the message that appears next to your subscription checkbox, such as “Yes, subscribe me to your newsletter.” Use the toolbar to style your text or add a link.
- Checked by default: Decide if the checkbox should be pre-selected when visitors open the form.
- Required field: Make the subscription checkbox mandatory, so visitors must agree to subscribe before submitting the form.
- Enable double opt-in: When turned on, visitors need to confirm their subscription through an email before they become subscribers. Until they confirm, their status is set to Subscription Pending in your contact list.
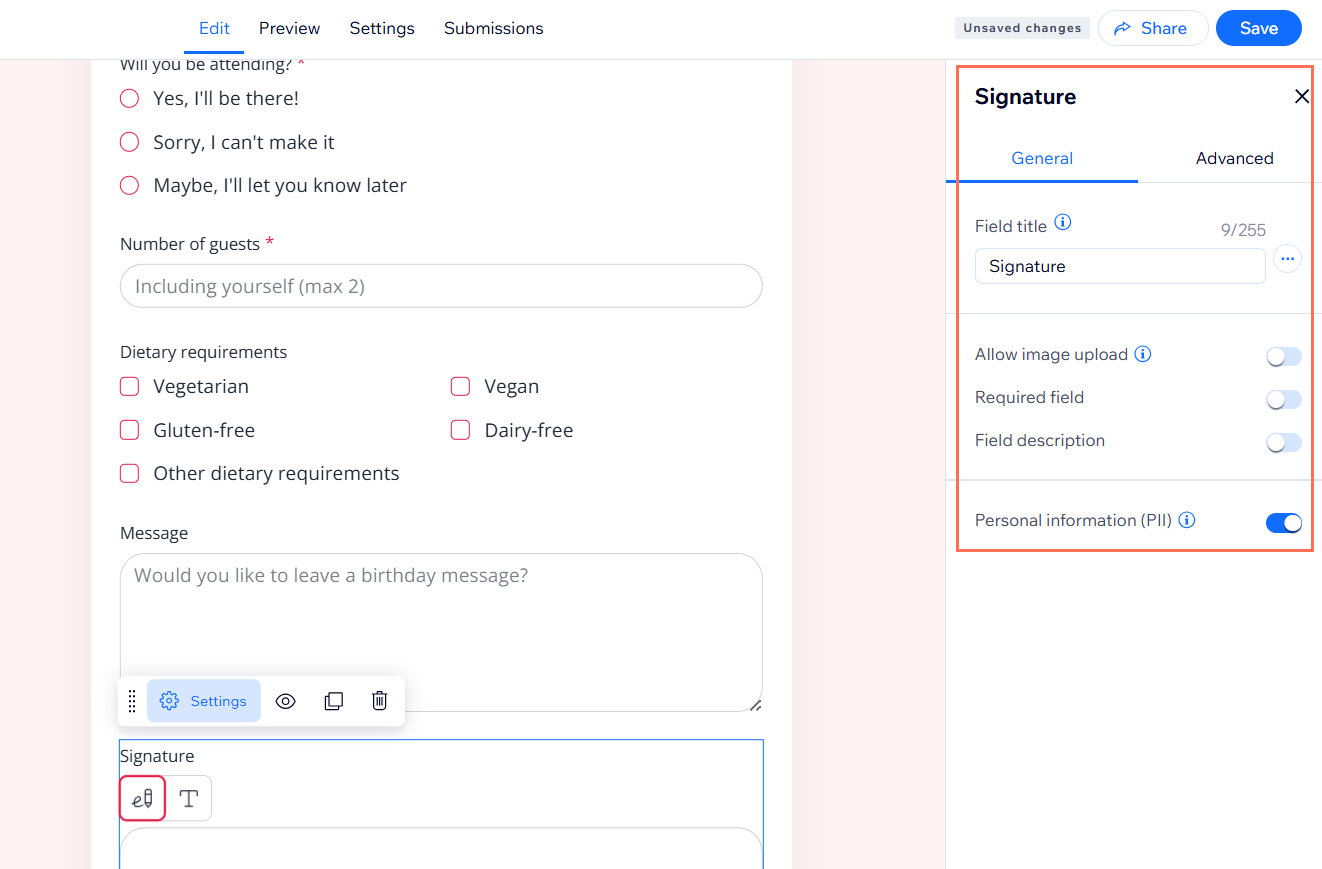
A signature field lets visitors electronically sign their names before submitting a form. This is useful for health waivers, registration, application forms, and more. Customize your signature field using the available options:
- Field title: Add a clear prompt or title for your signature field, such as "Sign here".
- Allow image upload: Let visitors upload an image as their signature if you enable this option.
- Required field: Make the field mandatory to ensure visitors cannot submit the form without adding their signature.
- Field description: Add extra guidance or instructions below the field.
- Personal information (PII): Protect sensitive data like signatures by enabling "Personal information (PII)". This provides an additional layer of privacy and protection for data like addresses or passport details.
Important:
Legal recognition of electronic signatures may have different requirements depending on your country and local regulations. Always check which rules apply to your situation to ensure compliance.
You can collect files from your visitors by adding a file upload field to your form. This is perfect for job applications (collecting resumes), consultations (collecting images), or any time you need visitors to share documents, videos, or audio files. Customize the file upload field using the available options:
- Field title: Set the question or title for your field, like “Please upload your resume.”
- Button text: Edit the button text visitors click to upload their files (e.g., “Upload File”).
- Text below button: Choose to display standard file info or add your own custom message below the button, such as accepted file types or instructions.
- Accepted file types: Choose which file types visitors can upload by selecting the checkboxes for video, image, audio, document, or archive files.
- File upload limit: Set a limit for how many files visitors can upload at once from the drop-down menu.
Single and multi choice fields
Single and multi choice fields let you collect specific answers from visitors by offering a set of options they can select. To customize single and multi choice fields:
- Click the single choice or multi choice field on your form.
- Click Settings.
- Set up the field and its choices:
- Field title: Enter the question or prompt for your visitors.
- Options: Edit the options that visitors can select. Add new options with + Add Option, or click Bulk Edit to update several options at once.
- Add “Other”: Enable this toggle to let people type in their own answer if their choice isn’t listed.
- Required field: Enable to make this field mandatory.
- Field description: Add more information or instructions about the question.
- Option layout: Choose how your options will be displayed—vertically, horizontally, or in a dropdown.
- Personal information (PII): Mark the field as collecting personally identifiable information if needed.
Dropdown fields let you offer visitors a list of options to choose from, making it easy to collect responses in a consistent format. To customize a dropdown field on your form:
- Click the dropdown field on your form.
- Click Settings.
- Set up the field and its choices:
- Field title: Enter the question or prompt for your visitors.
- Options: Edit the that visitors can select from the dropdown. Add new options with + Add Option, or click Bulk Edit to update several options at once.
- Default view: Set a default option to appear as the selected choice when the dropdown loads.
- Required field: Make this field mandatory before submitting the form.
- Field description: Add extra details or instructions for your visitors.
- Personal information (PII): Mark the field as collecting personally identifiable information if needed.
Managing your standalone form fields
Manage the fields of your standalone form at any time to keep it up to date. You can add more fields, rearrange them or delete those you don't need.
To manage your standalone form fields:
- Go to Forms & Submissions in your dashboard.
- All your standalone forms are labeled Standalone under the Form Type column. Manage them using the available options:
Do one of the following to add a field to your form:
- Chat to the AI Forms Assistant – it adds the fields for you (e.g., "Add a phone number field").
- Or click the Add icon to open the fields panel. Drag fields onto your form, or click to add.
Click the the field to edit the field's unique settings.
Hold and drag the
Reorder icon

where you want the field placed in the form.
Enable the Required toggle in the field settings to make it mandatory for visitors to fill out.
Click the
Duplicate icon

to the right of a field to duplicate it.
Click the
Delete icon

to remove it from your form.
FAQs
Click a question below to learn more about standalone forms.
What’s the difference between new and old standalone forms?
The new standalone forms offer an updated design and improved customization options, while old standalone forms use the previous version’s layout and settings. Both let you add, remove, and edit fields as needed.
Learn how to identify your standalone form version.
Why isn’t my subscribe checkbox adding visitors to the mailing list?
Visitors must check the subscribe box and, if double opt-in is enabled, confirm via email before they appear as subscribers. Check your form field’s opt-in settings and ask the visitor to check their email inbox (and spam folder).
A visitor says their signature or uploaded file is missing, where can I find it?
All files or signature uploads from your forms are saved in Site Files in your Media Manager. If you don’t see a new file, confirm the visitor submitted the form successfully and that the field was filled.
Why aren’t contact details for some entries showing in my contacts?
If you can't see certain details about a contact and those fields aren’t required in your form, it means the visitor did not fill them in. Contact info is only saved to your contact list if visitors complete the contact fields (e.g., Email, Phone) specifically. Check your form setup to make sure you’re collecting the data you need.
Why aren’t changes I made to my form saving?
Check that you’ve clicked Save at the top of the form editor after making your changes. If the button is grayed out, refresh your browser and try again. If the issue continues, clear your browser cache or try a different browser.