

Wix Restaurants: Setting Up Additional Restaurant Locations
5 min
In this article
- Step 1 | Add a new restaurant location
- Step 2 | Add menus to your new restaurant location
- Step 3 | Enable online ordering
- Step 4 | Enable and manage all your reservations
- FAQs
Important:
- This article is about the original Restaurants Orders app.
- We've released a new online ordering app. Learn how to add and set up the new Wix Restaurants Orders (New) app.
Manage your restaurant services at multiple locations with a single Wix Restaurants site. You can copy your menus to different locations or create separate menus for each branch. You can also set your online ordering, reservations, and phone ordering options for each location.
Step 1 | Add a new restaurant location
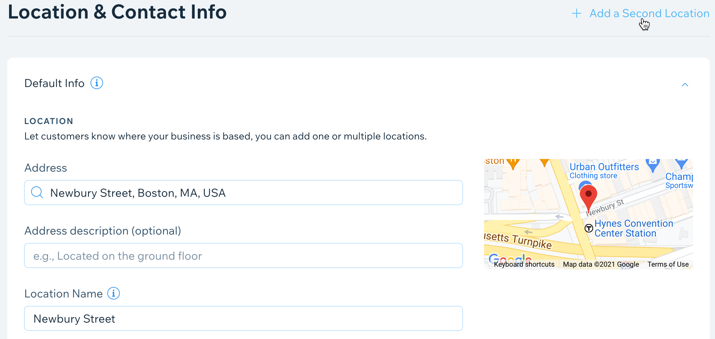
Start by adding new restaurant location(s) to the Location & Contact Info section of your site.
To add a restaurant location:
- Go to Business Info in your site's dashboard.
- Click + Add a Second Location next to Location & Contact Info.
- Enter your restaurant's address:
- Address: Start typing your restaurant's street address and select it from the drop-down list.
- Address description (optional): Enter an address description to help customers find you (e.g. rear entrance).
- Location Name: Enter a name for this restaurant location.
- Enter your restaurant's contact details:
- Email: Enter your restaurant's email address.
- Phone: Enter your phone number.
- Fax: Add your fax number.
- (Optional) Click Edit by Business Hours to edit the opening hours for this location.
- Click Save.
Important:
- Once you've entered your restaurant's address, make sure that the red pin is displayed on the map.
- If you delete a location later on, any menus and orders associated with it will also be deleted.
Want to add additional locations?
Click + Add New Location to add additional restaurant locations and repeat steps 3-6.
Step 2 | Add menus to your new restaurant location
From Menus, you can create a new menu for your new location or copy an existing menu.
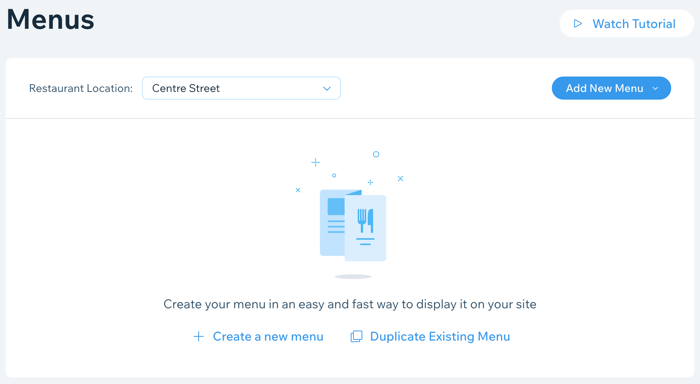
To add menus to a restaurant location:
- Go to Menus in your site's dashboard.
- Click the Restaurant Location drop-down and select the relevant location.
- Click + Create a new menu to create a new menu for this location, or Duplicate Existing Menu to copy existing menus.
Create a new menu for this location
Duplicate existing menus to this location

What's next?
Customize the design of your menu and decide what info you want to show. Learn more
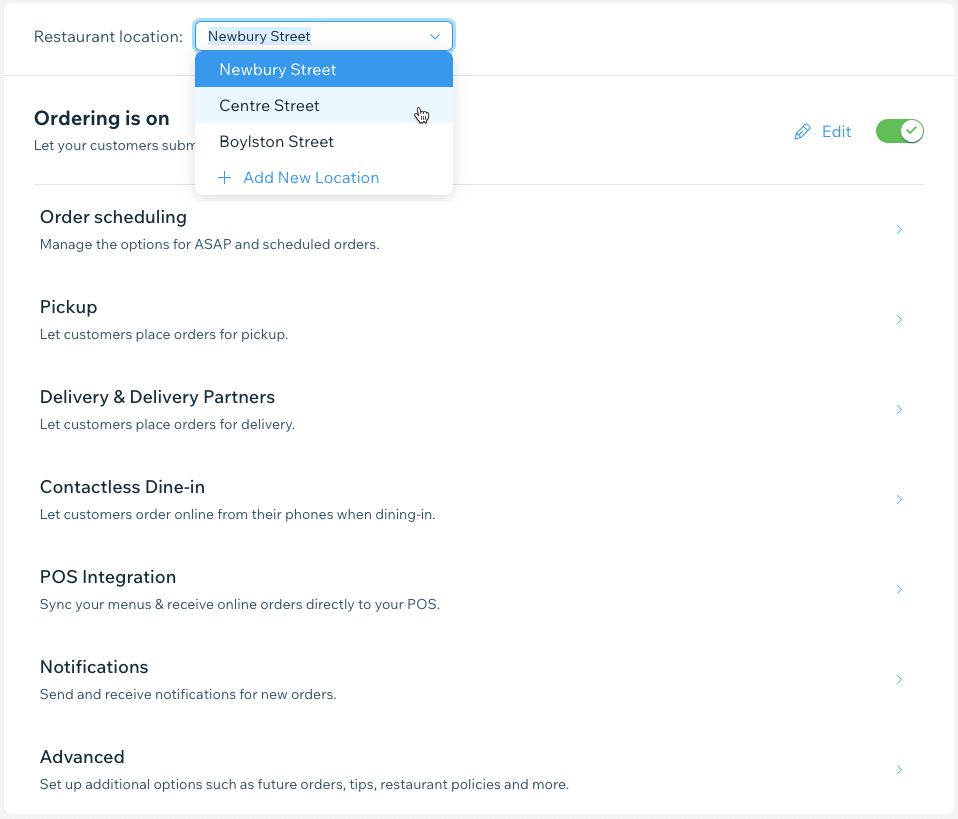
Step 3 | Enable online ordering
From Order Settings, you can enable your restaurant's online ordering system to receive online orders from customers at this location. You can customize pickup, delivery, future orders and more for each location.
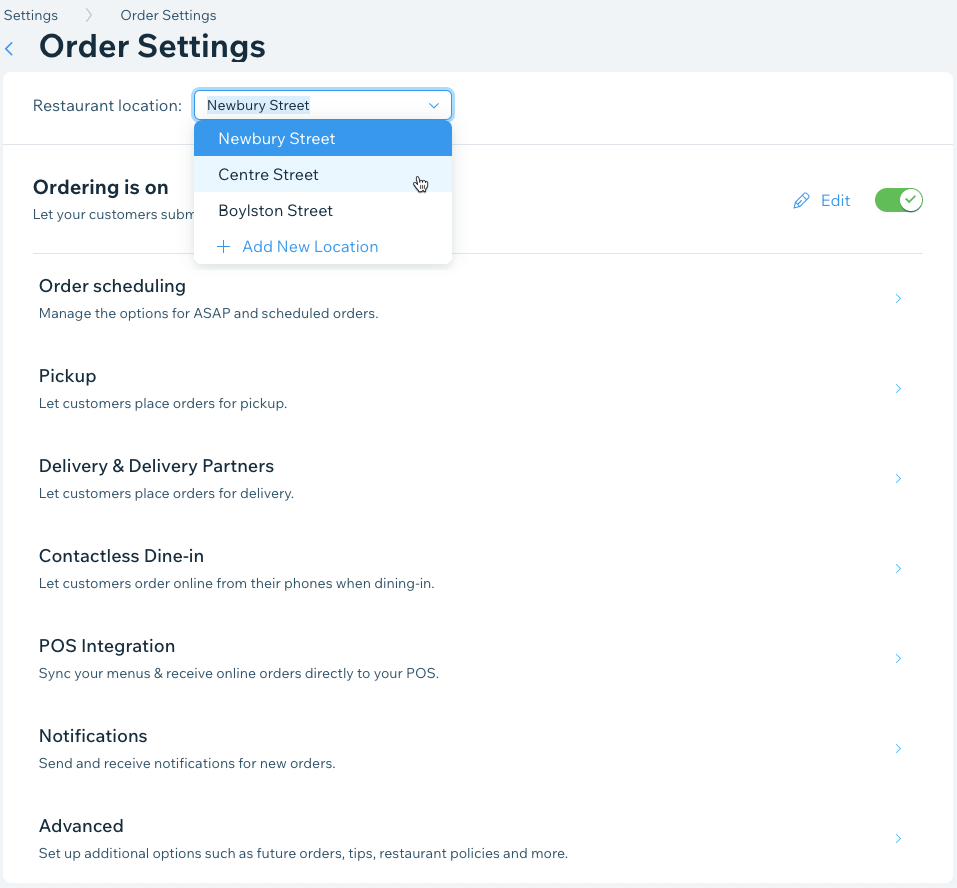
To enable online ordering:
- Go to Order Settings in your site's dashboard.
- Click the Restaurant location drop-down and select the relevant location.
- Click the Ordering is on/off toggle to enable online ordering.
What's next?
Set up additional options for this branch, including pickup, delivery, contactless dine-in and more. You can also create different discounts for different locations.
Step 4 | Enable and manage all your reservations
To accept table reservations at a new restaurant location, you have to enable it first and then customize the reservation options for each location. Set a minimum and maximum party size, availability hours, and choose from more advanced options like instantly printing incoming reservations and sending an SMS verification to customers.
Note:
As of October 2022, we have a new app for table reservations.
To enable reservations:
- Go to Table Reservations in your site's dashboard.
- Click the Restaurant Location drop-down and select the relevant location.
- Click Settings at the top right.
- Click the Online reservations are toggle to enable or disable online reservations for this location:
- Online reservations are on: Customers can book a table on your site.
- Online reservations are off: The reservations app appears on your site but customers won't be able to book a table.
What's next?
Customize additional reservation options for this branch, including party sizes, availability, and more.
FAQs
Click a question below to learn more about setting up multiple restaurant locations.
I already have multiple restaurant sites. Can I still set up a single Wix Restaurant site with multiple locations?
Will everything work the same way on my new single site?
How can I add my contacts from my other Wix sites?
What happens if I delete a location?
