

Wix Mobile Apps: Setting Up Apple In-App Purchase
6 min
In this article
- Step 1 | Set up Apple's In-App Purchase
- Step 2 | Choose which digital goods and/or services to list for In-App Purchases
- Step 3 | Wait for Apple to approve your services
- FAQs
Apple's In-App Purchase option lets you sell your digital products and services directly from your own mobile app, ensuring the most secure transactions through Apple's system.
Wix automatically identifies which services in your app require Apple's In-App purchasing. For example, if you run a fitness app, users can buy one-time access to a workout program directly through the app, making the process simple for everyone involved.
- To accept payments through Apple In-App Purchase, your app must be connected to a site with a premium plan that supports payments, in addition to an active Mobile App Premium plan for your own app.
- In-App Purchase supports single payments for one-time charges and recurring payments like monthly or annual subscriptions.
- In-App Purchase does not support free trials, one-time fees, custom start dates, changing plan duration, resubscribing after canceling. Read more about features not supported by Apple In-App Purchase.
Step 1 | Set up Apple's In-App Purchase
You complete most setup steps for In-App Purchase through your Apple Developer account. To make the process easier, we provide detailed instructions in your Mobile App dashboard to guide you through the process.
To set up Apple's In-App Purchase:
- Go to Mobile App in your dashboard.
- Click the tab with the name of your own mobile app.
- Scroll down and click Apple In-App purchase under Features and settings.
Note: If you haven't yet set up an Apple Developer account, click Set Up In-App purchase under Let’s set up your app to submit it and get it live in stores.

- Click Open Instructions next to Sign Apple's Paid Applications Agreement. Follow the steps provided to fill out the legal entity and to sign the agreement.
- Click Open Instructions next to Set up your banking and tax information. Follow the instructions provided to add your bank account, tax info and to submit your tax forms.
- Click Confirm Completion.
Step 2 | Choose which digital goods and/or services to list for In-App Purchases
Once you've agreed to Apple's terms, any digital good or service you provide that's available to sell with In-App Purchase appears on the submission page. You can choose what to include or exclude from your submission. Some examples of what you can sell include:
- Bookings services
- Digital store products
- Events
- Videos
- Online programs
Important:
The first time you add items for In-App Purchases, you need to submit your app to Apple.
To choose which digital goods and/or services to submit:
- Click the checkbox next to the items you want to add to In-App Purchases.
Tip: Click the checkbox next to Name to select all items. - Click List Items for In-App Purchase.
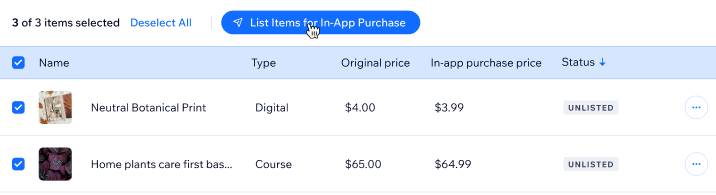
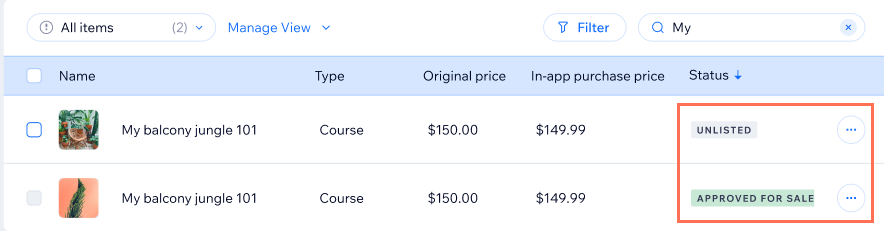
- Every available digital good and/or service is included in a list in the Apple In-App Purchase tab. Review the list to make sure the information is accurate. Approved for sale or Unlisted labels appear next to each listing to show you whether it's included in the submission or not. Once you submit an item it will show up as Pending until it is accepted or rejected.
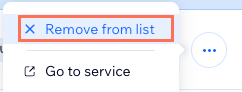
- (Optional) If you don't want to include one of the listed goods or services in your submission:
- Click the More Actions icon
 next to a good or service.
 - Click Remove from list.
- Click the More Actions icon
Step 3 | Wait for Apple to approve your services
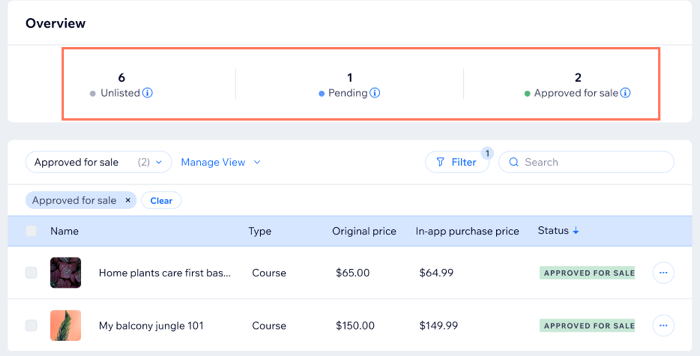
Your application is now in review with Apple. The label in the Mobile App Overview tab says Pending.
You can track what services are currently in review and approved from the Apple In-App Purchase tab. Under the Overview section at the top you can see which services are Unlisted, Pending (in review by Apple), or Approved for sale.
FAQs
Below are some frequently asked questions about setting up Apple's In-App Purchase for your own native mobile app.
Why do I need to use In-App Purchases for my services?
Can I offer services, products, or subscriptions without using Apple’s In-App Purchase?
How long does it take for Apple to approve my In-App Purchase submission?
What types of digital goods and services can I sell through Apple's In-App Purchase?
What percentage does Apple take if I sell my digital services through In-App Purchase?
Can I edit my services before I add them to my submission?
Do I need to resubmit my app every time I add more In-App Purchase services?
What happens if a user requests a refund for an In-App Purchase?
Can I hide an item if I don't want it to be sold as an In-App Purchase?
What types of bookings services do I need to set up In-App Purchases for?
Do I need to set up In-App Purchases for physical goods sold via Wix Stores?
Why do the prices of my in-app purchase items not match the prices on my website?
