Wix Loyalty Program: Giving Loyalty Points on Customers' Birthdays
4 min
In this article
- Adding birthdays as a way to earn points
- Customizing this way to earn points on your site
- FAQs
The Wix Loyalty Program allows you to automatically award loyalty points to your customers on their birthdays. This is a great way to show your appreciation and encourage repeat business.
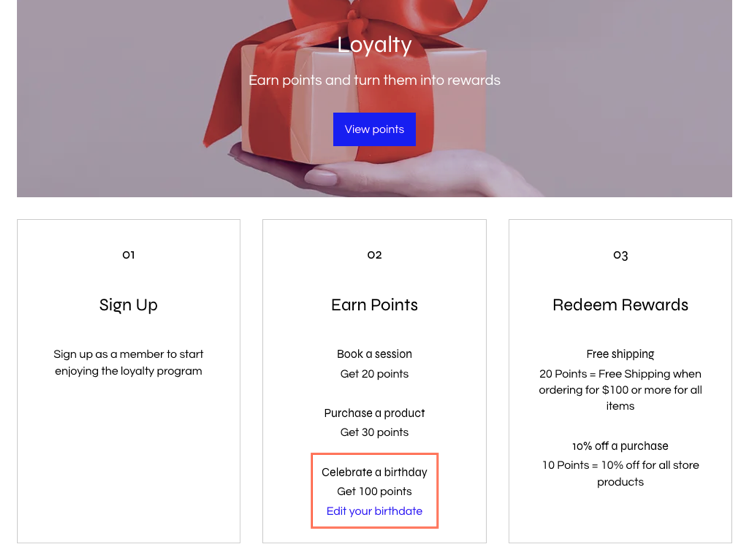
Customize the number of points customers receive and choose to send them an email notifying them of their birthday points. Also, when a site customer is logged in, they can edit their birthdate on your Loyalty program page to ensure they get the points on the right day.

Adding birthdays as a way to earn points
Add birthdays as a way for your customers to earn points. Name this way to earn and decide how many points customers will receive.
To add this way to earn:
- Go to Loyalty Program in your site's dashboard.
- Click Manage Program.
- Click + Add Way to Earn.
- Select Celebrate a birthday.
- Click Continue.
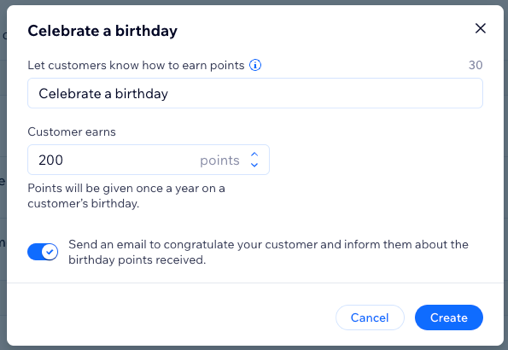
- Name this way to earn points. This is the text that is shown on your loyalty program page.
- Set the number of points you want your customers to earn on their birthday.
Note: If you've added tiers, instead select the checkboxes next to the tiers you want to make this available for and enter the number of points members earn for each. - (Optional) Enable the toggle to send an email to congratulate your customer and inform them about the birthday points received.
Tip: You can customize this email by editing the sender details and email template. To get started, scroll down to the Email automations section and click Edit next to Congratulate customers on their birthday. - Click Create.

Customizing this way to earn points on your site
After adding birthdays as a way to earn points, customize the way it looks on your site's dedicated loyalty program page. Change the color and font of the 'Edit your birthdate' button to align with the look and feel of your site design.
Note:
This button only appears when customers are logged in.
Wix Editor
Studio Editor
- Go to your editor.
- Click Pages & Menu
 on the left side of the editor.
 - Click the page named after your loyalty program.
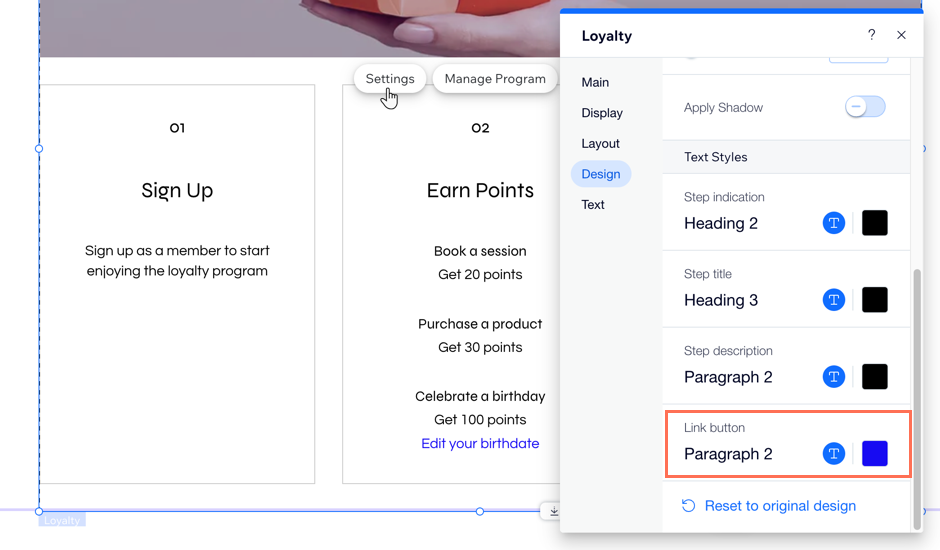
- Click the Loyalty element on your page and click Settings.
- Click the Design tab.
- Click Program Details.
- Scroll down to Link button.
- Change the color, style, font, and font size of the Edit your birthdate button.
Note: This change applies to all links added for ways to earn (e.g. the 'Follow' button for following social media channels).

Tip:
The title of this way to earn is the same as you configured when setting up the program. You can always edit this in your dashboard.
FAQs
Click a question below to learn more about giving loyalty points on birthdays.
How can I edit the name of this way to earn?
How can I update a customer's birthday on their behalf?
A customer changed their birthdate but didn't get any loyalty points. Why is that?


