

Wix Blog: Managing Display Options in Your Blog
9 min
In this article
- Showing or hiding information in a blog or category feed
- Showing or hiding information on your Post page
- FAQs
Showcase your blog your way by choosing exactly what readers see on your blog feed and posts. Whether it's the author name, publish date, like count, views and comment counters, you decide which details to show or hide. With full control over your blog display, you can craft a reading experience that feels thoughtful and aligned with your style.
Showing or hiding information in a blog or category feed
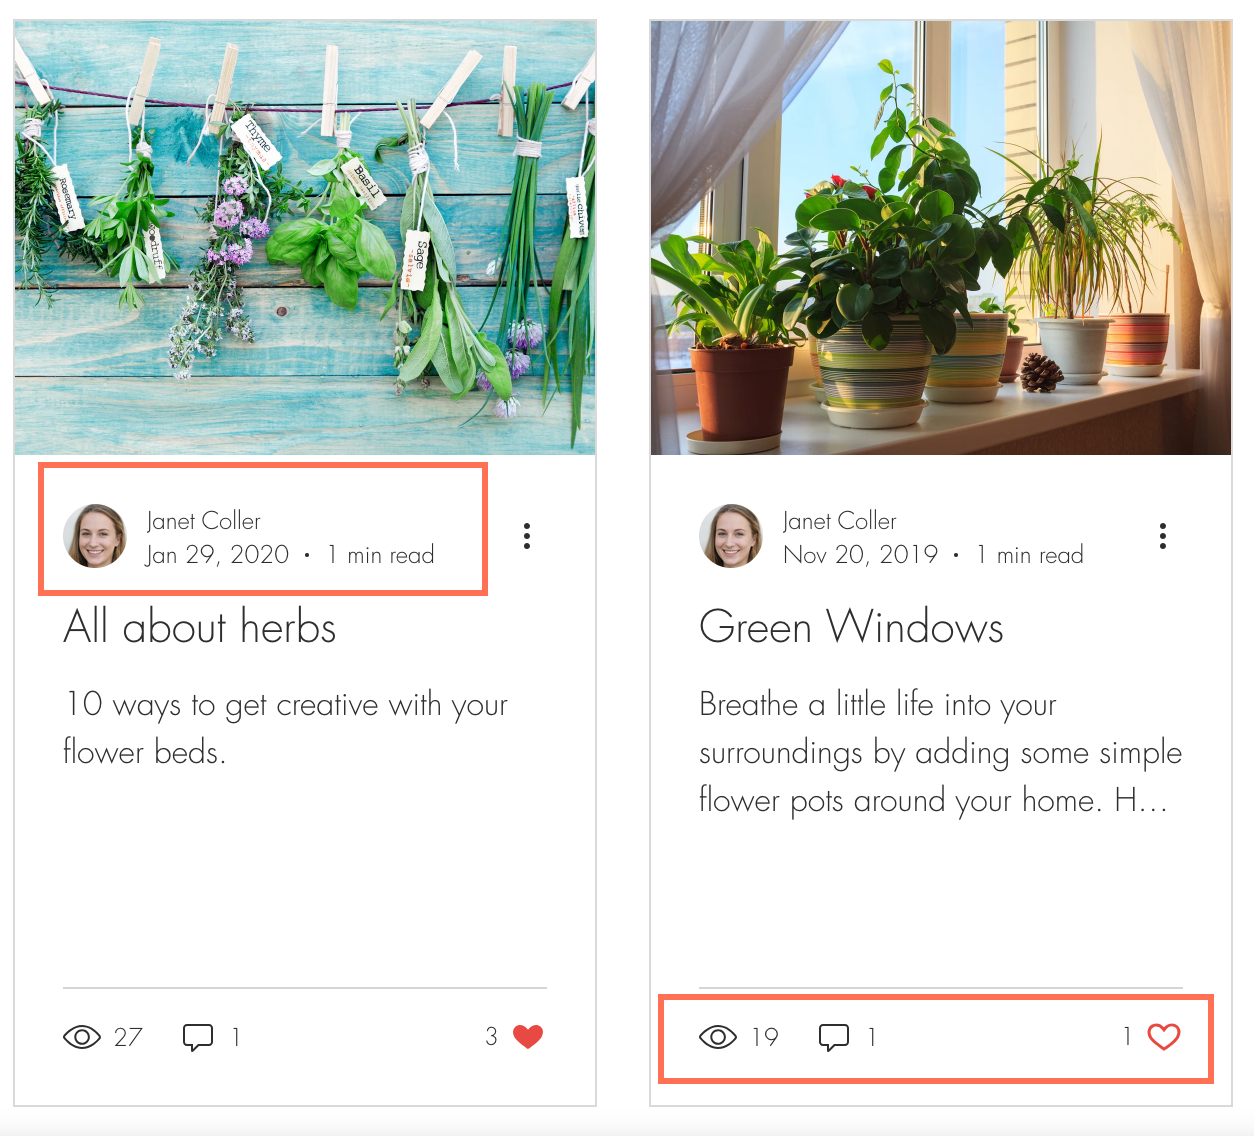
Highlight the details that matter most to your visitors by selecting what appears in your blog or category feed. These details that appear on your blog or category feed provide insight to the posts in your blog. They can boost engagement and help drive traffic to your blog. The options you choose apply to both your blog feed and your category feed.
Wix Editor
Wix Studio
Harmony Editor
Wix app
- Go to your editor.
- Go to your Blog page:
- Click Pages & Menu
 on the left side of the editor.
 - Click Blog Pages.
- Click your Blog page.
- Click Pages & Menu
- Click the blog element on your page.
- Click Settings.
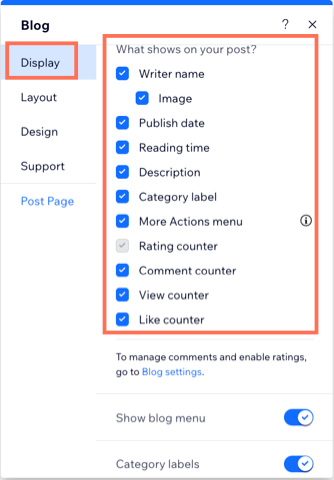
- Click the Display tab.
- Customize the following display options:
- What shows on your post: Select the checkboxes next to the information you want to display.
- Show blog menu: Enable/disable the toggle to show or hide the blog menu.
- Category labels: Enable/disable the toggle to show or hide category labels.
- Share and print: Click Share and print and customize the options available.
- Enable share & print icons: Enable/disable the toggle to show or hide share and print icons.
- Icons to show on posts: Select/deselect the checkboxes to show or hide certain icons.
- Enable share & print icons: Enable/disable the toggle to show or hide share and print icons.
Showing or hiding information on your Post page
Your Post page is the dedicated blog page which opens when your reader selects a specific post. You can choose what information you want to display on this page. Any settings you apply here apply to every post in your blog. Customize what displays on your post page by selecting or deselecting the relevant options.
Wix Editor
Wix Studio
Harmony Editor
Wix app
- Go to your editor.
- Go to your Post page:
- Click Pages & Menu on the left side of the editor.
- Click Blog Pages.
- Click Post.
- Click Pages & Menu
- Click the post page element on your page.
- Click Settings.
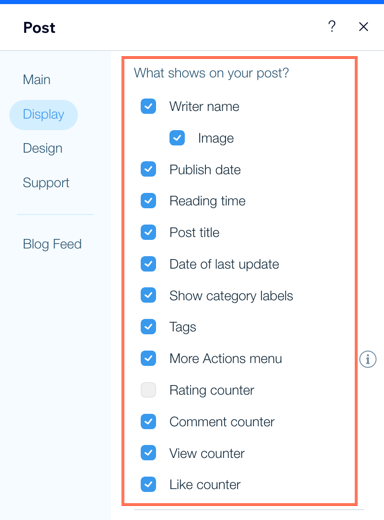
- Click the Display tab.
- Customize the following display options:
- What shows on your post: Select the checkboxes next to the information you want to display.
- Show blog menu: Enable/disable the toggle to show or hide the blog menu.
- Category labels: Enable/disable the toggle to show or hide category labels.
- Share and print: Click Share and print and customize the options available.
- Enable share & print icons: Enable/disable the toggle to show or hide share and print icons.
- Icons to show on posts: Select/deselect the checkboxes to show or hide certain icons.
- Add "Save" button to images: Enable/disable the toggle to add a Pinterest Save button to your post images.
- Share text on X/Twitter: Enable/disable the toggle to allow readers the option to highlight a piece of text from your post and share it on X/Twitter.
- Related posts: Click Related posts and customize the options available.
- Show related posts: Enable/disable the toggle to show or hide related posts.
- Display post label: Enable/disable the toggle to show or hide a post label.
- Select what the label says: Related posts or Recent posts.
- Show "See all" link: Enable/disable the toggle to show or hide a link to see all your blog posts.
- Display post label: Enable/disable the toggle to show or hide a post label.
- Show related posts: Enable/disable the toggle to show or hide related posts.
FAQs
Click a question below to learn more about displaying information on your blog
What is the difference between my Blog page and my Post page?
Can I customize what is displayed on a mobile view?
Can I hide the view, comment, and like counters from my posts in my blog feed?
Can visitors still leave comments if I hide the comment counter?
