

Wix Automations: Setting Up a Webhook Received Trigger
5 min
In this article
- Step 1 | Set up a new automation with a Webhook Received trigger
- Step 2 | Configure your external service to send webhooks
- (If relevant) Step 3 | Configure payload data for automations that use external information
- Step 4 | Set up the rest of the automation
- FAQs
Webhook triggers let you start Wix automations from external apps and bring information from those services into your automated processes. When something happens in an external app, you can set it to instantly start your automation and pass along the relevant data to the rest of your automation.
For example, trigger an automation when you receive a payment from a third-party provider, or when your CRM sends a status update.
Before you begin:
This feature is recommended for advanced users who want to integrate their Wix site and other external business tools and services.
Step 1 | Set up a new automation with a Webhook Received trigger
To get started, create a new automation and add the 'Webhook Received' trigger.
To add a webhook received trigger:
- Go to Automations in your site's dashboard.
- Click + Create Automation at the top right.
- Click + Start from Scratch to begin from a blank automation template.
- Click the title to give your automation a name.
- Select Webhook received as your trigger.
- Click Copy in the Webhook URL section.
Note: This URL is unique for each automation. You'll need to paste it in your external app or service in order to connect.

Important:
- If you switch to a different trigger and then back to 'Webhook received', you’ll get a new webhook URL. Make sure to copy the new URL and update it in the external service you're using.
- Keep this Wix Automations tab open as you continue to the next step – you'll need to come back to it later.
Step 2 | Configure your external service to send webhooks
To trigger your automation, set up your external service to send webhooks to the unique URL from Step 1. This connects your external service to Wix and makes sure your automation runs every time the event you choose happens.
To set up the webhook in your external service:
- (In your external service or app) Locate the area where you can configure outgoing webhooks or HTTP notifications.
- Configure your external service as you want it.
- Paste the Webhook URL you copied into the URL field.
- Set the request method to POST.
- (If your automation is using the external data) Set up the payload structure in the automation on Wix using the instructions in the next step).
Tips:
- The webhook payload must be sent in valid JSON format. You can include different types of data (such as, strings, numbers, arrays, etc.) as long as the overall format is valid JSON.
- To check your incoming payload structure, use a tool like Postman or your external service’s test feature.
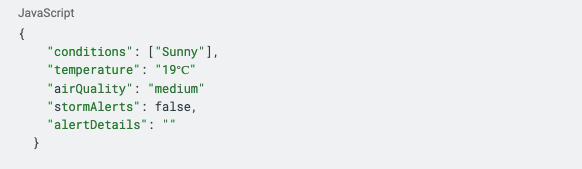
(If relevant) Step 3 | Configure payload data for automations that use external information
If your automation is going to use data from your external service, set up the payload (the data package) that your service sends to your Wix webhook URL. This step makes sure the correct fields are available when you set up automation actions.
Note:
The payload must include all the fields you want to use in your automation. For example, if you want to send a confirmation email including the customer's name, email, and order total, each of these fields should be included in your payload.
To set your payload structure:
- Go back to the automation you started creating in Wix.
- Click the Webhook Received trigger.
- Click Set Payload Data Structure to define the payload that your automation can expect to receive from the external service.
- Enter sample JSON data that the automation will use to extract the schema from.
- Click Preview Structure.
- Click Save Structure or Edit JSON to continue editing.
- When you're done, click Apply.

Step 4 | Set up the rest of the automation
Set up the rest of your automation and map the incoming fields to dynamic values in your automation’s actions. Once done, activate or save your completed automation.
To set up your automation:
- Go back to the automation you started creating in Wix.
- (Optional) Enhance your automation further by adding a Condition, Delay, Local variable or Global storage item.
- Set up the action of your automation:
- Click the Add Step icon
 and add an Action.
 - Select an action that you'd like the automation to perform.
- Configure the automation as needed. In the action’s field-mapping section, select the data from your webhook payload.
Tip: These data points appear as dynamic values just like data from other triggers.
- Click the Add Step icon
- Click Activate or Save at the top right.
Tip:
Send a test request from your external service to make sure you have successfully set up your response to meet your expectations.
FAQs
Click below to learn more about setting up a 'Webhook Received' trigger.
What can I do if my automation isn't triggering as expected?
Why aren’t my webhook fields appearing as I'm setting up the action?
What happens if my webhook payload structure changes after setup?
Can I use multiple webhook received triggers in one automation?
