Wix Events: Setting Up Your Event Details Page
15 min
In this article
- Choosing a layout
- Selecting which elements to display
- Editing text
- Customizing the design
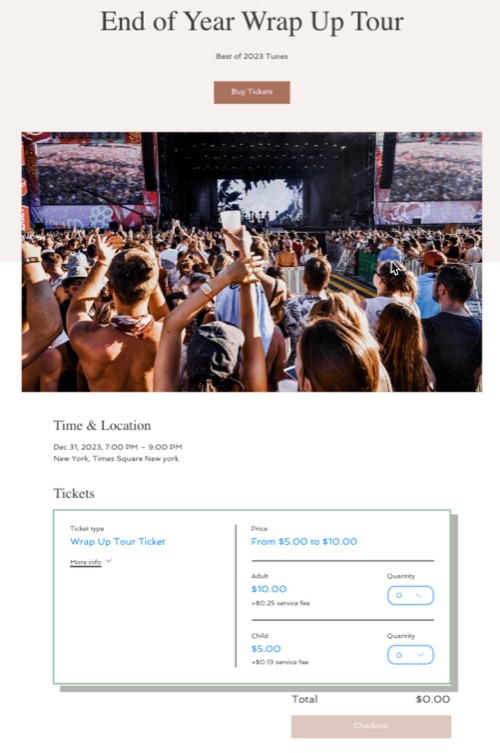
The Event Details page is where you can share all the key information your guests need about your event. This includes an 'About the Event' section, a map of the event location, and the option to display or hide the 'Guests' section.
By showcasing the guest list, you can generate excitement and encourage social interaction by letting attendees see who else will be joining.
Note:
If you have events without tickets (e.g. RSVP events) you have the option of disabling the Event Details Page.
Choosing a layout
Choose how you want to showcase your event details and image. This includes the event header, info and ticket picker where guests select the tickets they want to purchase.
Wix Editor
Studio Editor
Wix Harmony Editor
- Go to your editor.
- Go to the Event Details & Registration page:
- Click Pages & Menu
 on the left side of the editor.
 - Click Event Pages.
- Click Event Details & Registration.
- Click Pages & Menu
- Click the Event Details element on your page.
- Click Settings.
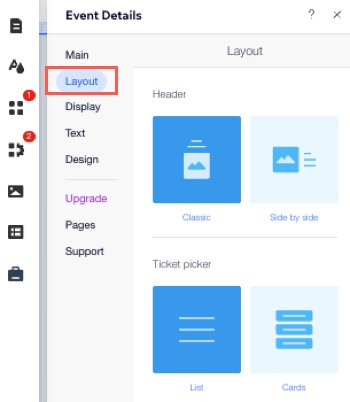
- Click the Layout tab.
- Customize the layout of your Event Details using the following options:
- Layout: Choose a layout for the Header and Ticker picker.
- Text: Choose where you want to display the text for your Event Header and Event Info.
- Image: Choose how you want to customize the event image by setting the ratio, size, opacity, and background color.
Selecting which elements to display
Customize your event details page by selecting which elements to display. For example, you can show or hide the 'Guests' section to manage attendee visibility.
Wix Editor
Studio Editor
- Go to your editor.
- Go to the Event Details & Registration page:
- Click Pages & Menu on the left side of the editor.
- Click Event Pages.
- Click Event Details & Registration.
- Click Pages & Menu
- Click the Event Details element on your page.
- Click Settings.
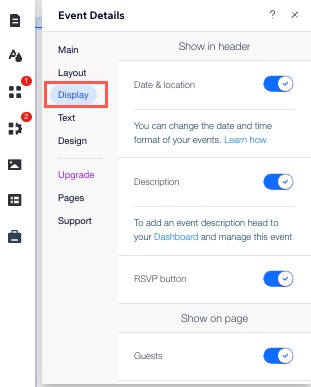
- Click the Display tab.
- Enable the toggles to display the relevant information:
Show in header
Show on page
Editing text
Your page comes with certain default text that you can edit to match your voice and tone. Change the titles, links and buttons across the page so they suit your events.
Wix Editor
Studio Editor
- Go to your editor.
- Go to the Event Details & Registration page:
- Click Pages & Menu on the left side of the editor.
- Click Event Pages.
- Click Event Details & Registration.
- Click Pages & Menu
- Click the Event Details element on your page.
- Click Settings.
- Click the Text tab.
- Choose you want to edit:
Tip: You may not see options you have not set up or have hidden.
Button
Link
Event titles

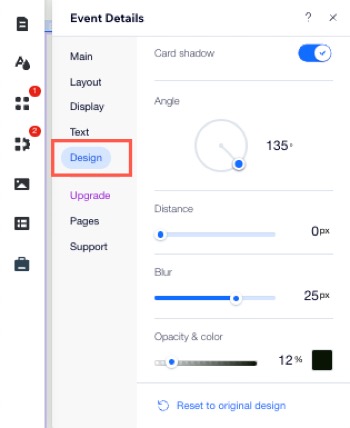
Customizing the design
Select the colors, fonts, button shapes, and more to create an event page that guests find inviting.
Tip:
The available design options may vary depending on your layout and display selections.
Wix Editor
Studio Editor
Wix Harmony Editor
- Go to your editor.
- Go to the Event Details & Registration page:
- Click Pages & Menu on the left side of the editor.
- Click Event Pages.
- Click Event Details & Registration.
- Click Pages & Menu
- Click the Event Details element on your page.
- Click Settings.
- Click the Design tab.
- Choose what you want to design:
Text
Schedule text
Ticket picker

Button & links
Background