

Setting Up Tax Calculation Using the Manual Method
8 min
In this article
- Step 1 | Add tax locations
- Step 2 | Enter your tax rates
- Step 3 | (Optional) Customize advanced mode settings
- Step 4 | Set how tax is displayed in your shop
- Step 5 | (Optional) Create tax groups
- FAQs
Make sure you're compliant with local tax regulations by setting up tax collection in relevant locations. Learn more about figuring out where you need to collect tax.
Important:
- This tax solution is currently available for Wix Stores, Wix Bookings, Wix Restaurants Orders (New) orders, Wix Donations, and is in the process of becoming available for Pricing Plans.
- Using a different app? Click an option below:
Step 1 | Add tax locations
Start by adding the first location where you need to collect taxes. If needed, you can add additional locations.
Important:
Different tax rules apply in different regions. Consult with an accountant or your local tax authority for specific information relevant for your business.
To add tax locations:
- Go to Tax in your site's dashboard.
- Click +Add Location.
- Select a country from the Country drop-down.
- (Optional) Click the Set up tax for every region individually toggle.
Notes:- Leave the toggle disabled to collect the same tax rates for the entire country.
- The toggle doesn't appear for the US, Canada, and countries without separate regions.
- (If you enabled the toggle) Select one or more states/provinces etc. from the Districts drop-down.
- Click Add.
- (Optional) Repeat steps 2-6 to add additional tax locations.
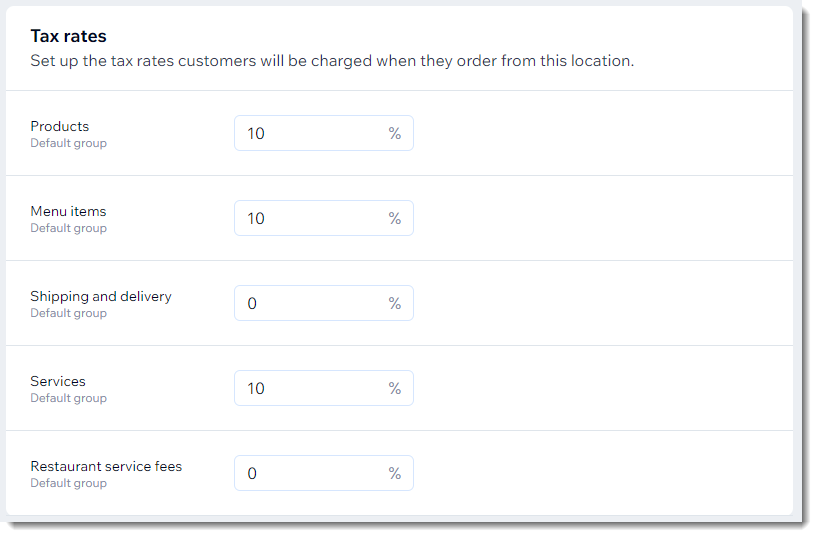
Step 2 | Enter your tax rates
Now that you've created the locations where you need to collect tax, you need to enter tax rates for each group. You can enter a rate for products created through Wix Stores, services created through Wix Bookings, menu items created through Wix Restaurant Orders (New), and the additional costs associated with store or restaurant orders.
Tips:
- In some locations, digital products and shipping costs aren't taxed as the same rate at physical products. Check with an accountant to see if you need to tax these items.
- To tax digital products at a different rate, create a tax group (see below).
To enter tax rates:
- Go to Tax in your site's dashboard.
- Select a tax location.
- Enter the rates.
- If you have multiple locations, repeat steps 2 and 3 for each one.
- Click Save.
Step 3 | (Optional) Customize advanced mode settings
By enabling advanced mode, you're able to customize two types of settings.
First of all, you can edit the default tax name that appears on your site (e.g. change "VAT" to "Sales tax") in each tax location. To learn more about tax names, read the FAQ below.
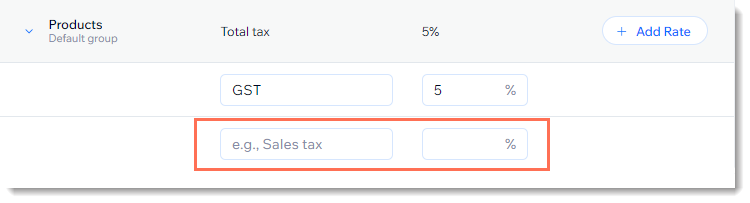
Additionally, if tax in a location is more complex and involves multiple rates, you can add them.
An example of a tax location that requires 2 rates is Canada. Besides the federal sales tax (GST), most provinces in Canada collect a provincial sales tax. So a merchant selling in Ontario would want to collect both the Ontario sales tax (HST) and federal sales tax (GST).
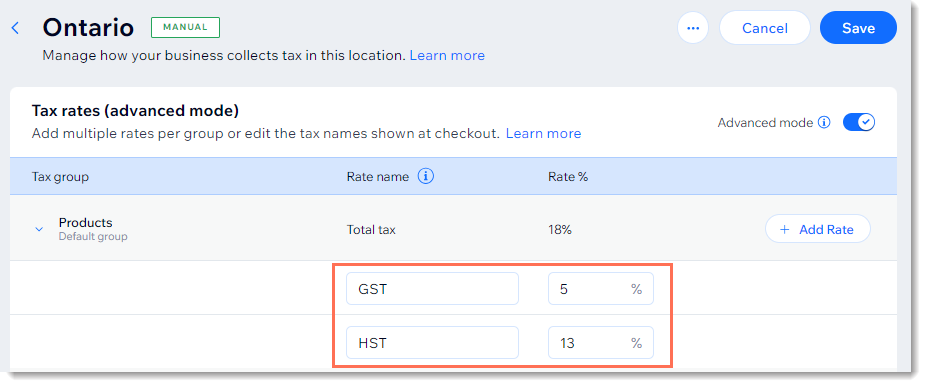
To customize advanced mode settings:
- Go to Tax in your site's dashboard.
- Select the relevant location.
- Click the Advanced mode toggle to enable it.
- (Optional) Add an additional tax rate:
- Click Add rate.
- Enter a rate name (e.g. GST).
- Enter the tax rate percentages.
- (Optional) Select the Add to all tax groups in this location checkbox.
- Click Add.
- Enter the second name and rate (e.g. HST)
- (Optional) Repeat step 4 to add an additional rates.
Note:
If you use Wix Invoices, you'll need to enable the Tax breakdown in the total section toggle to see any additional tax rates you created. Learn more
Step 4 | Set how tax is displayed in your shop
Decide whether to display items in your shop with the tax included or add tax at checkout. Learn more about setting whether tax is included in the price.
To set how tax displays in your shop:
- Go to Tax in your site's dashboard.
- Select an option:
- Tax should be added at checkout: For example, if the tax rate is 10% and a customer buys a $100 product, they are charged $110 at checkout.

- Tax is already included in my prices: For example, if the tax rate is 10% and a customer buys a $100 product, they are charged $100 at checkout.

- Tax should be added at checkout: For example, if the tax rate is 10% and a customer buys a $100 product, they are charged $110 at checkout.
Step 5 | (Optional) Create tax groups
Note:
Tax groups are not currently available for Wix Bookings services.
If some of your items are taxed at a different rate, you can create a custom tax group for them.
For example, if children's car seats are tax-exempt in one of your tax locations, you can create a car seat tax group, add all the relevant products to the group, and assign the group a tax rate of 0%.
Learn how to create tax groups.
FAQs
Click a question below to learn more about collecting tax using the manual method.
What is the difference between manual and automatic tax collection?
How can I display tax estimates on the Cart Page?

How can I collect the same / a different rate for every state in a country?

How do tax names work?


How can I set up tax for a home rule state in the US?
Can I set up tax using the Wix app?
How are tax calculations rounded?

