

Velo: Integrate Your Google Cloud BigQuery Database with Your Wix Site
15 min
In this article
- Overview
- Google Cloud Platform
- Create and Configuring a Database
- Set Up a BigQuery Database on GCP
- Create a New Database Table
- Set Up Secrets
- Create Secrets
- Deploy the Adaptor to Cloud Run
- Create a Service
- Configure Access Roles, Secrets, and Environment Variables
- Check Your Connection Status
- Test Your Service
- Connect to Your Wix Site
Wix data gives you powerful data storage and retrieval capabilities and the ability to create and maintain your own data collections. But what if you have your own database already, or want to host your data on a relational database?
With External Database Collections, you can use your BigQuery database hosted on Google Cloud Platform, and fully integrate it into your Wix site. You can use any of the wix-data and wix-dataset APIs with External Database Collections, as well as connect repeaters, tables, and other page elements to your BigQuery data.
To integrate a MySQL or Postgres Database, see Integrate Your Google Cloud MySQL or Postgres Database with Your Wix Site. If you want to do this with AWS, see Integrate Your AWS MySQL Database with Your Wix Site. For Microsoft Azure, see Integrate your Azure Database with your Wix Site.
Overview
This tutorial walks you through setting up a BigQuery database on Google Cloud Platform (GCP) and connecting it to your Wix site.
If you don't already have your own database on GCP, we'll help you create one.
Here's what's involved:
- Set up a new project on Google Cloud Platform.
- Create a BigQuery database, if you don't already have one.
- Create a new table in your database.
- Create secrets to securely store your database credentials.
- Create and deploy a new Cloud Run service to host the Wix database adaptor.
- Connect your Wix site to your database.
This tutorial uses a container image with all the functionality needed to interface between your database and your Wix site. If you want to look under the hood, you can have a look at the SPI specifications for external database collections, and an overview of what's involved in building your own adaptor.
Google Cloud Platform
This tutorial assumes a bit of knowledge about Google Cloud Platform. If you've never worked with GCP, have a look at this guide and click the Get Started For Free button.
Once you're ready to go, create a new project for this tutorial and call it velo-external-db.
Create and Configuring a Database
This part of the tutorial walks you through setting up a BigQuery database and adding a table. If you already have your own database on GCP, you can skip this section. Note that if you want read-write access to your database tables, they must contain the 4 columns described in the Create a New Database Table section.
Set Up a BigQuery Database on GCP
Show me how

 and select Create dataset.

Create a New Database Table
This section walks you through creating a new table in BigQuery. If you know what you're doing, or you already have tables and don't want write access, you can skip this section.
Prerequisites for Read-Write Access to Your Database Table:
If you want your table to be read-write on your Wix site, it must contain the following columns:
- _id
- _createdDate
- _updatedDate
- _owner
Tables without these columns will be read-only in your Wix site.
Show me how
 and select Create table.


Set Up Secrets
The external database adaptor requires you to set some environment variables. Some of these variables, like the DB credentials, are sensitive and should not be visible. We'll use the GCP Secret Manager to store and access these variables securely.
We need to store the following secret values:
- DATABASE_ID
The BigQuery dataset ID. When we created our database in the previous steps, we set the dataset ID to bigQuery_dataset. - PROJECT_ID
The ID of the project your dataset is in. You can find this on the Explorer panel.
- SECRET_KEY
A secret key that is used when connecting your Wix site to the adaptor. To create a level of authentication between your site and the adaptor, each request your site sends to the adaptor contains this value in the payload. - PERMISSIONS (optional) A JSON object that defines the read and write permissions for the tables in your database.
Note: Customizing permissions for external databases is currently a developer preview feature, and may change. Changes to permissions settings are not reflected in the Wix Editor.
Learn more about configuring database permissions
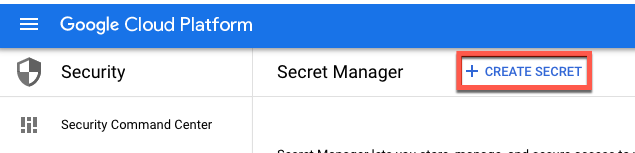
Create Secrets
1. To create the secrets, go to the GCP Secret Manger page.
2. Click Create Secret.
3. Enter the secret Name and Secret Value and click Create Secret.
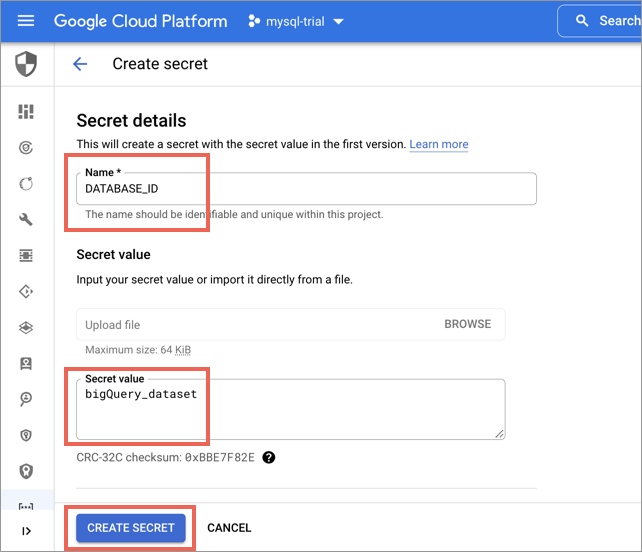
4. Repeat steps 1 and 2 for each of the 3 secrets:
- DATABASE_ID
- PROJECT_ID
- SECRET_KEY
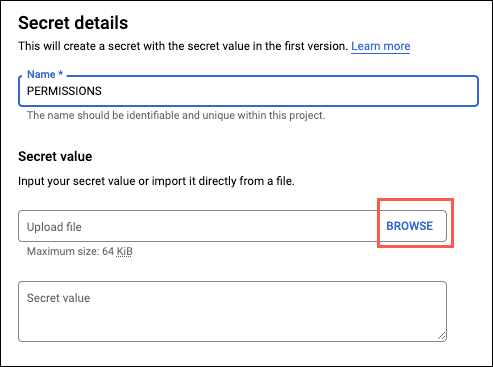
5. To create a PERMISSIONS secret, instead of entering a Secret value, click Browse and select the .json file that contains your permission settings.
Deploy the Adaptor to Cloud Run
Next, we'll deploy the external database adaptor as a service on Cloud Run. We create the service using a prebuilt container, configure secrets and environment variables, and then configure the database connections.
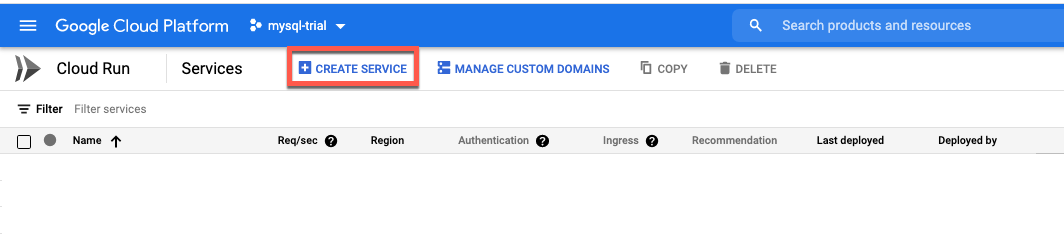
Create a Service
- Go to the Cloud Run Instances page and select your project.
- Click Create Service.
3. Enter gcr.io/wix-velo-api/velo-external-db in the Container Image URL field. The Service name will default to velo-external-db.
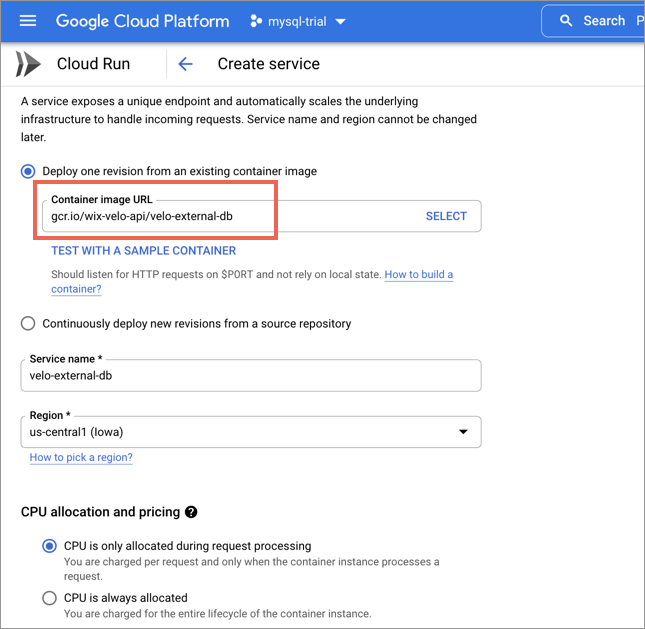
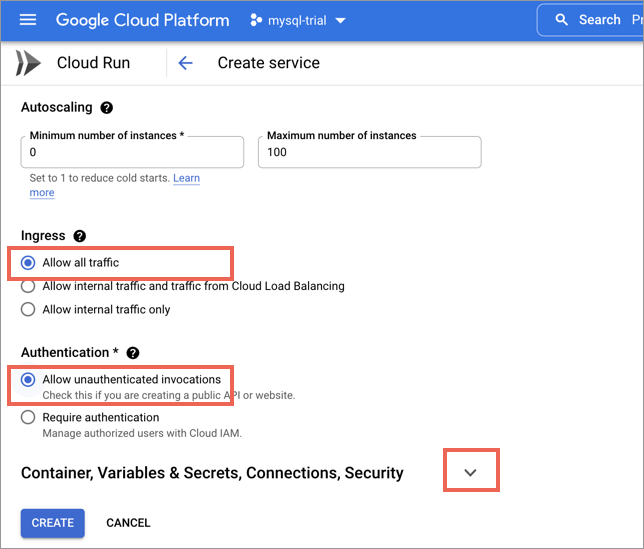
4. Uner Ingress, select Allow all traffic.
5. Under Authentication, select Allow unauthenticated invocations.
6. Expand the Container, Variables & Secrets, Connections, Security section.
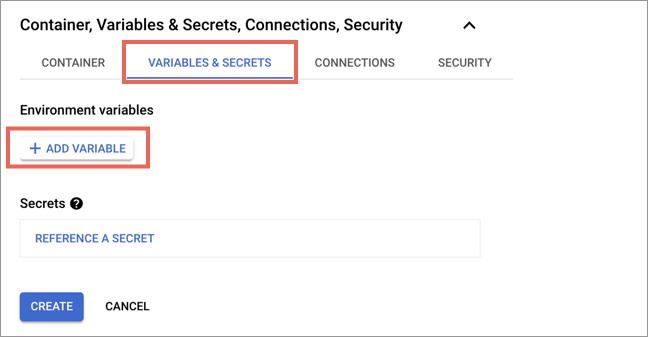
7. Select Variables & Secrets, then click Add Variable.
8. Create 2 environment variables by clicking Add Variable twice. Define the names and values for the variables as follows:
| NAME | VALUE |
|---|---|
TYPE | bigquery |
CLOUD_VENDOR | gcp |
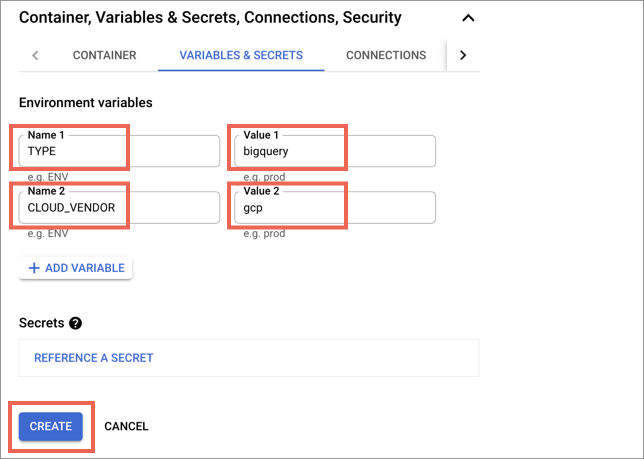
9. Click Create.
Configure Access Roles, Secrets, and Environment Variables
Now we configure the secrets that we defined earlier as environment variables for the service. To do this we'll perform the following steps:
- Create a new service account that will run the Cloud Run service.
- Grant access roles to the new account.
- Create environment variables and assign the secrets' values.
Security Access Roles
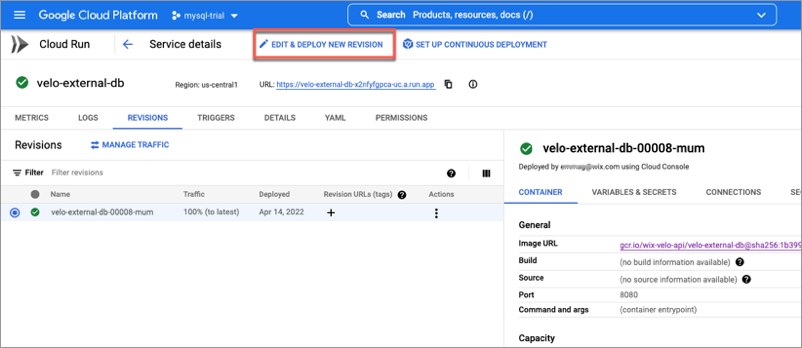
1. On the Service details page, click Edit & Deploy New Version.
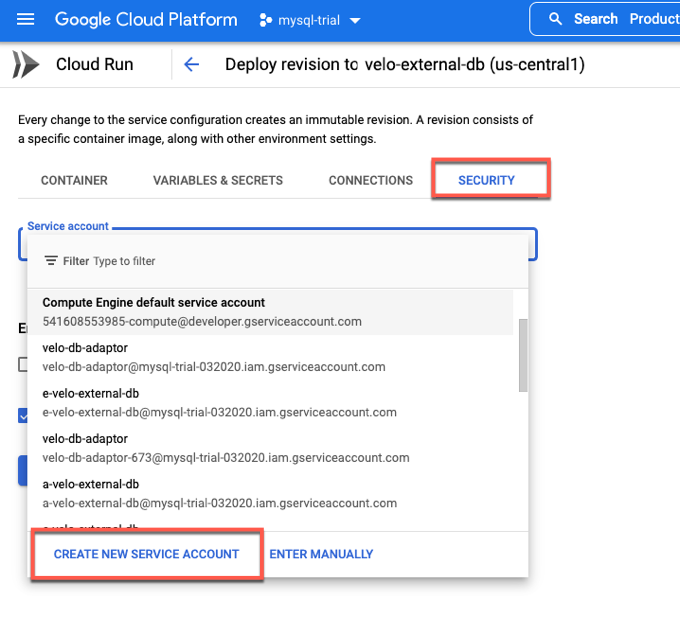
2. Select the Security tab and then select Create New Service Account from the Service account dropdown.
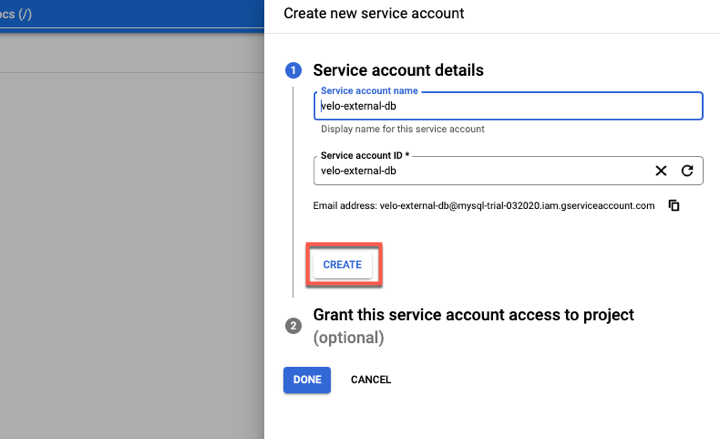
4. Set the Service account name. It is recommended to set the Service account name to match the Cloud Run instance name so that you can easily know which account is used by which instance.
5. Click Create.
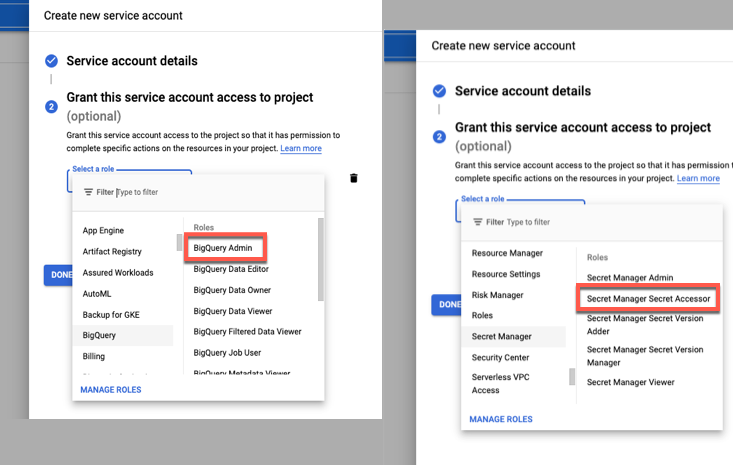
6. Grant the following roles to the service account:
- BigQueryAdmin
- Secret Manager Secret Accessor
You can paste the roles above into the dropdown filter.
7. Click Done.
Environment Variables and Secrets
1. Define the environment variables and assign their values from the secrets that we defined earlier in the Create Secrets section.
2. In the Variables & Secrets tab, click Reference a Secret.
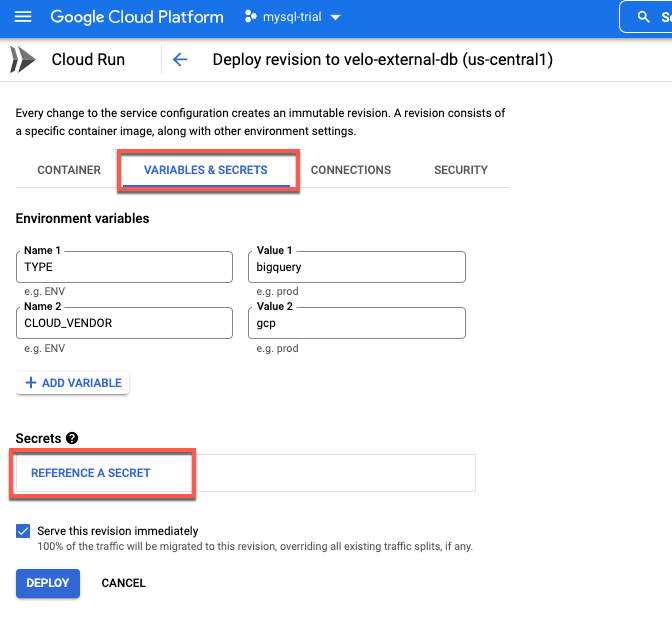
3. Select a secret from the Secret dropdown and select Exposed as environment variable from the Reference method dropdown.
4. Assign the environment variable the same name as the secret.
5. Select latest from the Version dropdown, and click Done.
Repeat this process for all of the secrets that you defined in the Create Secrets section.

If you get a warning that the service account does not have permissions to access the selected secret, you are no longer configuring the service account that you set up in Step 7 above.
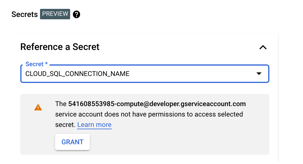
In that case, click the Security tab, select your service account from the dropdown, and then return to the Variables & Secrets tab.
Once you have configured all of the secrets and environment variables, your configuration looks like this:
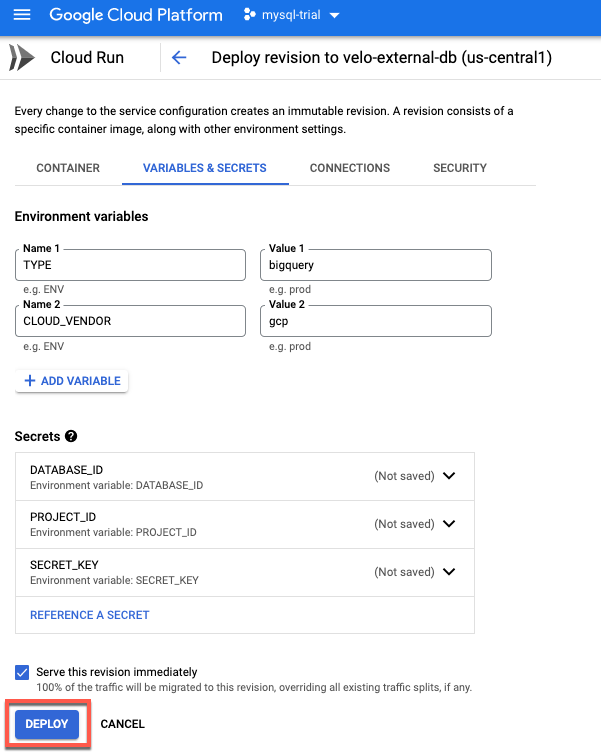
6. Click Deploy.
Check Your Connection Status
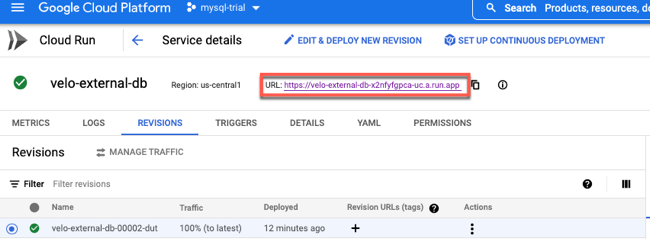
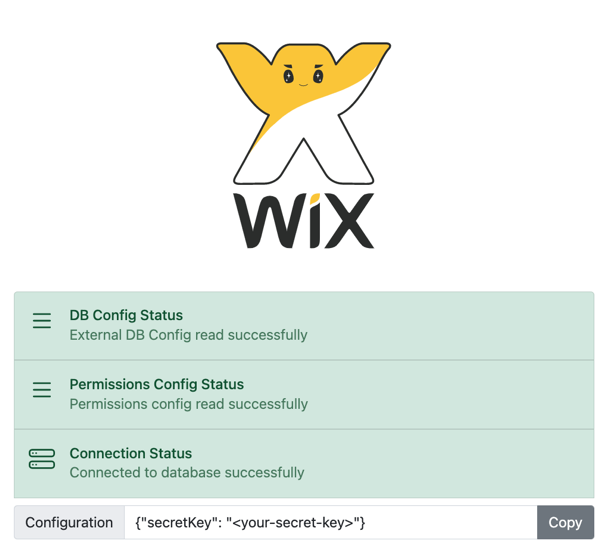
Once deployed, check that your setup is working.
1. From the Cloud Run Service details page, click the service's URL. This URL is used to connect to your database adaptor service and to configure the external collection on your Wix site.
The following page displays DB Config Status and Connection Status in green. If you added a PERMISSIONS secret, the Permissions Config Status is also green. If you didn’t, it’s yellow.
If one of the statuses is red, check the configuration, secret values, and environment variables. Make any necessary changes and redeploy the service.
Note:
If you change the value of a secret, you must redeploy the service for the new value to take effect.
Test Your Service
You can test that your service is working by making a quick request using curl.
Use the curl command below, replacing the URL with your URL from Step 2 above, and replacing the secretKey value with your secret.
1curl -L -X POST 'https://velo-postgres-db-cacacapca-uc.a.run.app/schemas/list' \
2-H 'Content-Type: application/json' \
3--data-raw '{
4    "requestContext": {
5        "settings": {
6            "secretKey": "ourLittleSecret"
7        },
8        "role": "OWNER"
9    }
10}'
The output provides a list of tables and their columns from your database. If you have python installed, you can pipe the output to python -m json.tool and it will give you nicely formatted JSON.
The formatted output contains the list of tables and their columns from your database.
1{
2    "schemas": [
3        {
4            "id": "contacts",
5            "displayName": "contacts",
6            "allowedOperations": [
7                "get",
8                "find",
9                "count",
10                "update",
11                "insert",
12                "remove"
13            ],
14            "maxPageSize": 50,
15            "ttl": 3600,
16            "fields": {
17                "name": {
18                    "displayName": "name",
19                    "type": "text",
20                    "queryOperators": [
21                        "eq",
22                        "lt",
23                        "gt",
24                        "hasSome",
25                        "and",
26                        "lte",
27                        "gte",
28                        "or",
29                        "not",
30                        "ne",
31                        "startsWith",
32                        "endsWith"
33                    ]
34                },
35                "_createddate": {
36                    "displayName": "_createddate",
37                    "type": "datetime",
38                    "queryOperators": [
39                        "eq",
40                        "lt",
41                        "gt",
42                        "hasSome",
43                        "and",
44                        "lte",
45                        "gte",
46                        "or",
47                        "not",
48                        "ne",
49                        "startsWith",
50                        "endsWith"
51                    ]
52                },
53                "email": {
54                    "displayName": "email",
55                    "type": "text",
56                    "queryOperators": [
57                        "eq",
58                        "lt",
59                        "gt",
60                        "hasSome",
61                        "and",
62                        "lte",
63                        "gte",
64                        "or",
65                        "not",
66                        "ne",
67                        "startsWith",
68                        "endsWith"
69                    ]
70                },
71   ...
Connect to Your Wix Site
Now that we have a database and an adaptor service, we are ready to add the database as an external collection on our site.
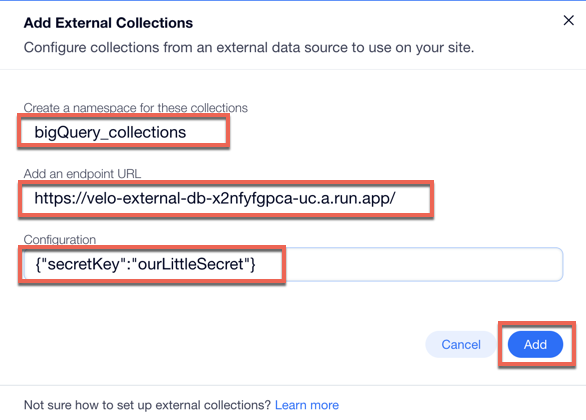
1. In the Wix editor, select Databases from the Velo sidebar.
2. Click the  icon next to Content Collections and select Add External Collections.
icon next to Content Collections and select Add External Collections.
3. Enter a name for your external collection.
4. Copy and paste your adaptor service's URL into the Add an endpoint URL field.
5. Enter the Secret Key value that you created in the GCP Secret Manager. For this tutorial, we set the SECRET_KEY value to 'ourLittleSecret'.
6. Click Add.
The Content Management System (CMS) displays the tables. If your table contains the _id, _createdDate, _updatedDate, and _owner fields, you can add data to the table directly from the CMS.
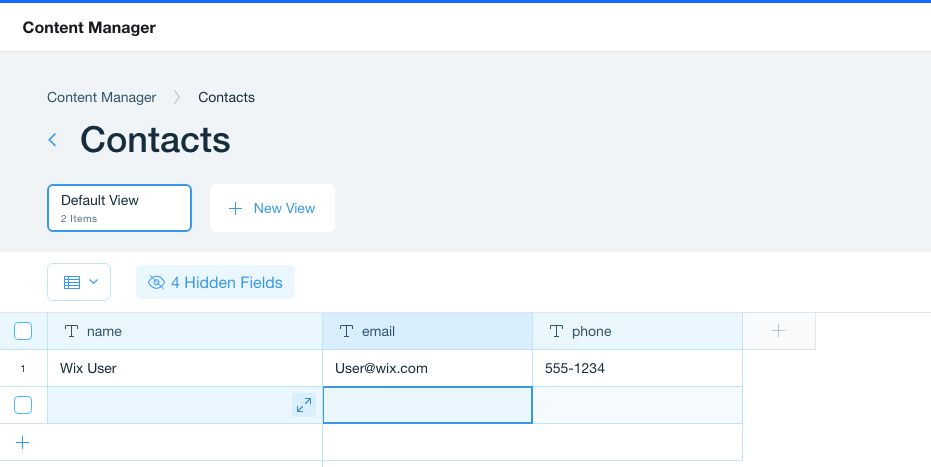
Note:
The CMS does not currently support deleting from external collections. You can delete records from your collection using wix-data.remove() or an HTTP REST call.
The external connection and its collections are displayed under Content Collections.
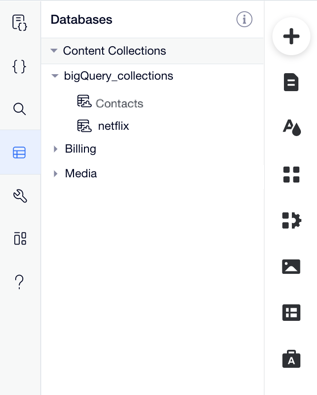
You can now use any of the wix-data and wix-dataset APIs with this collection as well as connect repeaters and tables to your BigQuery database.
Try the following Velo code to query your external data:
1import wixData from 'wix-data';
2
3export function externalQuery() {
4    return wixData.query("bigQuery_collections/Contacts")
5        .find()
6        .then((results) => {
7            return results;
8        })
9        .catch((err) => {
10            let errorMsg = err;
11            return errorMsg;
12        });
13}Hire a Velo Web DeveloperNeed a little extra help with your site? Hire a developer from the Wix Marketplace to build and deploy advanced web applications.
