Velo: Integrate Your Google Cloud Platform Databases with Your Wix Site
Note: This feature is only available for sites with certain premium plans. If you need to use this feature, you can upgrade your site. Learn more about premium plans.
Wix data gives you powerful data storage and retrieval capabilities and the ability to create and maintain your own data collections. But what if you have your own database already, or want to host your data on a relational database?
With External Database Collections, you can use your database hosted on Google Cloud Platform, and fully integrate it into your Wix site. You can use any of the wix-data and wix-dataset APIs with External Database Collections, as well as connect repeaters, tables, and other page elements to your Google Cloud data.
If you want to do this with AWS see Integrate Your AWS Databases with Your Wix Site.
Overview
This tutorial walks you through setting up a database on Google Cloud Platform (GCP) and connecting it to your Wix site.
Supported Databases
Wix currently supports the following GCP databases:
- Cloud SQL for MySQL
- Cloud SQL for Postgres
- Cloud SQL for Microsoft SQL Server
- Google BigQuery
- Google Cloud Spanner
If you don't already have your own database on GCP, we'll help you create one.
Here's what's involved:
- Set up a new project on Google Cloud Platform.
- Create one of the supported databases, if you don't already have one.
- Create a new collection (table) in your database.
- Create secrets to securely store your database credentials.
- Create and deploy a new Cloud Run service to host the Wix database adaptor.
- Connect your Wix site to your database.
This tutorial uses a container image with all the functionality needed to interface between your database and your Wix site. If you want to look under the hood, you can have a look at the SPI specifications for external database collections, and an overview of what's involved in building your own adaptor.
Google Cloud Platform
This tutorial assumes a bit of knowledge about Google Cloud Platform. If you've never worked with GCP, have a look at this guide and click the Get Started For Free button.
Once you're ready to go, create a new project for this tutorial and call it velo-external-db.
Create and Configure a Database
This part of the tutorial walks you through setting up a supported Google Cloud Database and adding a table. If you already have your own database on GCP, you can skip this section.
Note If you want read-write access to your database tables, they must contain the 4 columns described in the Create a New Database Table section.
Set Up a MySQL Database on GCP
Show me how
Once you have set up a GCP account and project, create a new database instance using the Cloud SQL Instances page.
-
Select your project.

-
Open the SQL dashboard listed under Databases in the Navigation Menu.

-
Click Create Instance.

-
Click Choose MySQL.

-
Enter an Instance ID and a Password. For the tutorial, use velo-mysql-db for the instance name, and velo123 for the password.

-
Click Create Instance at the bottom of the page.

This redirects you to the SQL Overview page for your instance. Once your instance is ready, create a database on the instance.
-
Click Databases, then click Create Database.

-
Enter a Database Name, then click Create. For the tutorial, use myDatabase.

You now have a MySQL database instance called velo-mysql-db, with a database called myDatabase.
Set Up a Postgres Database on GCP
Show me how
Once you have a set up your GCP account and project, create a new database instance using the Cloud SQL Instances page.
-
Select your project.

-
Click Create Instance.

-
Click Choose PostgreSQL.

-
Enter an Instance ID and a Password. For the tutorial use velo-postgres-db for the instance ID, and velo123 for the password.
-
Click Create Instance.

This redirects you to the SQL Overview page for your instance. Once your instance is ready, create a database on the instance.
-
Click Databases, then click Create Database.

-
Enter a Database Name, then click Create. For this tutorial we'll call the database myPostgresDB.

You now have a Postgres database instance called velo-postgres-db with a database called myPostgresDB.
Set Up a MsSQL Server Database on GCP
Show me how
Once you have a GCP account and project set up, create a new database instance with SQL.
-
Select your project.

-
Click Create Instance.

-
Click Choose SQL Server
-
Enter an Instance ID and a Password. For this tutorial we'll use velo-sqlserver-db as the instance ID, and velo123 as the password.
-
Click Create Instance.
-
From the SQL Instance Overview page, click Databases and then click Create Database.

-
Enter a Database Name and click Create. For this tutorial we'll call the database myDatabase.


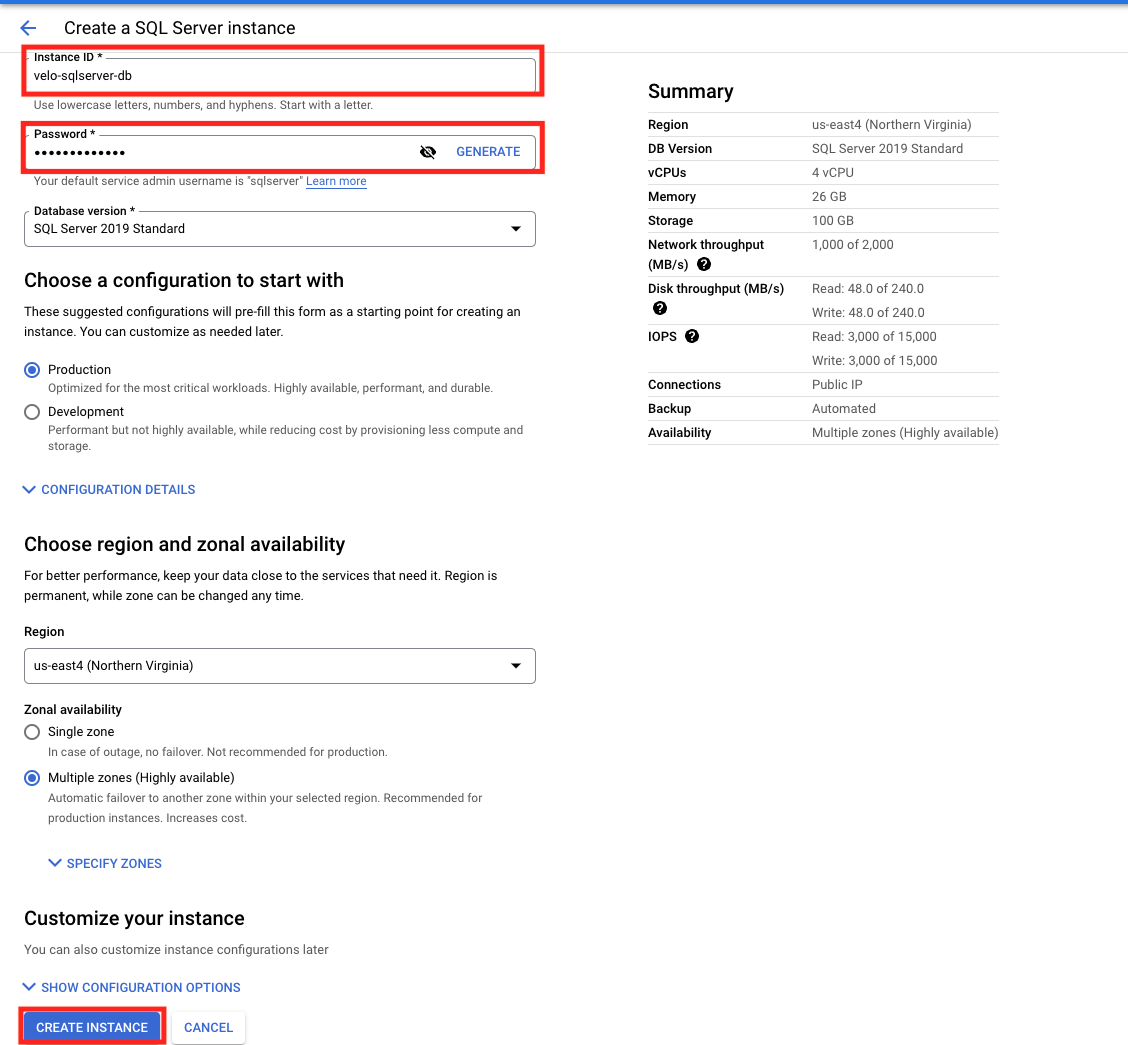
You now have an SQL Server Database instance called velo-sqlserver-db with a database called myDatabase.
Set Up a BigQuery Database on GCP
Show me how
Once you have a GCP account and project set up, create a new dataset with BigQuery.
-
Select your project.

-
Open the BigQuery page in the cloud console.

-
In the Explorer panel, select the project where you want to create a dataset.
-
Click View actions
 and select Create dataset.
-
On the Create dataset page:
-
For Dataset ID, enter a unique dataset name. For this tutorial, we set the Dataset ID to bigQuery_dataset.
-
For Data location, choose a geographic location for the dataset. Note that after a dataset is created, the location can't be changed.
-
-
Click Create Dataset.

Set Up a Spanner Database on GCP
Show me how
Once you have a GCP account and project set up, create a new database instance with Spanner.
-
Select your project.

-
Open the Spanner page in the cloud console.

-
Click Create a Provisioned Instance.

Note: If this isn't your first time working with spanner databases, click Create Instance.

-
Enter an Instance Name and an Instance ID.
-
Under Choose a Configuration, select Regional then select your configuration.
-
Click Create.

Create a New Database Table
This section walks you through creating a new table in MySQL and Postgres. If you know what you're doing, or you already have tables and don't want write access, you can skip this section.
Prerequisites for Read-Write Access to Your Database Table: If you want your table to be read-write on your Wix site, it must contain the following columns:
_id_createdDate_updatedDate_owner
Tables without these columns will be read-only in your Wix site.
Create a New MySQL Table
Show me how
-
From the SQL Instance Overview page, click Open Cloud Shell.
If you are prompted to Authorize Cloud Shell, click Authorize.

-
A command line console opens with the connect command at the prompt. Press Enter.
If Allowlisting your IP for incoming connection for 5 minutes is displayed in the console, wait a few moments, then enter your database instance's password when prompted. The instance password for this tutorial is velo123.

-
At the mysql> prompt, enter the code below to create a table.
If you are using a previously existing database, use that database's name instead of "myDatabase" in the CREATE TABLE statement.
Copy -
Check that the command worked by entering the following at the mysql> prompt:
CopyIf you are using a previously existing database, use that database's name instead of "myDatabase".
The following output means that you have successfully created the Contacts table:

Create a New Postgres Table
Show me how
-
From the SQL Instance Overview page, click Open Cloud Shell.
If you are prompted to Authorize Cloud Shell, click Authorize.

-
A command line console opens with the connect command at the prompt. Press Enter.
If Allowlisting your IP for incoming connection for 5 minutes is displayed, wait a few moments, then enter your database instance's password when prompted.

-
At the postgres=> prompt, enter the following code to change to the myPostgresDB database:
Copy -
Enter the password when prompted.
-
At the myPostgresDB=> prompt, enter the code below to create a table:
Copy -
Check that the table was successfully created with the following command:
Copy
The following output means that you have successfully created the Contacts table.

Create a New BigQuery Table
Show me how
-
In the Explorer panel, click View actions
 and select Create table.
-
Under Create table from, select Empty table.
-
Under Table, enter a name for your table. For this tutorial, we set the Table name to Contacts.

-
Make sure your table is located in the correct dataset and project.
-
Under Schema, click Add Field.

-
Add the following fields to your table:

Note: The Max length field is optional.
-
Click Create Table.
-
Check that the table was created. In the Explorer panel, expand your dataset. There should now be a table called Contacts.

You can also create a new BigQuery table using Google's Standard SQL:
-
In the BigQuery workspace, click Compose New Query.

-
In the Editor, enter the code below to create the table.
If you are using a previously existing database, use that database's name instead of 'bigQuery_dataset'.
Copy -
Click Run.

-
Check that the table was created. In the Explorer panel, expand your dataset. There should now be a table called Contacts.

Create a New Spanner Table
Show me how
-
Click Create Database in the Spanner Instance Overview page.
-
Enter a name for your database.
-
Choose Google Standard SQL as the database dialect.

-
Define your schema using SQL. Enter the code below:
Copy -
Click Create.


Set Up Secrets
The external database adaptor requires you to set some environment variables. Some of these variables, like the DB credentials, are sensitive and should not be visible. We'll use the GCP Secret Manager to store and access these variables securely.
Configure Secrets
We need to store the following secret values for all databases:
- SECRET_KEY
A secret key that is used when connecting your Wix site to the adaptor. To create a level of authentication between your site and the adaptor, each request your site sends to the adaptor contains this value in the payload.
- PERMISSIONS (optional)
A JSON object that defines the read and write permissions for the tables in your database.
If you don't set permissions, they default to admin. With admin permissions, only site admins can read or write to the external database from a Wix site. API calls or CMS connections to the database don't work for anyone who isn't a site admin. This means site code that communicates with the external database might not work for site visitors.
When setting up permissions, make sure you use the ID of the table you want to read and write to, and not the database ID.
Learn more about configuring database permissions
You can use the PERMISSIONS secret to customize the permission settings for each table in a database. The JSON object contains one key, collectionPermissions, whose value is an array of objects. Each object in this array contains the permissions settings for one of the collections in the database, using the following parameters:
- id: The collection ID.
- read: An array of strings representing which roles can read from the collection.
Options: 'Admin', 'Member', 'Visitor' - write: An array of strings representing which roles can write to the collection.
Options: 'Admin', 'Member', 'Visitor'
Example PERMISSIONS value:
Note that you can save this object as a .json file and upload it to GCP as the value for the PERMISSIONS secret.
Customizing permissions for external databases is currently a developer preview feature, and may change. Changes to permissions settings are not reflected in the editor.
Database-Specific Secrets Configuration
In addition to the secrets above, each database requires its own specific secret configurations:
MySQL, Postgres, and MsSQL secret names and values
- USER: The username used to connect to your database instance. For Postgres instances, the default user name is postgres. For MySQL instances, the default user name is root.
- PASSWORD: The password used to connect to your SQL instance. When we created our database in the previous steps we used the password velo123.
- DB: The database name to connect to. When we created our database in the previous steps, we called the database myDatabase for mySQL and myPostgresDB for Postgres.
- Cloud_SQL_CONNECTION_NAME: The connection name for your DB instance. It can be found on your instance's overview page as shown in the image below.

BigQuery secret names and values
- DATABASE_ID: The BigQuery dataset ID. When we created our database in the previous steps, we set the dataset ID to bigQuery_dataset.
- PROJECT_ID: Your Google Cloud Project ID. You can find this on the Explorer panel.
Spanner secret names and values
- INSTANCE_ID: The Spanner instance ID. In the previous steps, we called our spanner instance ID velo-spanner-db.
- PROJECT_ID: Your Google Cloud Project ID. You can find this on the Explorer panel.
Make sure to create all of the required secrets for your database. All databases must include a SECRET_KEY.
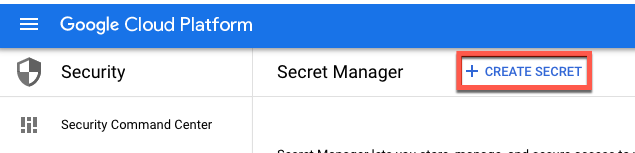
How to Create Secrets
-
To create the secrets, go to the GCP Secret Manager page.
-
Click Create Secret.
-
Enter the secret Name and Secret Value and click Create Secret.

-
Repeat steps 2 and 3 for the rest of the secrets needed for your database.
Database Secret Configurations MySQL, Postgres, and MsSQL SECRET_KEY
USER
PASSWORD
DB
CLOUD_SQL_CONNECTION_NAMEBigQuery SECRET_KEY
DATABASE_ID
PROJECT_IDSpanner SECRET_KEY
INSTANCE_ID
DATABASE_ID
PROJECT_ID -
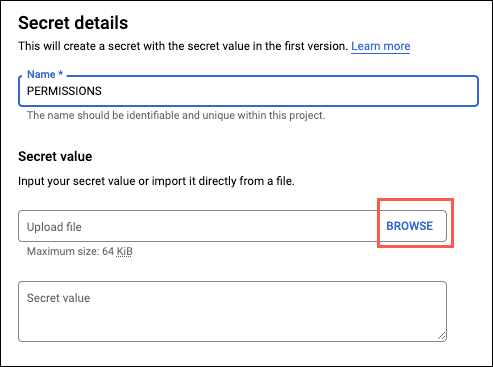
To create a PERMISSIONS secret, instead of entering a Secret value, click Browse and select the .json file that contains your permission settings.
Deploy the Adaptor to Cloud Run
Next, we'll deploy the external database adaptor as a service on Cloud Run. We create the service using a prebuilt container, configured secrets, and environment variables. Then we configure the database connections.
Create a Service
-
Go to the Cloud Run Instances page and select your project.
-
Click Create Service.

-
Enter gcr.io/wix-velo-api/velo-external-db in the Container Image URL field. The Service name will default to velo-external-db.
-
Select All under Autoscaling, and select Allow unauthenticated invocations under Authentication.
-
Click Create.

You now have a service called velo-external-db up and running.
Configure Access Roles, Secrets, and Environment Variables
Now we configure the secrets that we defined earlier as environment variables for the service. To do this we'll perform the following steps:
-
Create a new service account that will run the Cloud Run service.
-
Grant access roles to the new account.
-
Create environment variables and assign the secrets' values.
-
On the Service details page, click Edit & Deploy New Revision.

-
Select the Security tab and then select Create New Service Account from the Service account dropdown.

-
Set the Service account name. It is recommended to set the Service account name to match the Cloud Run instance name so that you can easily know which account is used by which instance.
-
Click Create.

-
Grant the following roles to the service account according to your database:
All Databases:
- Secret Manager Secret Accessor
MySQL, Postgres, MsSQL:
- Cloud SQL Editor
BigQuery:
- BigQueryAdmin
Spanner:
- Cloud Spanner Database User
You can paste the roles above into the dropdown filter.

-
Click Done.
-
Select the Container tab and scroll down to the Environment Variables section.
Click Add Variable.

-
Define 2 environment variables according to your database.
The names and values for the variables are as follows:
NAME VALUE TYPE MySQL database: **mysql
**Postgres database: postgres
MsSQL server database: mssql
BigQuery database: bigquery
Spanner database: spannerCLOUD_VENDOR Google Cloud Platform: gcp 
-
In the Container tab, click Reference a Secret, then define environment variables and assign their values from the secrets that we defined earlier in the Create Secrets section.

-
Select a secret from the Secrets dropdown and choose Exposed as environment variable from the Reference method dropdown.
-
Assign the environment variable the same name as the secret.
-
Select latest from the Version dropdown, and click Done.
Repeat this process for all of the secrets that you defined in the Create Secrets section.

If you get a warning that the service account does not have permissions to access the selected secret, you are no longer configuring the service account that you set up in Step 7 above.
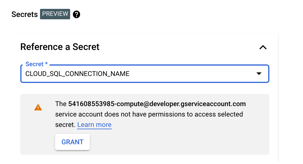
In this case, click the Security tab, select your service account from the dropdown, then return to the Container tab.
Once you have configured all of the secrets and environment variables, your configuration will look like this:

Configure the Database Connection
If you're using a BigQuery database, start with step 3 below.
-
In the same Container tab, click Add Connection under Cloud SQL Connection.
-
In the Cloud SQL Instance1 dropdown, select the SQL instance that you created.
-
Click Deploy.

Once deployed, check that your setup is working.
-
From the Cloud Run Service details page, click the service's URL. This URL is used to connect to your database adaptor service and to configure the external collection on your Wix site.

The following page displays DB Config Status and Connection Status in green. If you added a PERMISSIONS secret, the Permissions Config Status is also green. If you didn't, it's yellow.
If one of the statuses is red, check the configuration, secret values, and environment variables. Make any necessary changes and redeploy the service.

Note: If you change the value of a secret, you must redeploy the service for the new value to take effect.
Test Your Service
You can test that your service is working by making a quick request using Curl.
Use the Curl command below, replacing the URL with your URL from Step 2 above, and replacing the secretKey value with your secret.
The output provides a list of tables and their columns from your database. If you have python installed, you can pipe the output to python -m json.tool and it will give you nicely formatted JSON.
The formatted output contains the list of tables and their columns from your database.
Connect to Your Wix Site
Now that we have a database and an adaptor service, we are ready to add the database as an external collection on our site.
Note: You can only add external collections to your site if you have a premium plan.
-
Go to the Databases section of the Code sidebar (Wix Editor) or the Code sidebar (Wix Studio).
-
Click the
 icon next to External Databases and select Add external database.
-
Choose Google Cloud as the cloud provider of the external collection being added, then click Next.

-
Enter a name for your external collection's namespace.
-
Copy and paste your adaptor service's URL into the endpoint URL field.
-
Enter your database adaptor's secret key.
-
Click Connect.

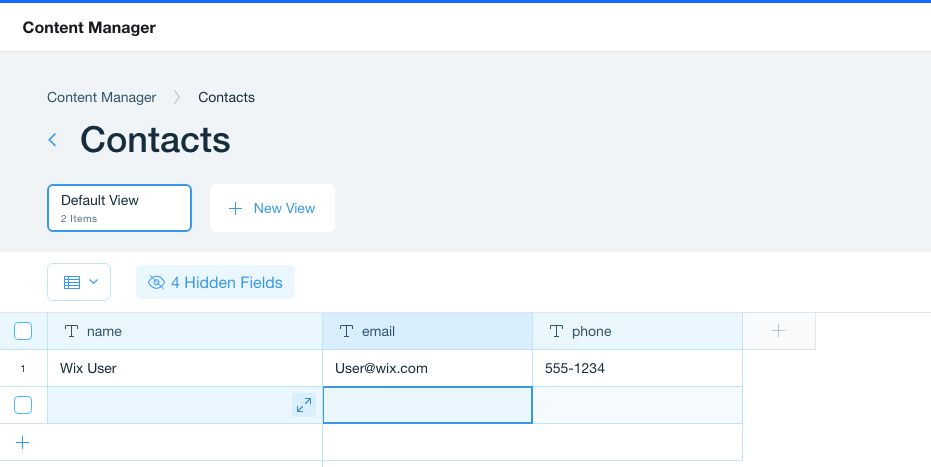
The collection displays the tables. If your table contains the _id, _createdDate, _updatedDate, and _owner fields, you can add data to the table directly from the CMS.
Important: The CMS does not currently support deleting from external collections. You can delete records from your collection using the wix-data.remove() function or an HTTP REST call.
The external connection and its collections are displayed under External Databases.

You can now use any of the wix-data and wix-dataset APIs with this collection as well as connect repeaters and tables to your MySQL, Postgres, MsSQL, BigQuery, and Spanner databases.
Try the following Velo code to query your external data: